During this course, my artistic practice has evolved significantly through each assignment, and I have gained more confidence in my abilities as an artist. At the beginning of the course, I was apprehensive about starting new projects and feared the “blank page.” Now, I embrace the preliminary stages of creation by experimenting with thumbnail sketches, developing mind maps, and conducting thorough research before embarking on a final piece. The course has taught me to think outside the box and push myself creatively, which has led to substantial growth. For example, I have begun testing ideas more rigorously, making bold artistic decisions, and I am no longer afraid to take risks. This transformation is evident in my approach during assignment four, where I decided to learn a new and complex software package called Blender. By incorporating 3D modelling, I took my idea of sculpture further than I had originally envisioned, bringing a new dimension to my work.
Reflecting on each unit, I can see how every stage has contributed to my development as an artist. The exercises in the first unit encouraged me to challenge myself and embrace the learning process without fear of making mistakes. These initial exercises were a foundation for building my confidence, allowing me to develop a more playful approach to creating illustrations. During the first assignment, I learned that being playful can unlock innovative ideas and creativity. This experience also highlighted the importance of taking risks to continually improve my work.
Throughout part two, I faced one of my biggest challenges—speaking about my work and creating a presentation to share online. As someone who is naturally shy and has struggled with anxiety, this was an extremely challenging task for me. However, I pushed through my fear and delivered a successful presentation that was well-received by my family, friends, and tutor. The positive feedback I received, combined with gaining new subscribers to my blog, encouraged me to continue sharing my thoughts and experiences publicly. This part of the course also introduced me to new methods of working, such as the word association game, the cutting-up exercise, and collage-making. These activities proved to be immensely helpful in sparking creativity and shifting my perspective on how to approach my work. I found myself increasingly open to experimentation and more willing to take creative risks.
Part three introduced many new challenges, including animation, paper folding, and working at a large scale. The workload was intense, but I enjoyed experimenting with new techniques and pushing my creative boundaries. I discovered a love for animation and have a desire to explore it further. Painting on a large scale was especially daunting, as it was something I had not attempted before. Yet, I was pleasantly surprised by the outcome of my landscape scene, which I have since framed and displayed in my living room. It serves as a constant reminder of what can be achieved when pushing myself and venturing beyond one’s comfort zone.
In part four, I continued to step out of my comfort zone by integrating handmade sculptures with painted backgrounds, which were digitally enhanced using Photoshop. When submitting my work for tutor feedback, I was apprehensive, worried that I had pushed myself too far or veered down the wrong path. However, my tutor’s positive feedback reassured me and encouraged me to keep exploring this new direction. This experience taught me to trust my instincts more and reminded me that it is important to embrace uncertainty as part of the creative process.
Part five was a continuation of the journey I started in part four. I focused on refining my skills and further developing my artistic style, while also trusting my instincts more deeply. Although I still had moments of doubt, the consistent positive feedback from my tutor helped me gain more self-assurance in my work. By receiving such encouraging responses, I realised I can produce strong and original pieces when I trust the process and lean into my creativity.
By the end of the course, I have learned to continue testing ideas, pushing my creativity, and having faith in my abilities as an artist. I am grateful for the experience and the skills I have acquired along the way. The course has not only expanded my technical skills but also instilled in me a newfound confidence to approach future projects with curiosity and enthusiasm. I am excited to see where these skills take me in my artistic career and look forward to continuing this journey of growth and exploration.
Below is a selection of my work that I believe has been the most successful during the course.
“Completing my project based on Through the Looking Glass and receiving feedback from my tutor was both a nerve-wracking and a rewarding experience. I often feel apprehensive about how my work will be received and whether I’ve done enough to meet expectations. However, I was delighted to hear that my tutor was blown away by my efforts, particularly in handmade crafting, the stunning illustrations I created, and my integration of technology. She also recognised my initiative in learning Blender, expressing eagerness to see the animation I am currently working on. My tutor has also encouraged me to start marketing myself, and playfully adviced me to display my sculptures at home rather than sell them. This feedback gave me a renewed sense of confidence in my abilities. Hearing her say, ‘ If you don’t have confidence now you never will, well done Gemma,’ and that she was impressed and blown away by my work was incredibly affirming, and it’s a reminder to trust in my creative instincts moving forward.”
This assignment is an open brief but challenges me to produce a body of work that explores a starting point of my thoughts through different stages of development, materials and processes.
Keywords from the brief:
Think unconventionally
An open-theme example is improving my drawings
Consider sizes, shapes, forms and materials
Have an idea, test it, develop it unusually and take it somewhere further.
A minimum of three finished pieces
Document what you do as you go along
This project should take 90hours
Write a final reflective statement
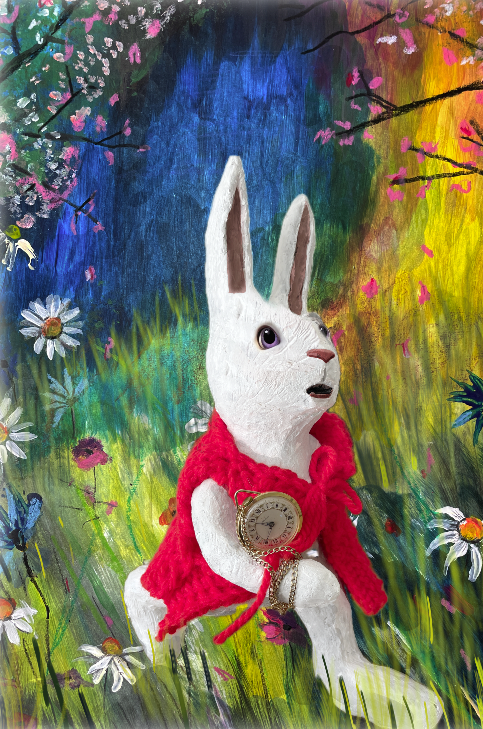
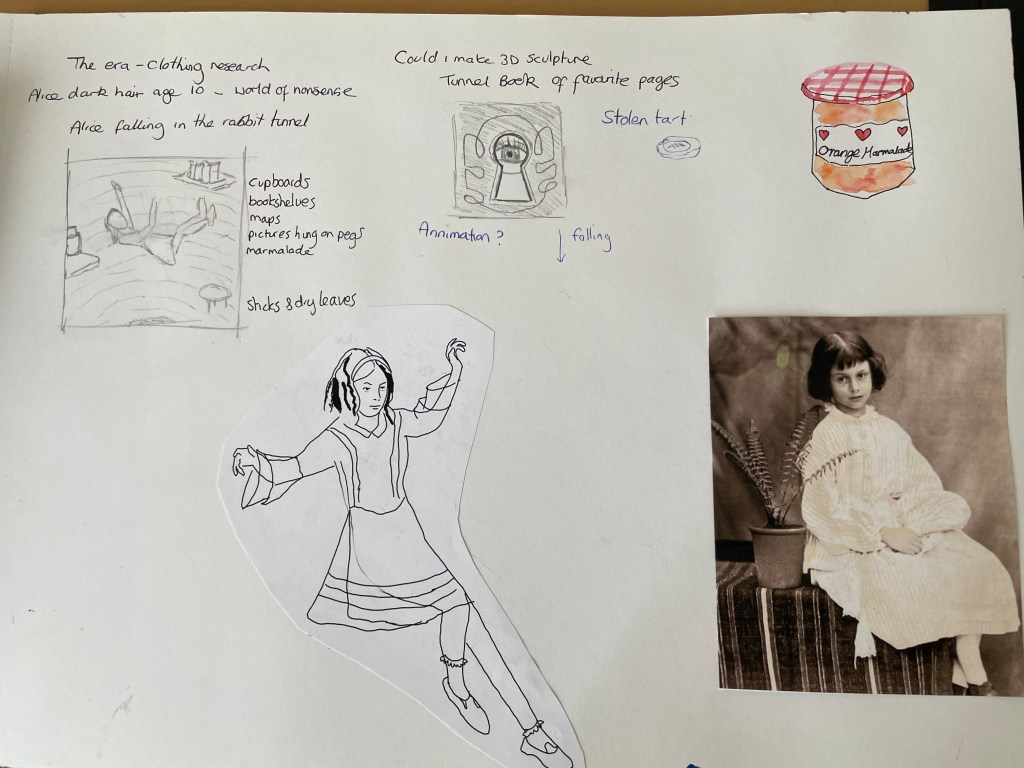
Previously, in assignment four, I created 3D clay sculptures and hand-painted backdrops around the theme of imagination, focussing my work on the story of Alice in Wonderland. These artworks included 3D clay sculptures of Alice and the white rabbit, which I photoshopped into hand-painted backdrops. These can be seen here:
For this new project, I intend to elaborate on the artwork done in assignment four, with a focus on the sequel to Alice in Wonderland, Through the Looking Glass which was first published in 1865. As a result, new challenges will arise, hopefully leading to fresh and different artworks. I’m excited to explore the numerous characters and places depicted in Through the Looking Glass and incorporate them creatively into my illustrations. By delving into this story, I hope to boost my creativity and create a collection of visually appealing and thought-provoking artwork.
Project Proposal: Exploring “Through the Looking Glass”
Brief
Building on my previous work inspired by Alice in Wonderland, this new project will focus on the sequel, Through the Looking Glass. My aim is to develop and refine my creative process by exploring different characters, settings, and themes from the book. The emphasis will be on thinking unconventionally and pushing the boundaries of my artistic practice.
Project Goals
Expand on previous themes: Using my prior experience with clay sculptures and painted backdrops, but take the ideas further by exploring new materials, forms, and scales.
Create at least three final pieces: These should reflect the development of my ideas and demonstrate my experimentation with either different materials and techniques or both.
Document the process: Keep a detailed record of my work at each stage, from initial sketches to finished pieces.
Reflect on my practice: Write a final reflective statement that evaluates my process, challenges, and outcomes.
Initial Ideas and Research
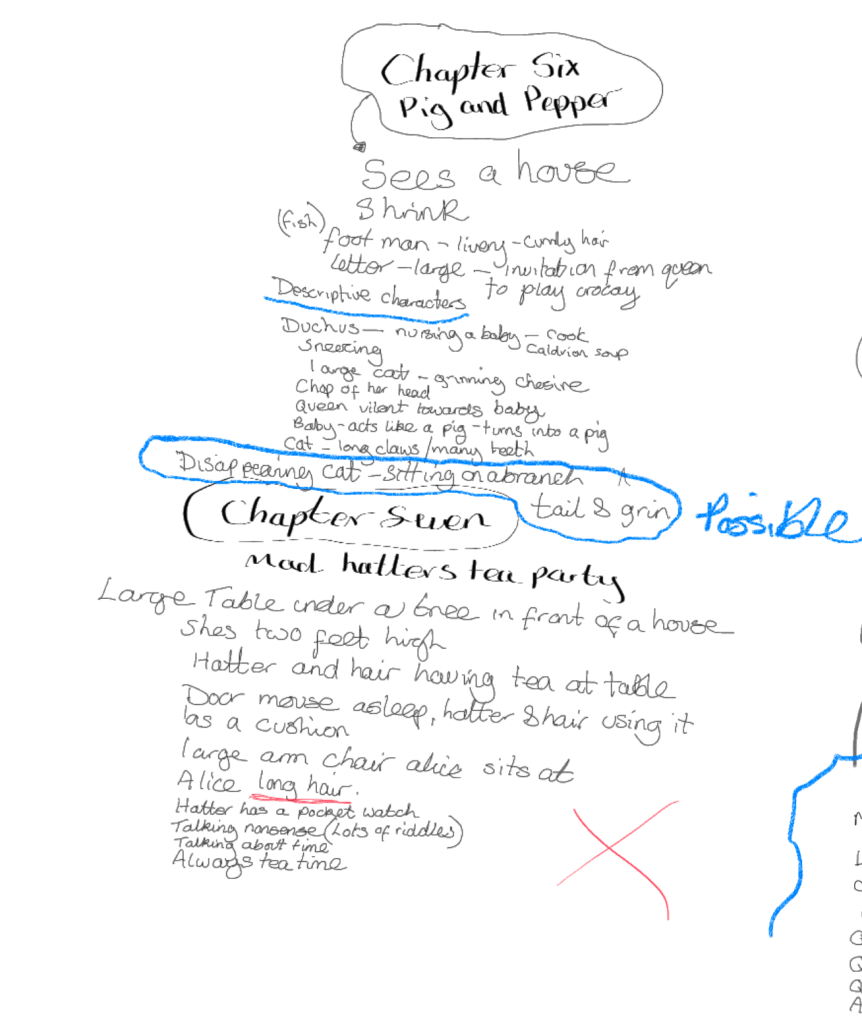
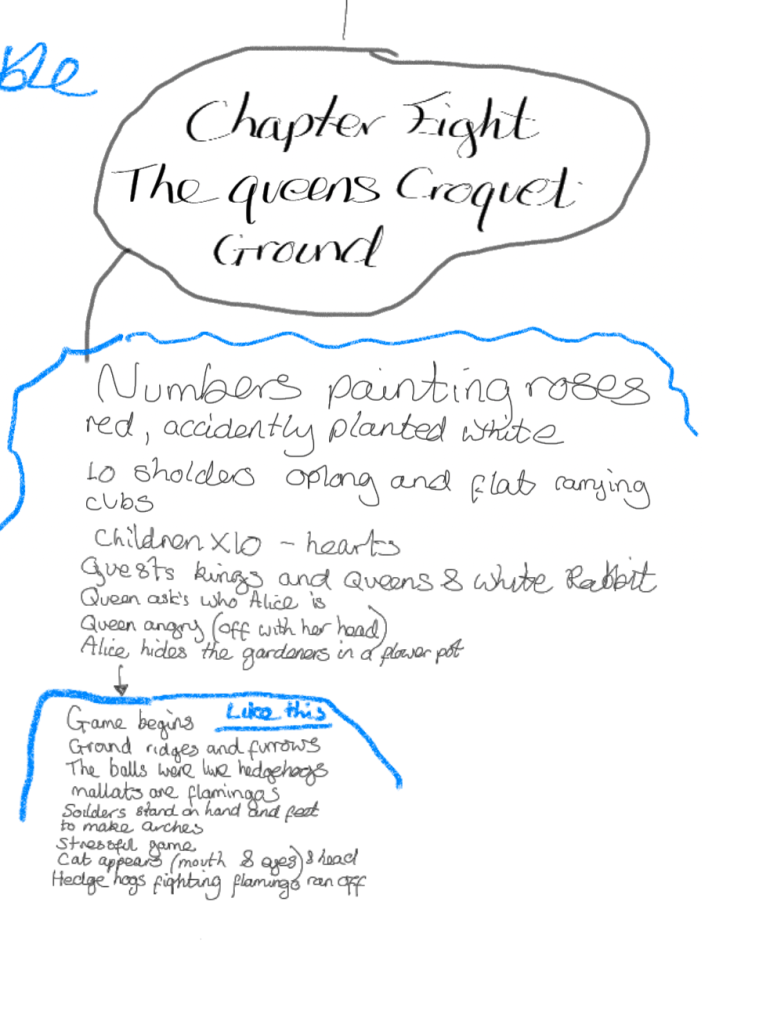
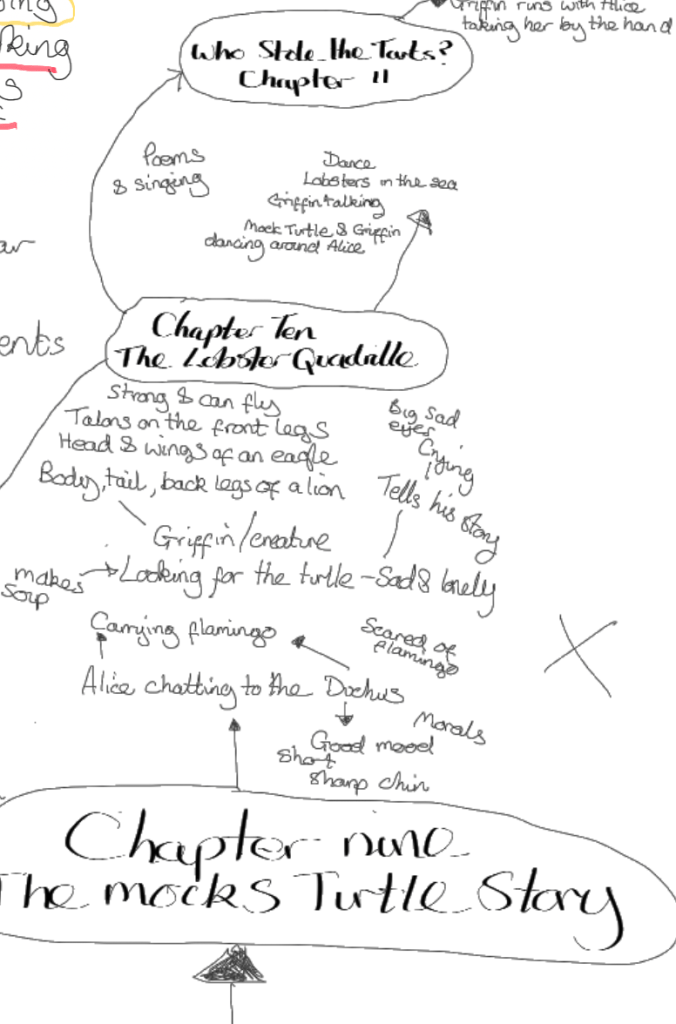
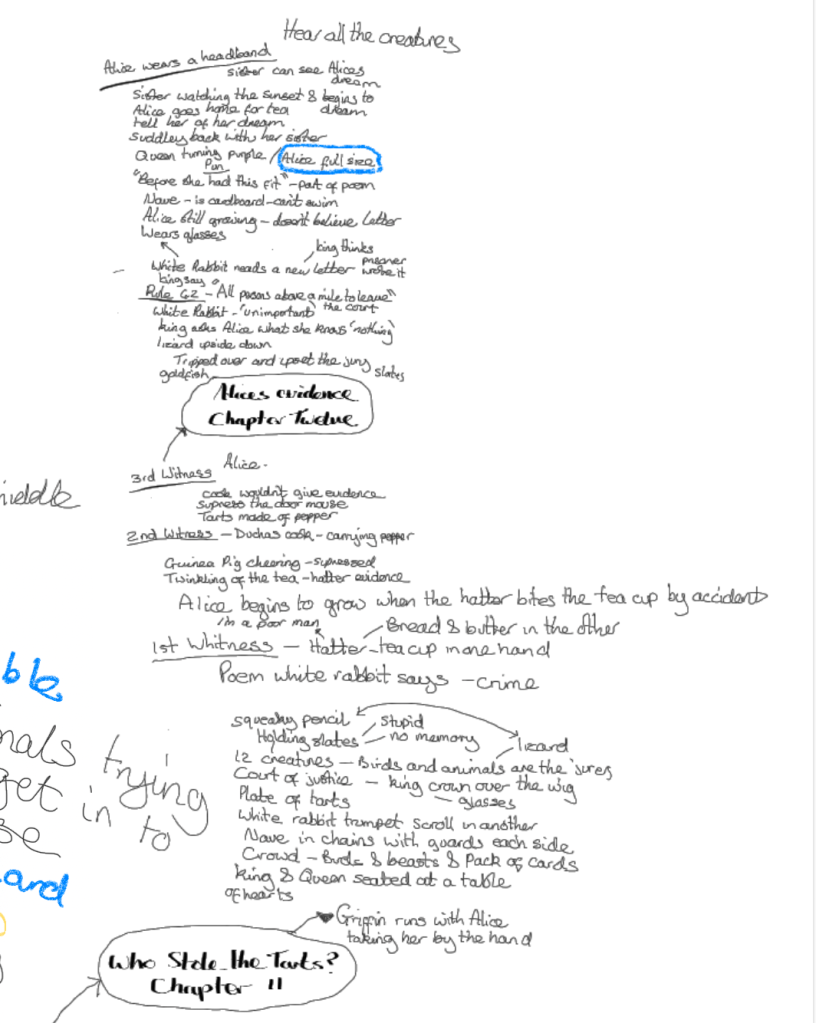
First, I downloaded the book ‘Through the Looking Glass’, which I learnt was free to read on Google Play (Google.com, 2024). Due to my dyslexia, I found it helpful to listen to an audio version of the book too (Reads, 2024). While reading the book, I took notes on specific paragraphs that I felt would create interesting pictures.
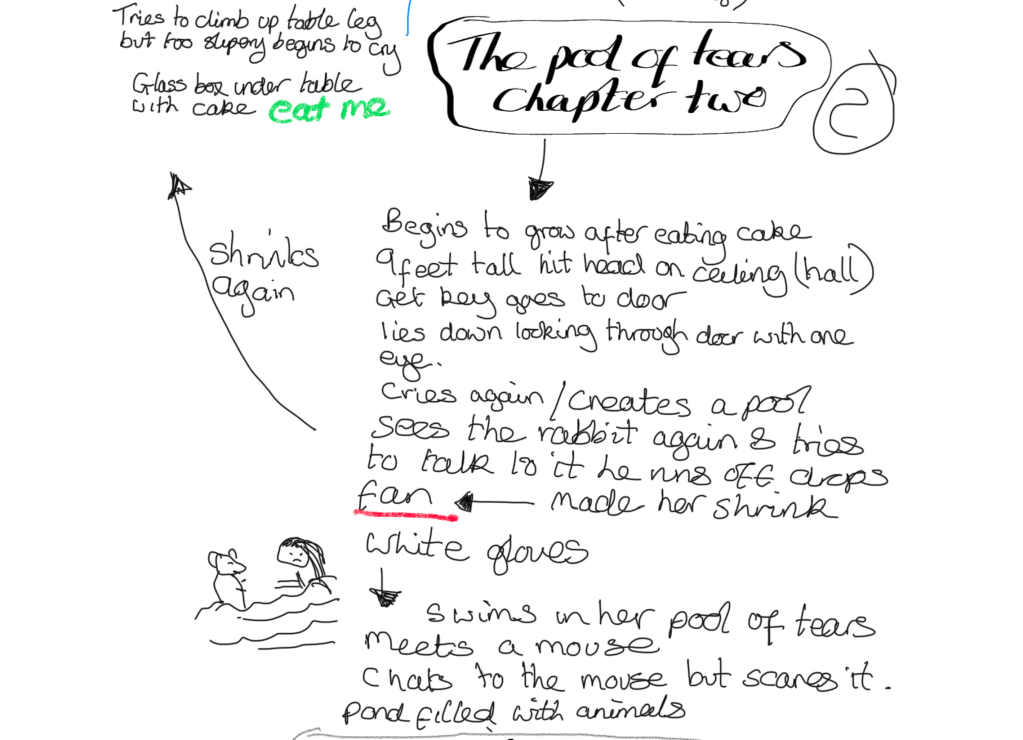
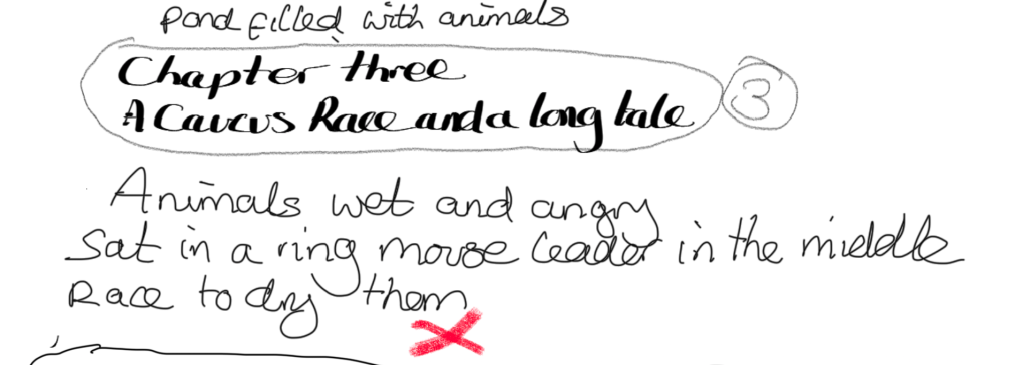
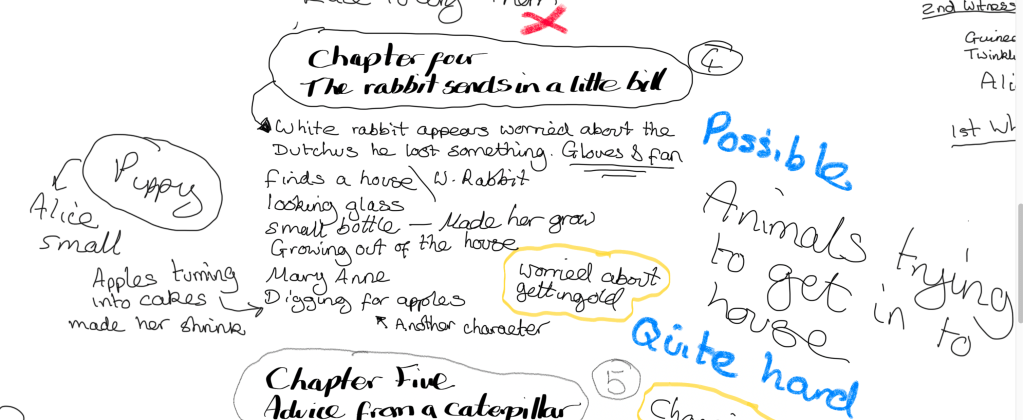
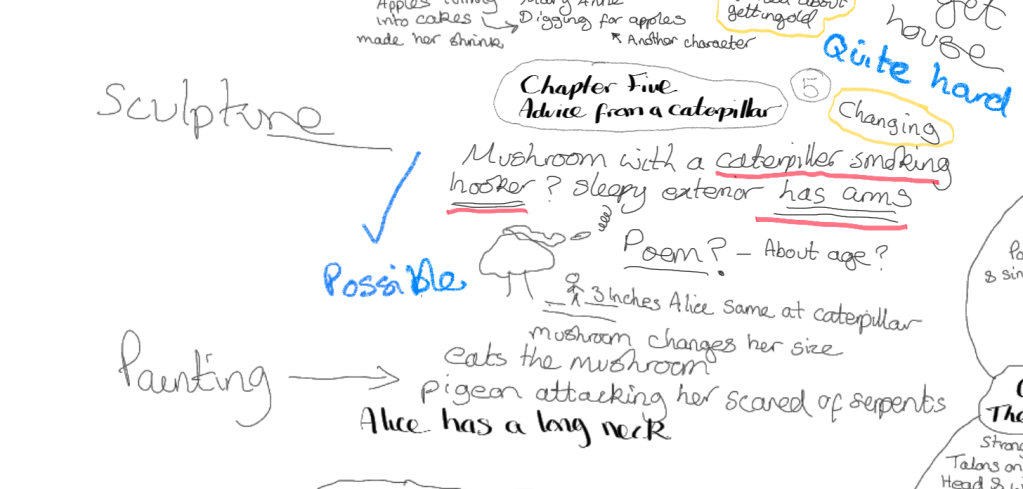
Fig. 1 Annotations (2024)
Once completed, I reduced the selection to thirteen possible illustrations.
Fig.2 Possible ideas (2024)
I then produced a list of these thirteen ideas, explaining the story for each one, and asked friends and family which three they would most like to see in a book.
Fig.3 Asking friends (2024)
It was interesting as ideas numbered two and eight were the favourites and I selected number one as I was keen to make that particular illustration.
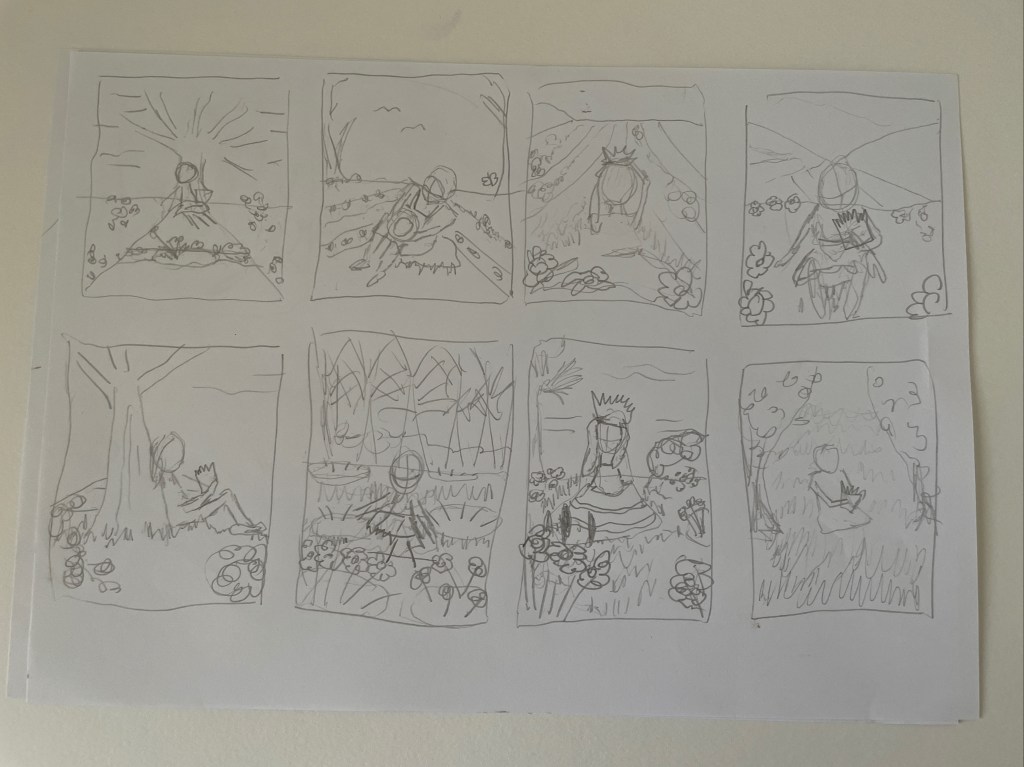
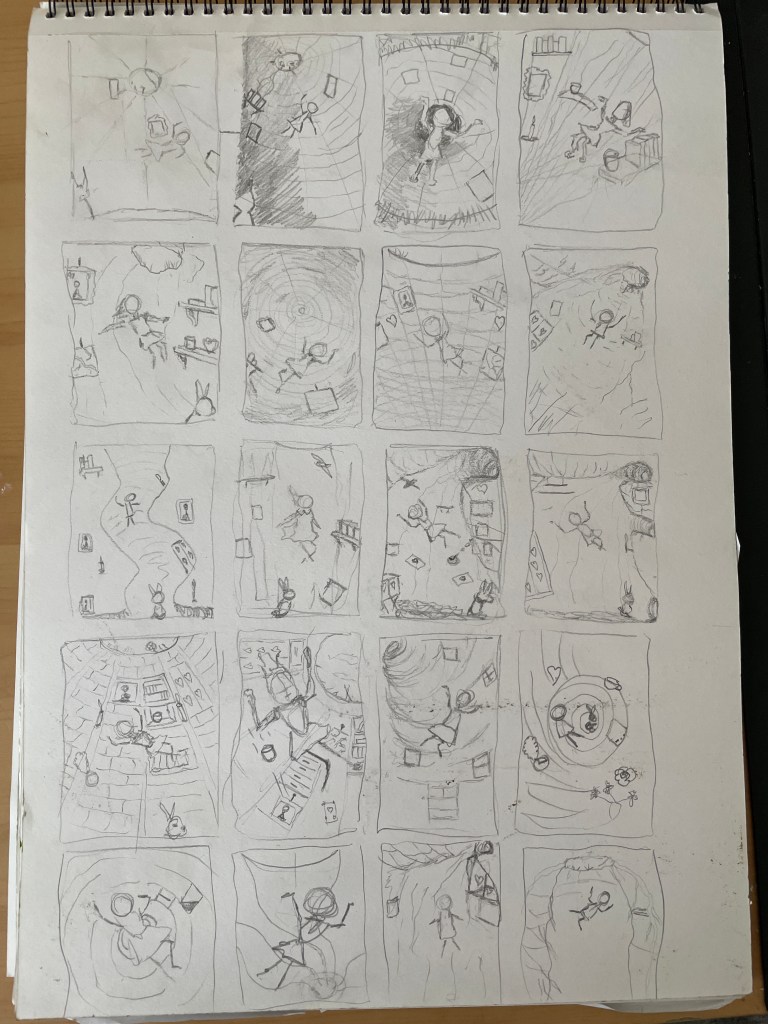
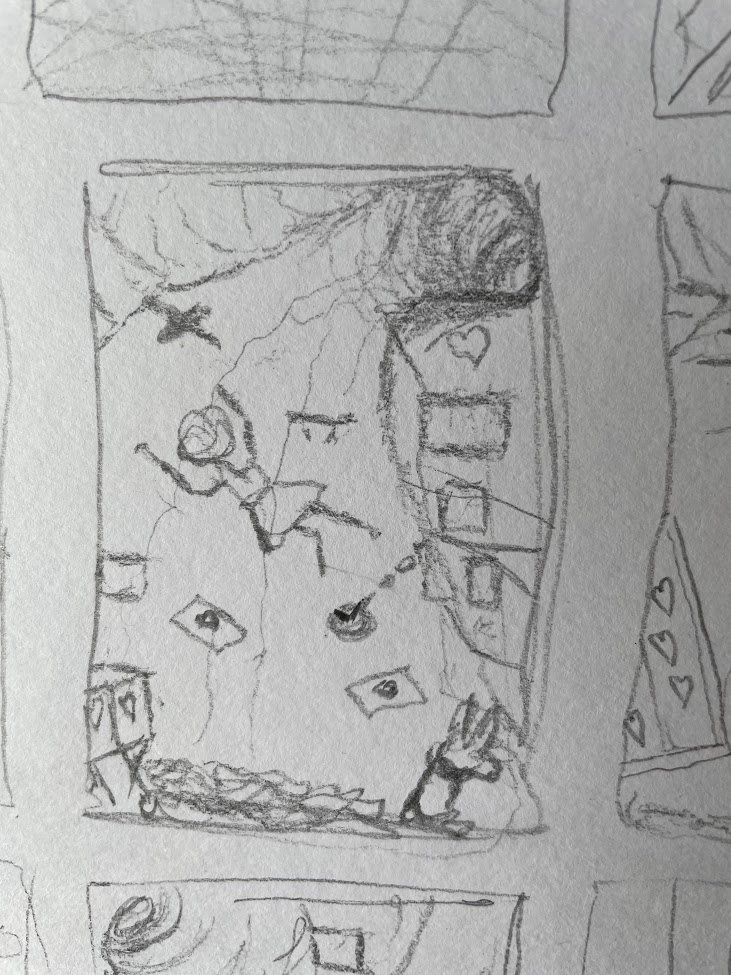
Brainstorming& Thumbnails:
Next, I began creating a series of sketches and notes on the characters, scenes, and themes from Through the Looking Glass that resonate with me and focused on how I can reinterpret these elements in unexpected ways.
Brainstorming slideshow
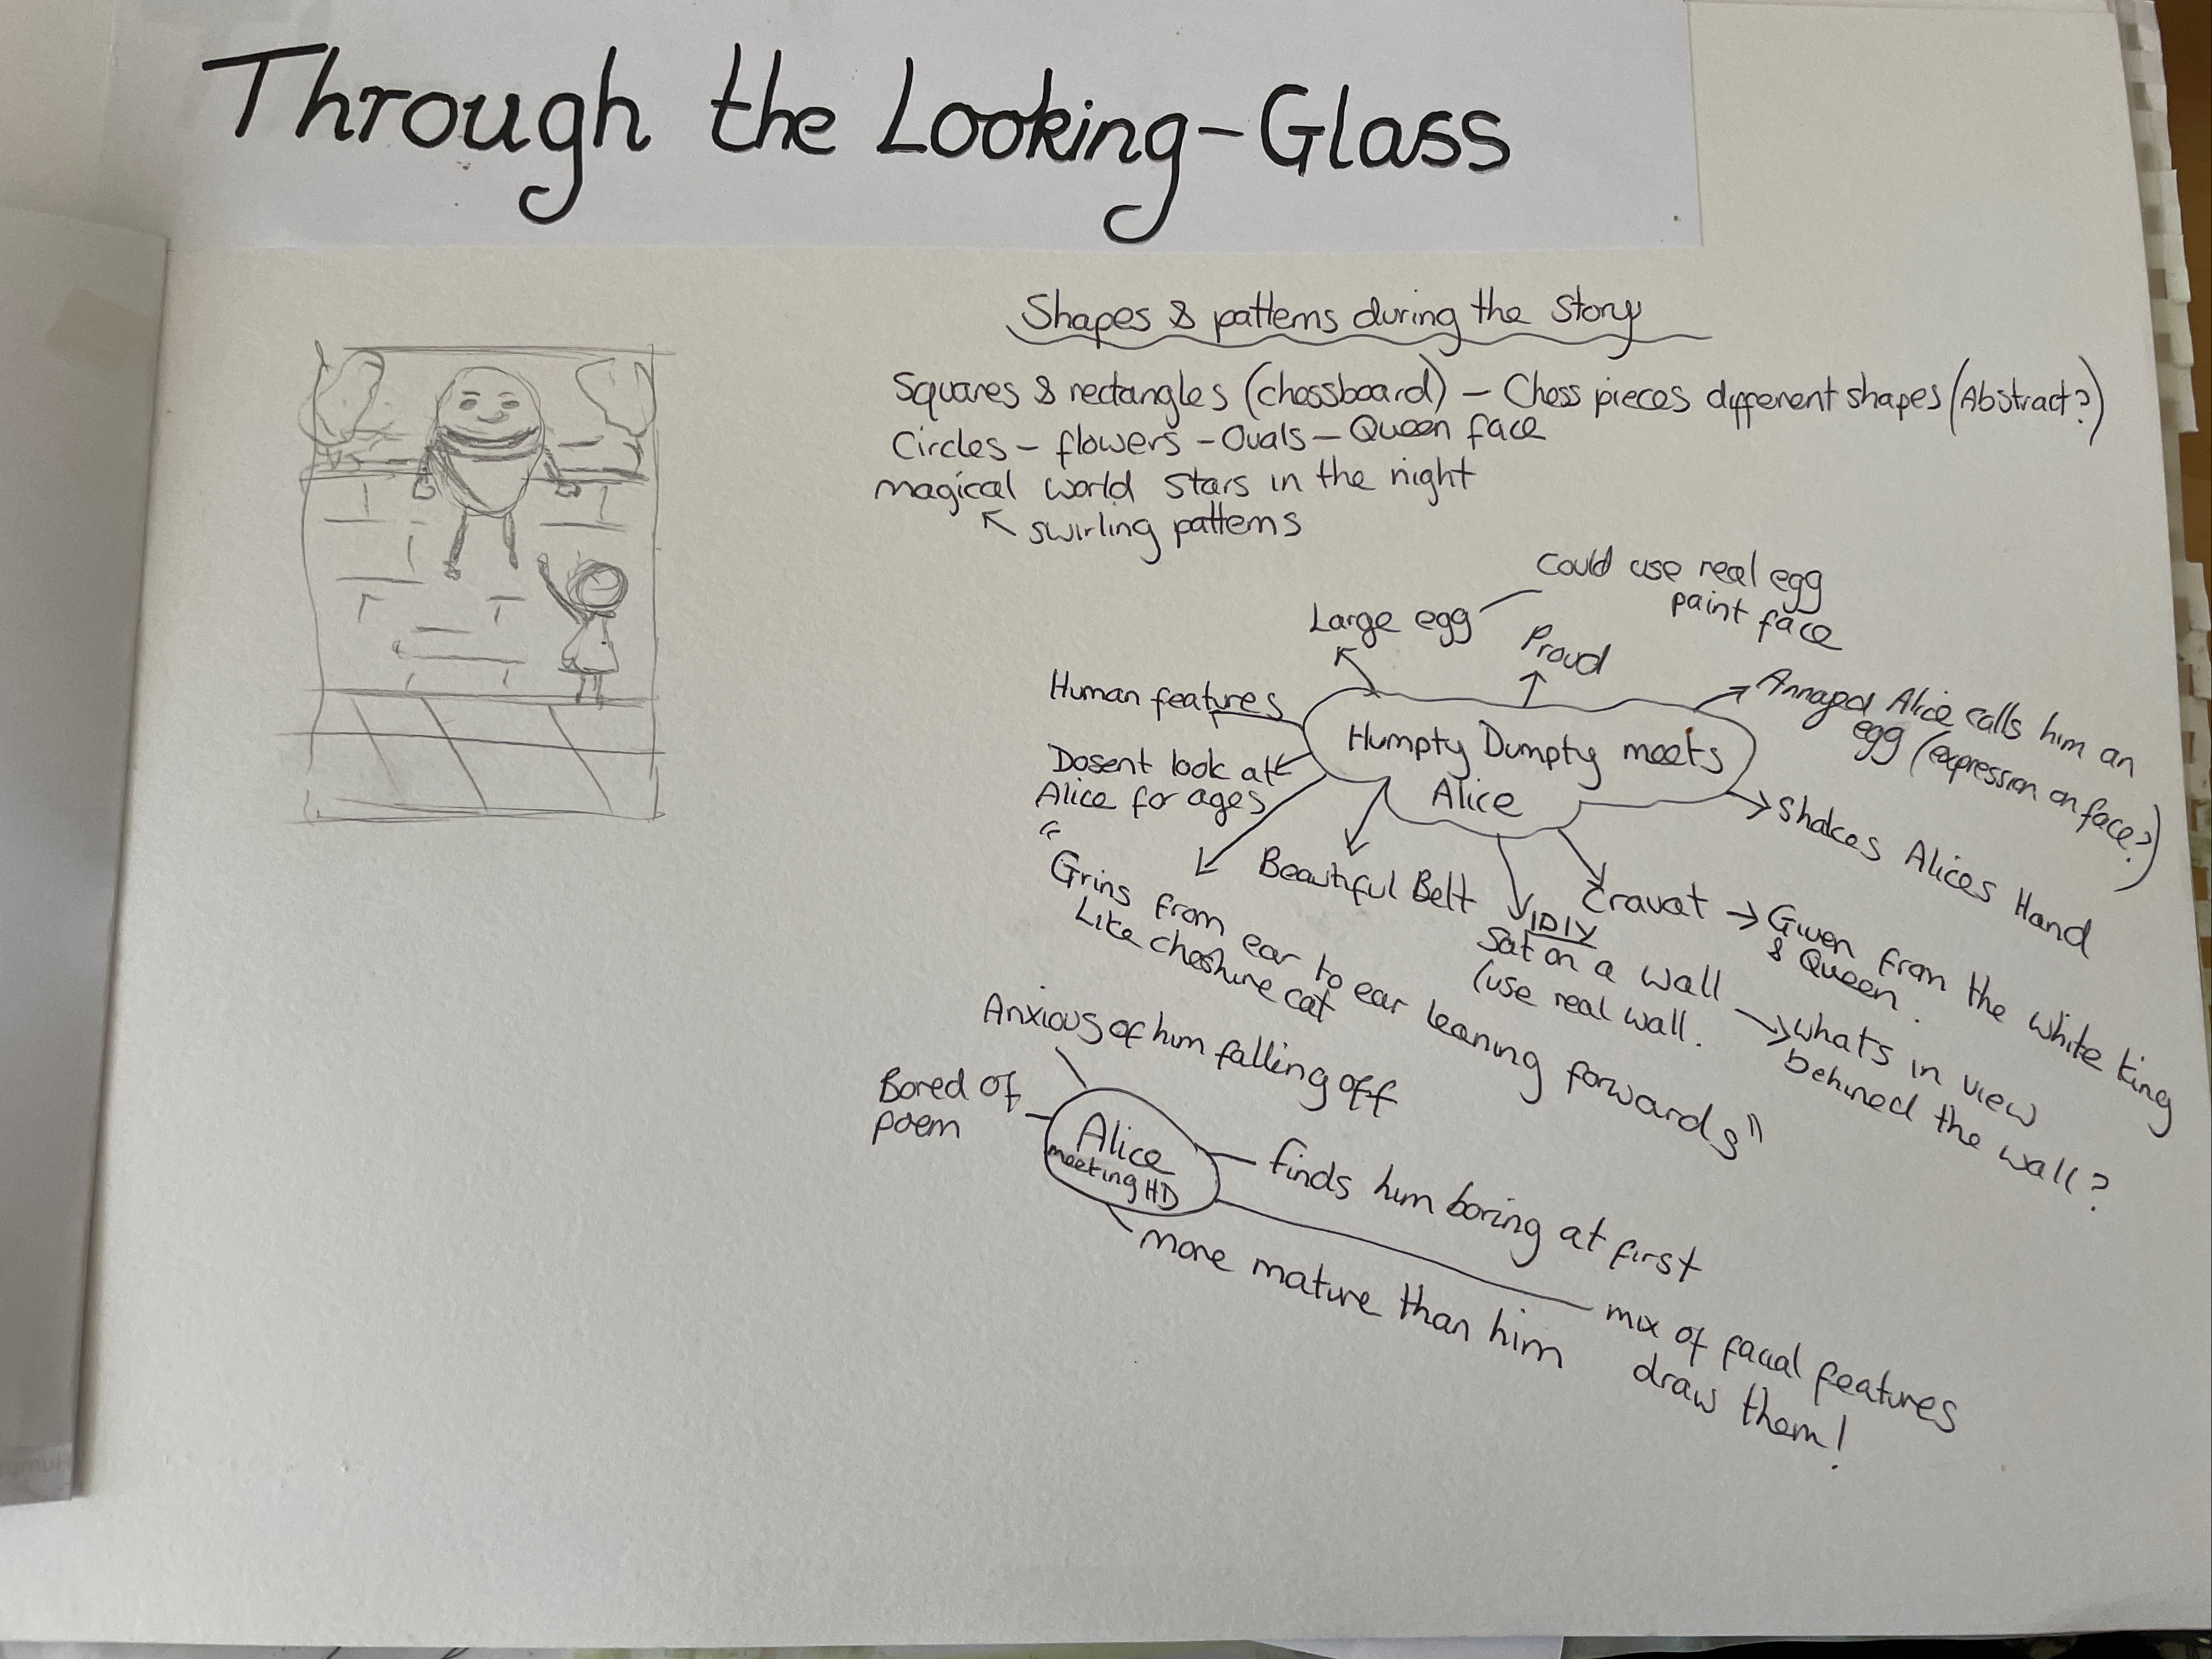
Brainstorming Alice meeting Humpty Dumpty
Brainstorming Alice meeting Humpty Dumpty
Brainstorming Alice stopping for a rest to find a gold crown appear on her head
ThumbnailSlideshow
Alice Composition idea
Alice sat in a mossy field with flowers
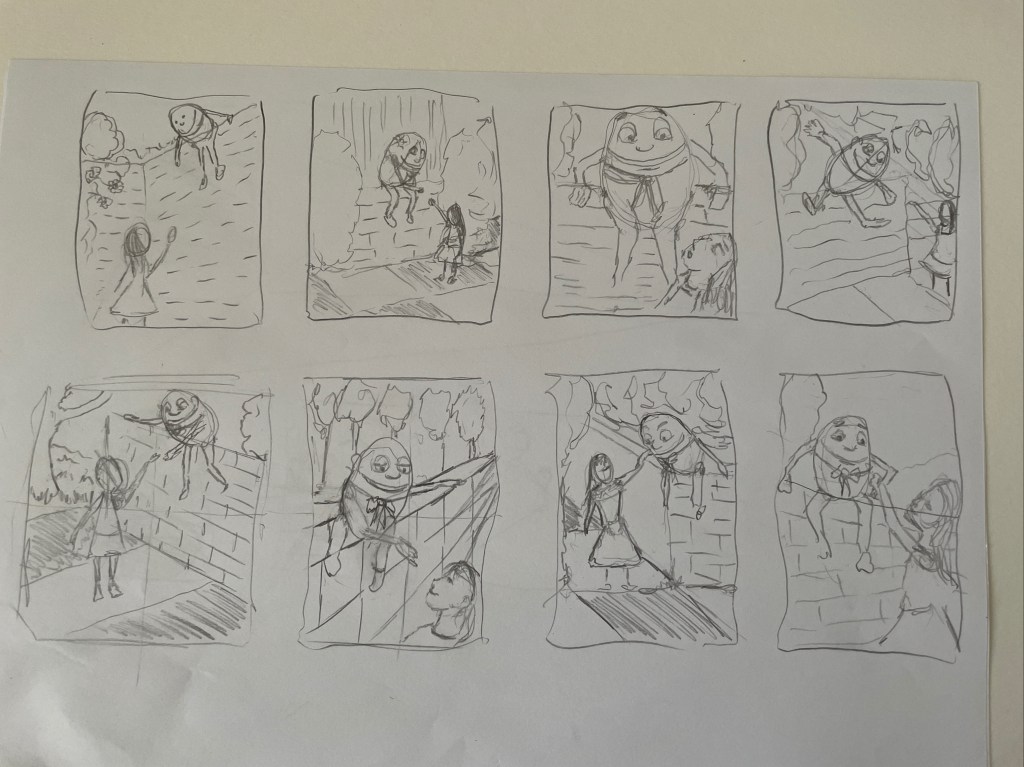
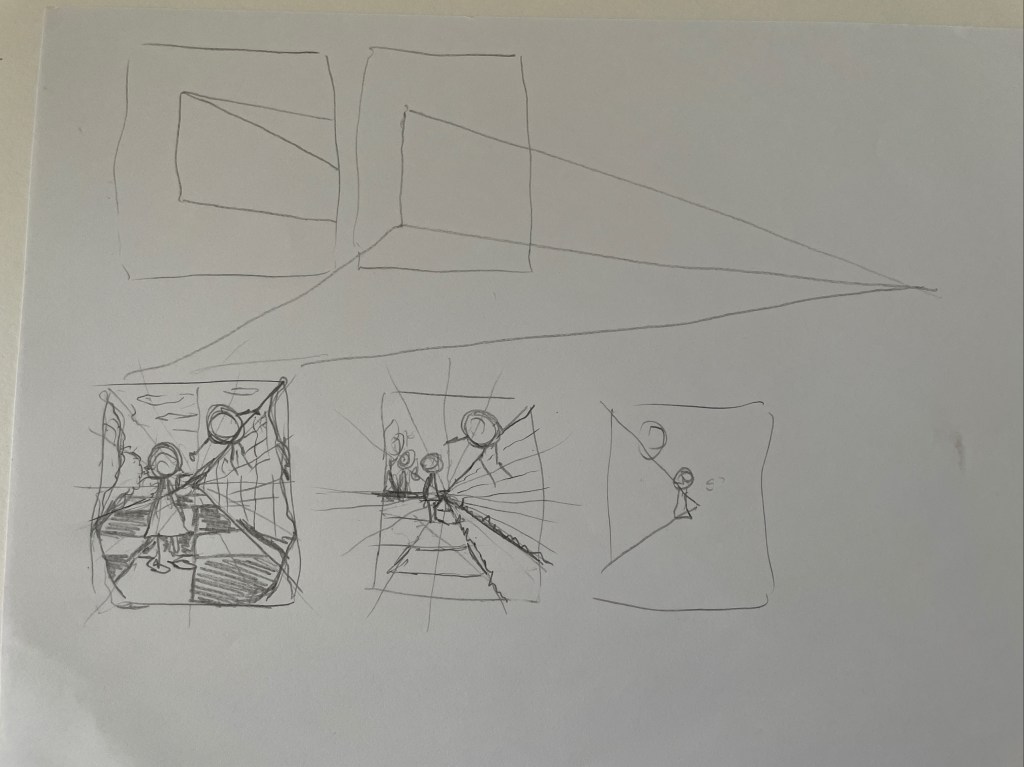
Composition ideas for Alice meeting Humpty Dumpty
Working out the composition and perspective for Alice and Humpty Dumpty meeting each other
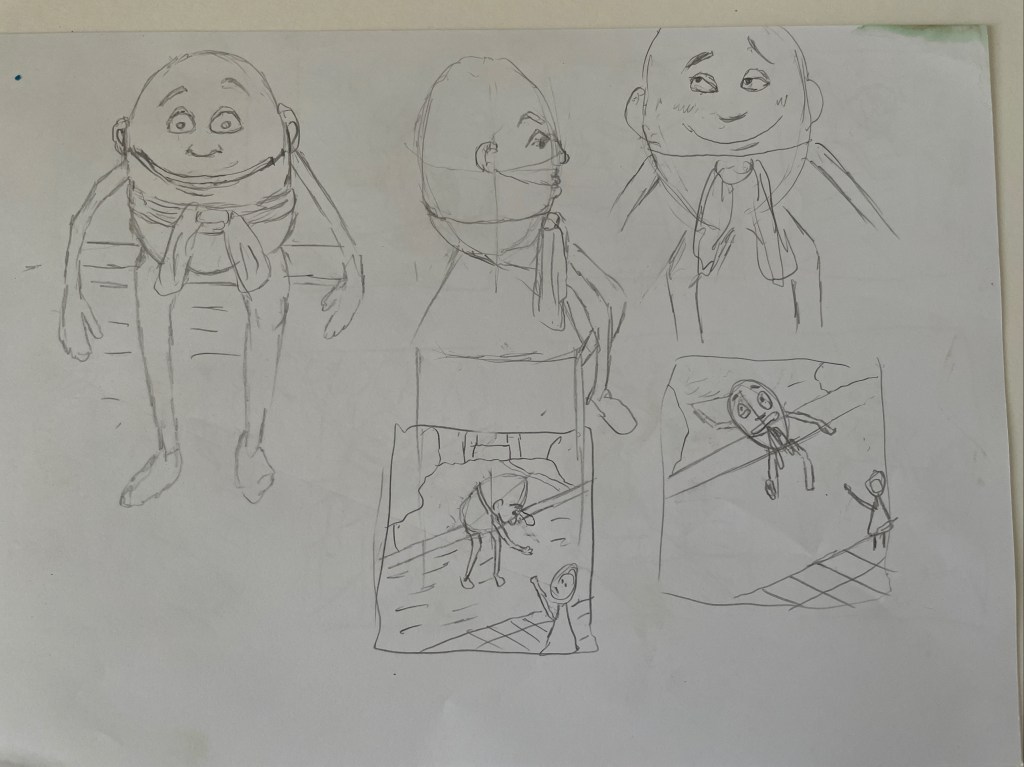
Humpty Dumpty Character Design
Research
Graham Rawle
Studying the methods of other illustrators and artists is essential for discovering artistic movements and strategies that can inspire my work. To this end, I explored Graham Rawle’s book The Wizard of Oz: An Interpretation, a creative reimagining of the classic story. I began by watching a short animated film by Pete Mellor and Graham Rawle that showcased Rawle’s unique visual style.
You can watch the video below.
After viewing it, I purchased a used copy of his book on eBay to delve deeper into his interpretations. As I spent time examining his artwork, it became clear that Rawle painstakingly assembled numerous elements to craft a surreal interpretation of the story. By merging tactile handmade materials, he has created a work that is both imaginative and captivating. Many of the characters, like Toto, were intricately handcrafted before being combined and edited in Photoshop.
During myresearch, I discovered an interview Rawle did with an editor from The International Wizard of Oz Club. It was fascinating to learn that Rawle had been drawn to the narrative for many years before embarking on his reinterpretation and that he uncovered backstories for each character. This undoubtedly deepened his passion for the project, much like my exploration of Alice in Wonderland.
I was excited to see parallels between his work and my previous creation of 3D sculptures integrated into painted backgrounds for my own interpretation of Alice in Wonderland. This has strengthened my confidence in my creative process and fueled my enthusiasm to continue exploring unconventional mediums.
History of Through the Looking Glass
After studying Graham Rawle’s work and techniques, I decided to delve into the origins and inspiration behind Through the Looking-Glass. As I mentioned in my previous assignment, Lewis Carroll was not just an author but also a brilliant mathematician. He had a fascination with reflection, symmetry, and binary logic, which, for many years, scholars have been analysing alongside his mathematical workings. This, along with his relationship with Alice Liddell, likely inspired the creation of Through the Looking Glass.
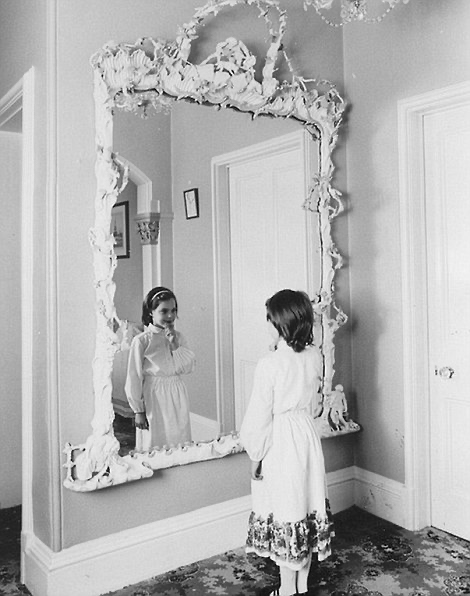
During my research, I was excited to learn Alice Liddel’s grandparent’s home was located in Cheltenham, Gloucestershire (not far from myself), where Carroll visited her for a short time. This home still features a large ornate mirror, which is believed to be the mirror that inspired Through the Looking Glass. This is shown below.
Fig. 4 Alice looking in the mirror (2024)
Next, I studied some of the original illustrations by John Tenniel for the book. His artwork is incredibly detailed, with intricate line work that vividly brings Carroll’s fantastyl world to life. Tenniel captures the whimsy and imagination of the story, conveying emotion through the characters facial expressions and body language. This is evident, for instance, when Alice encounters the bewildered Queen and helps her by fixing her messy hair and retying her shawl. This illustration can be seen in the Pinterest folder below.
After looking at his work, I’m hoping to be able to create something that is both original and distinctive, like Gramham Rawles and John Tenniels artwork combined.
Visuals
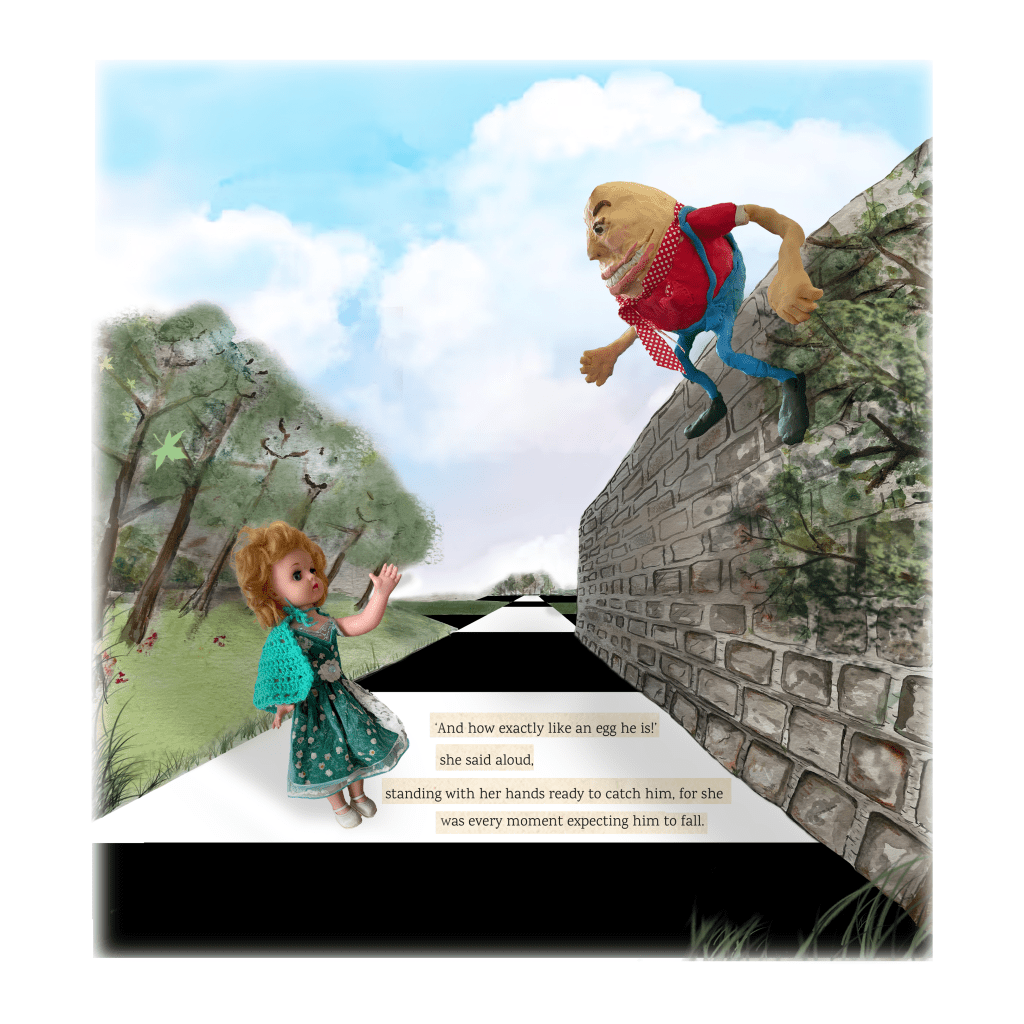
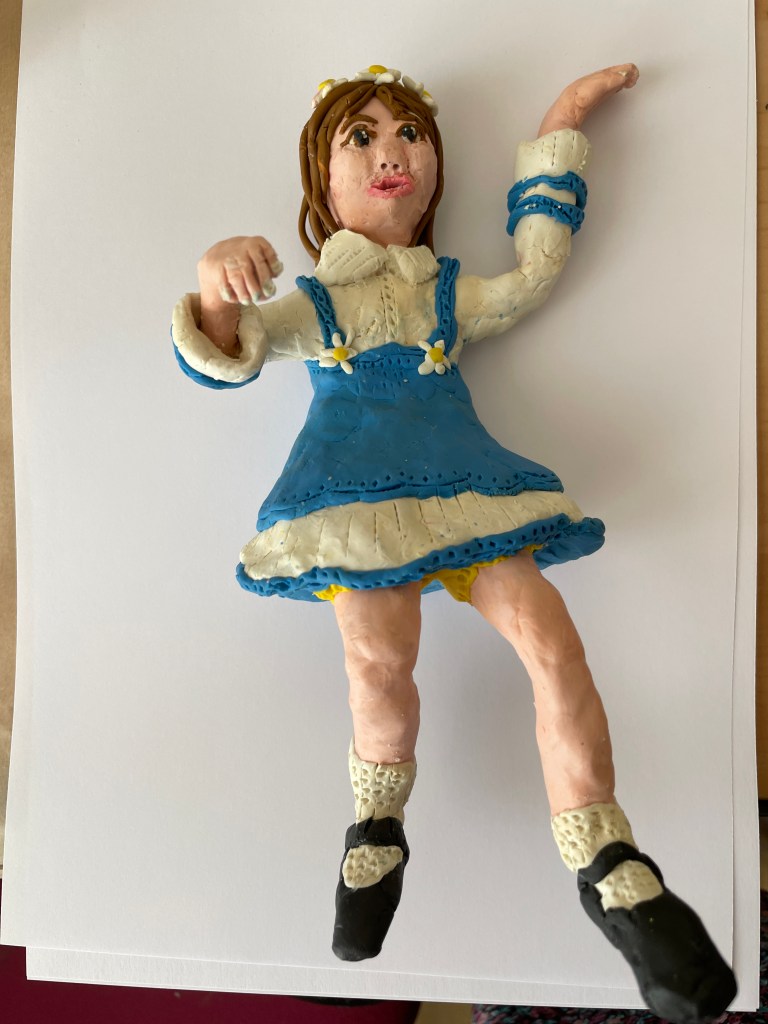
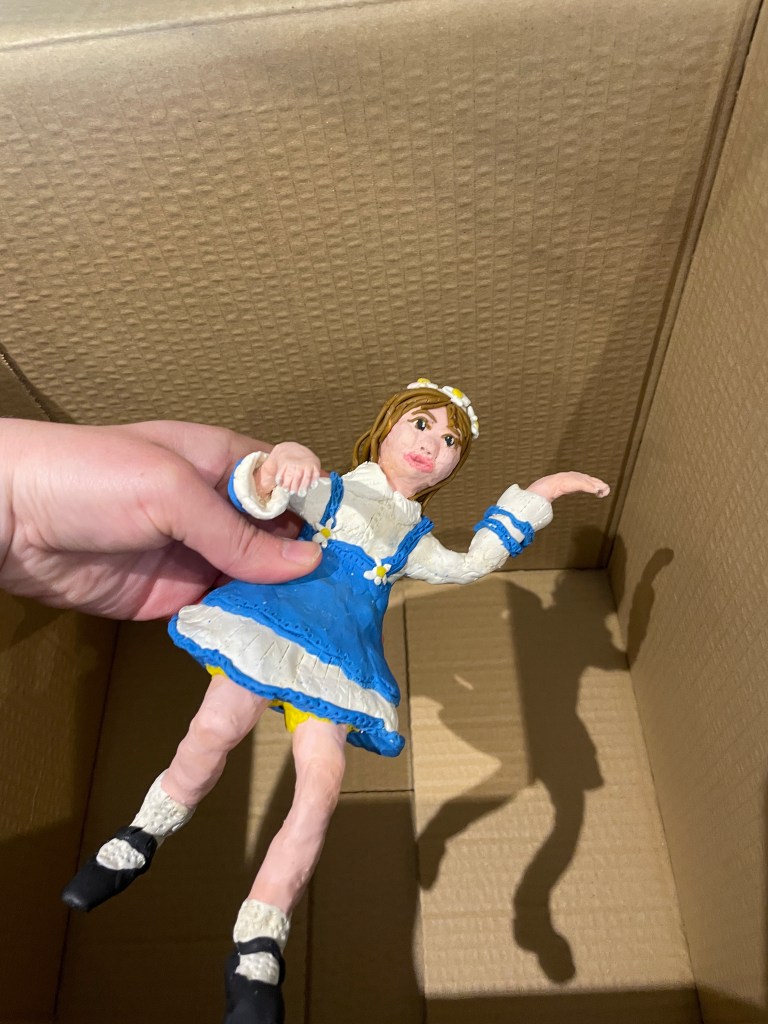
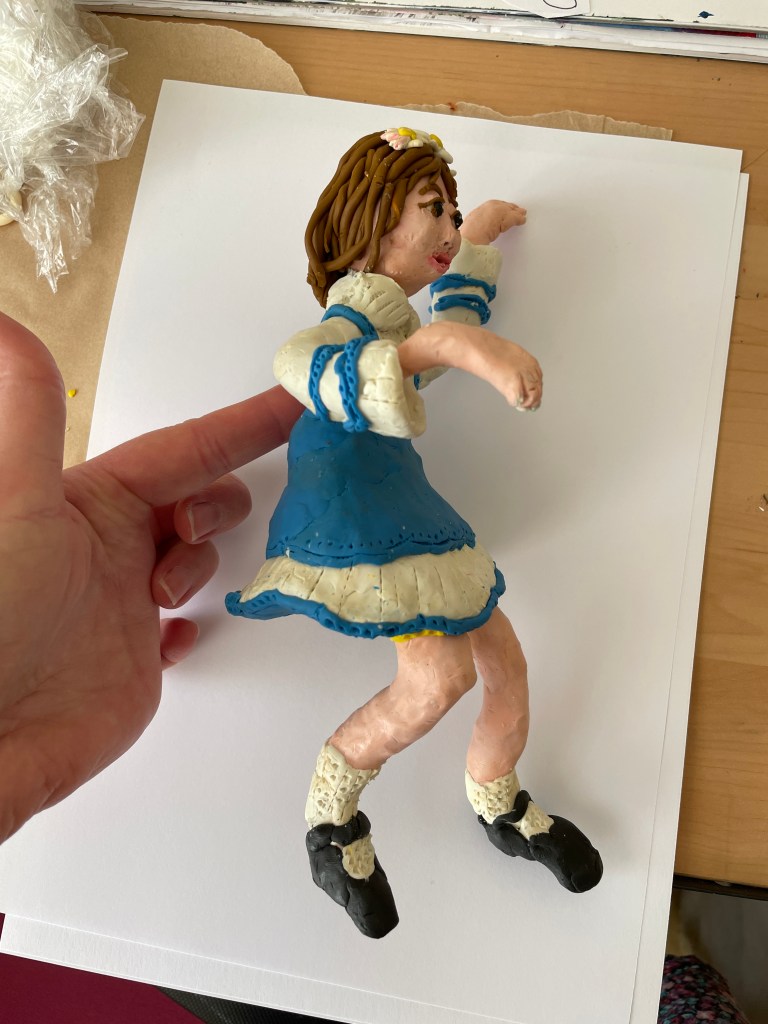
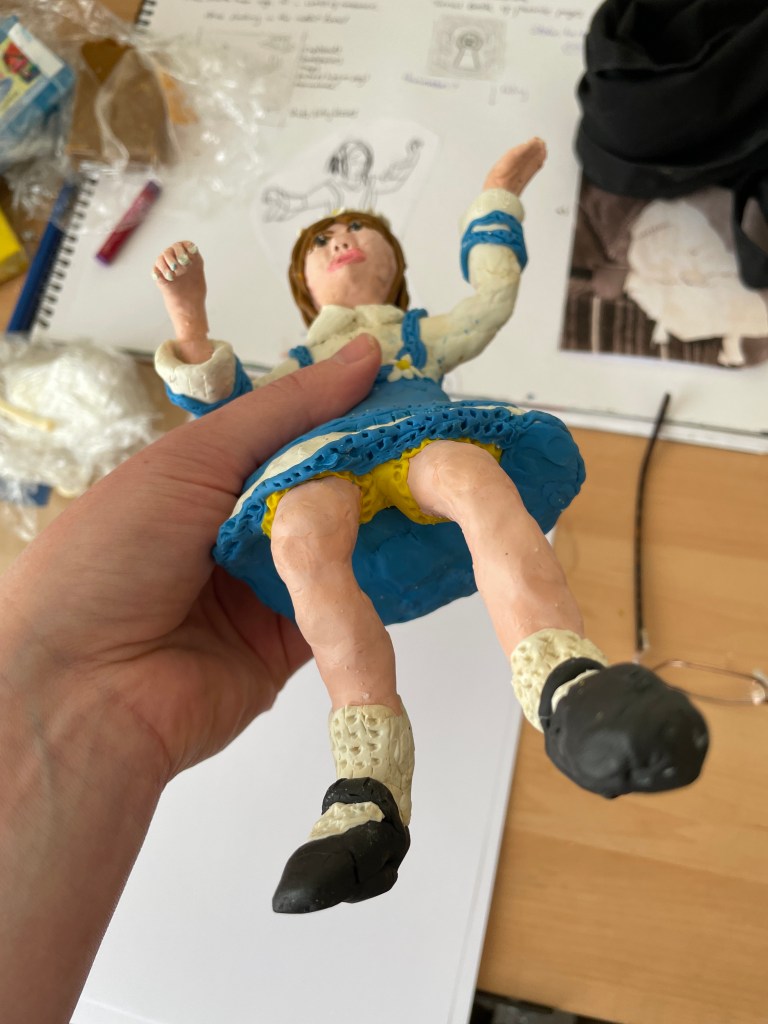
Alice meets Humpty Dumpty
This illustraton it is based on the following paragraph from the book.
‘And how exactly like an egg he is!’ she said aloud, standing with her hands ready to catch him, for she was every moment expecting him to fall.‘(Google.com, 2024)
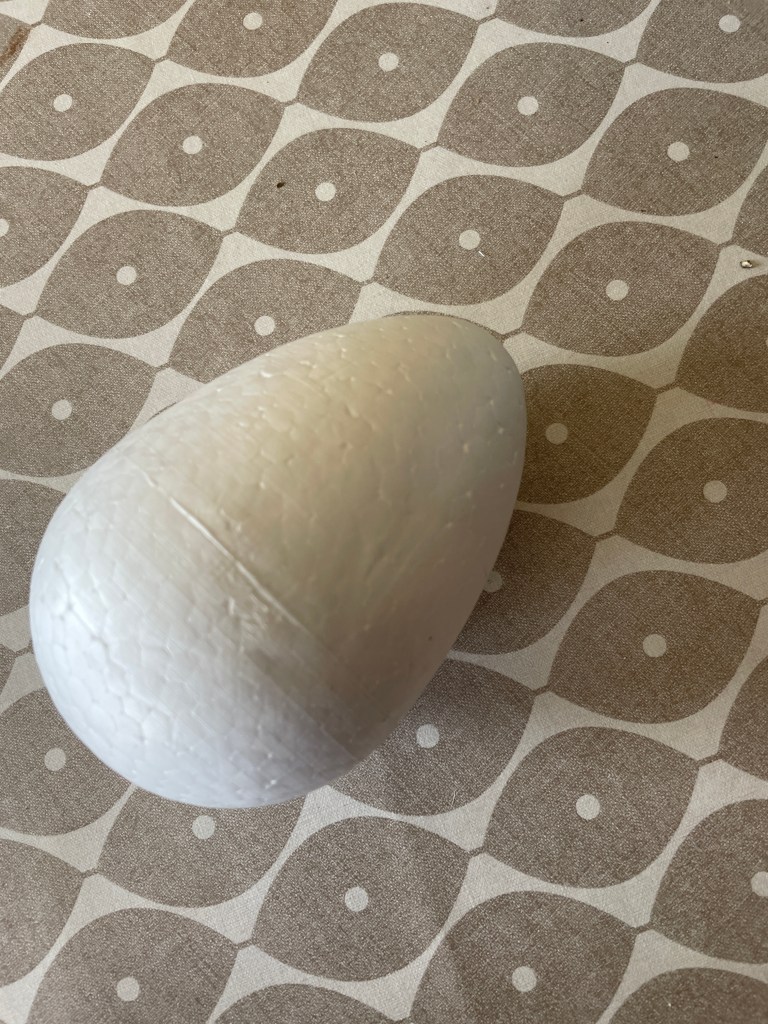
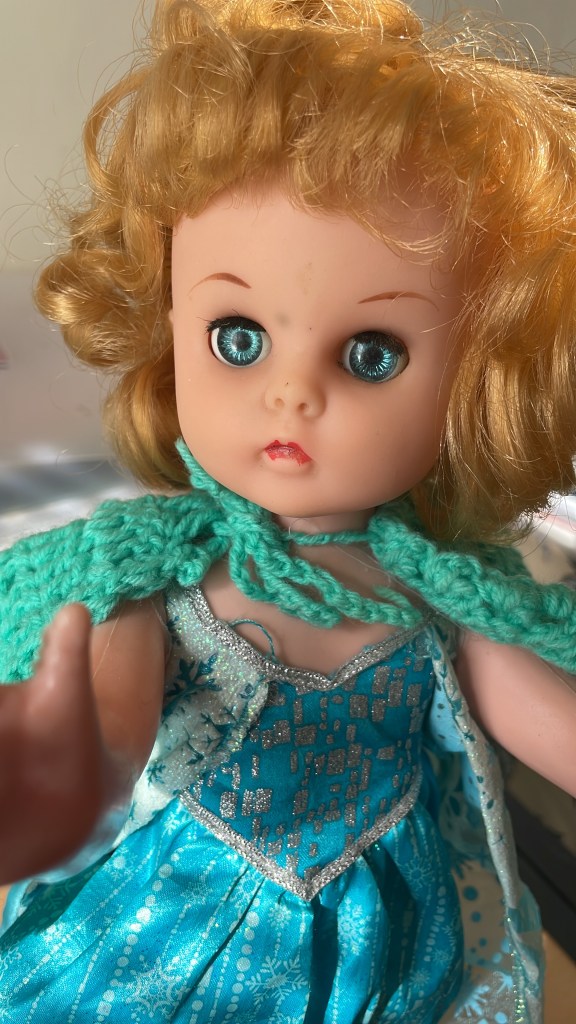
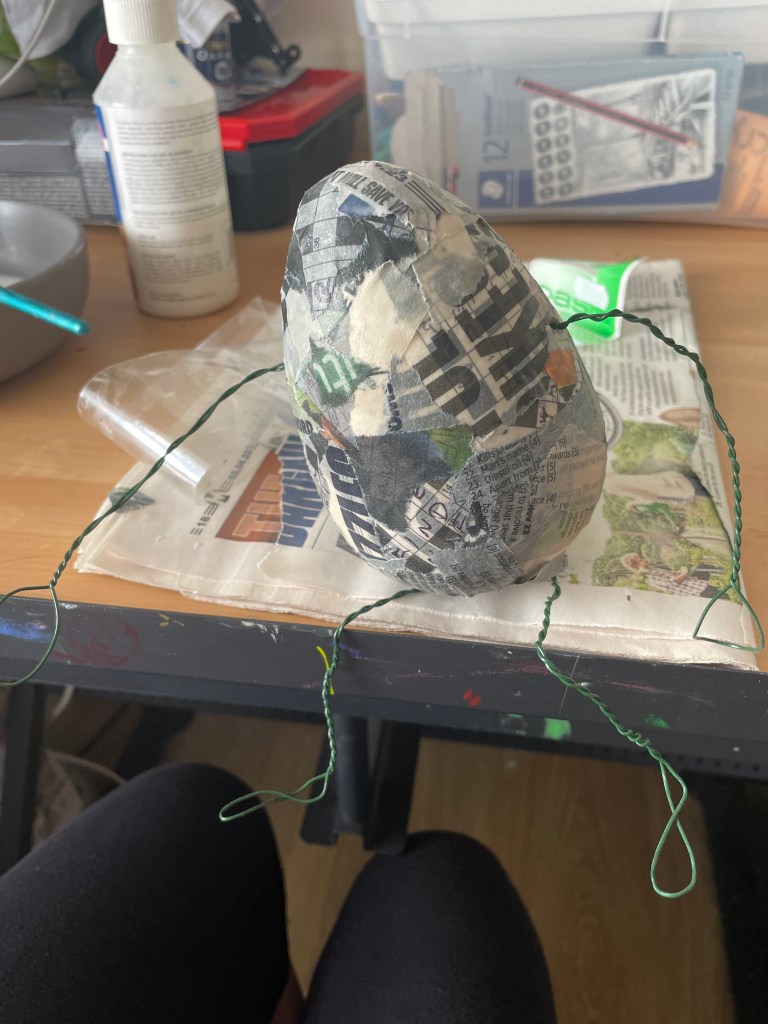
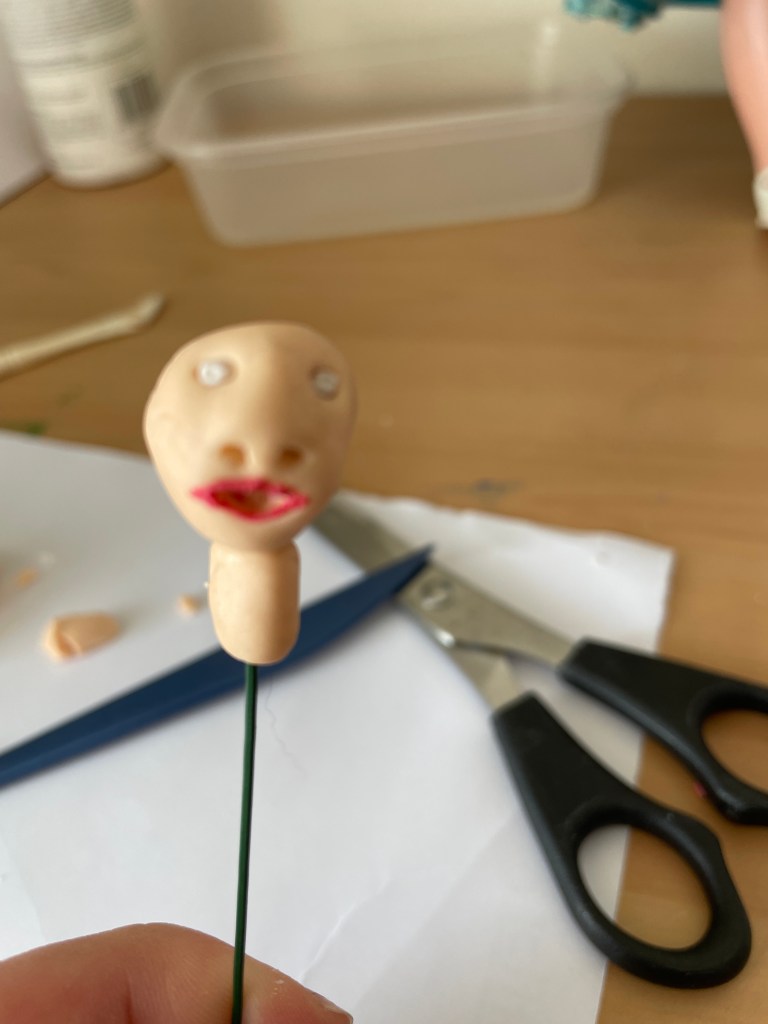
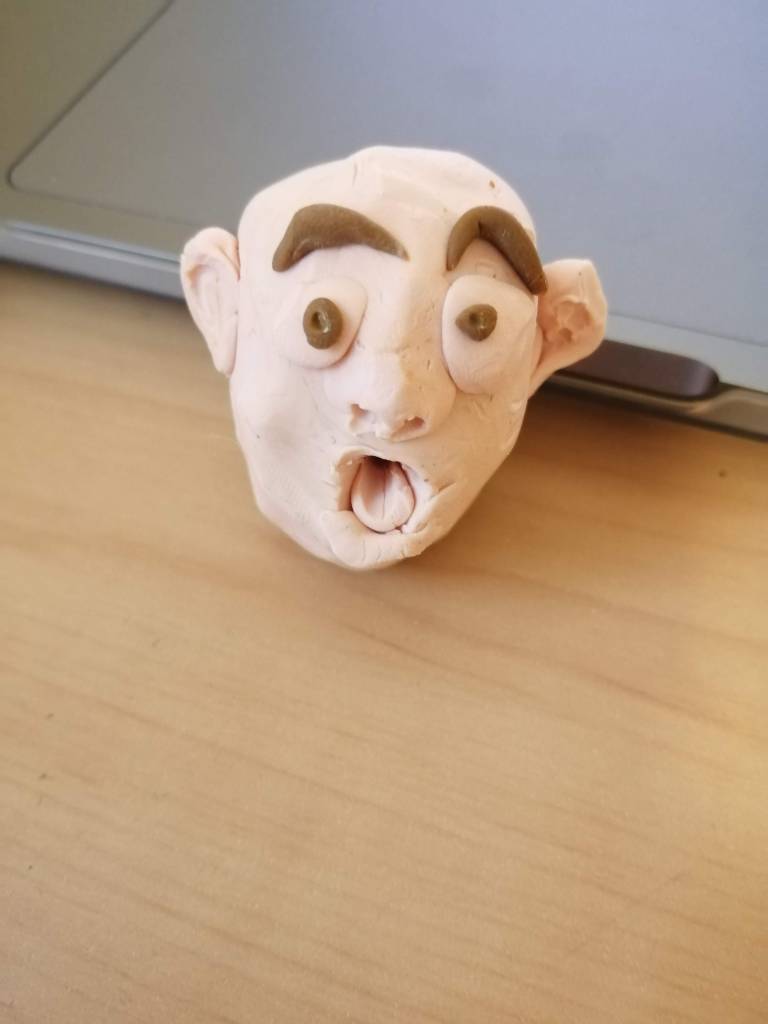
After producing thumbnails and experimenting with various compositions, I started to build a 3D model of Humpty Dumpty, I went to my local recycling centre to check if they had anything I could use for this project. I was excited to discover a Styrofoam egg and an old vintage doll. Both I thought would be good for this project.
Fig. 5 egg (2024)
Fig. 6 Vintage Doll (2024)
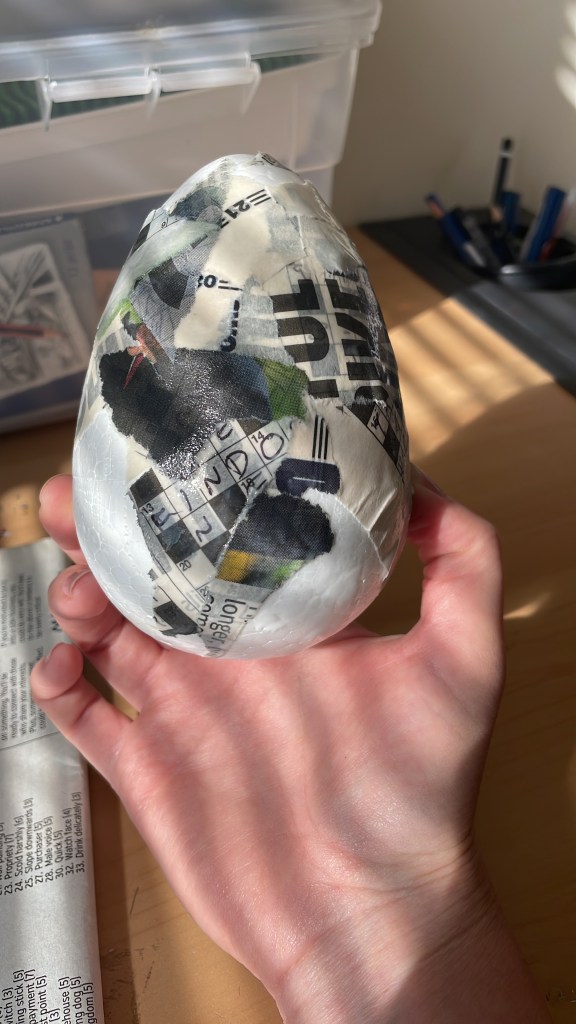
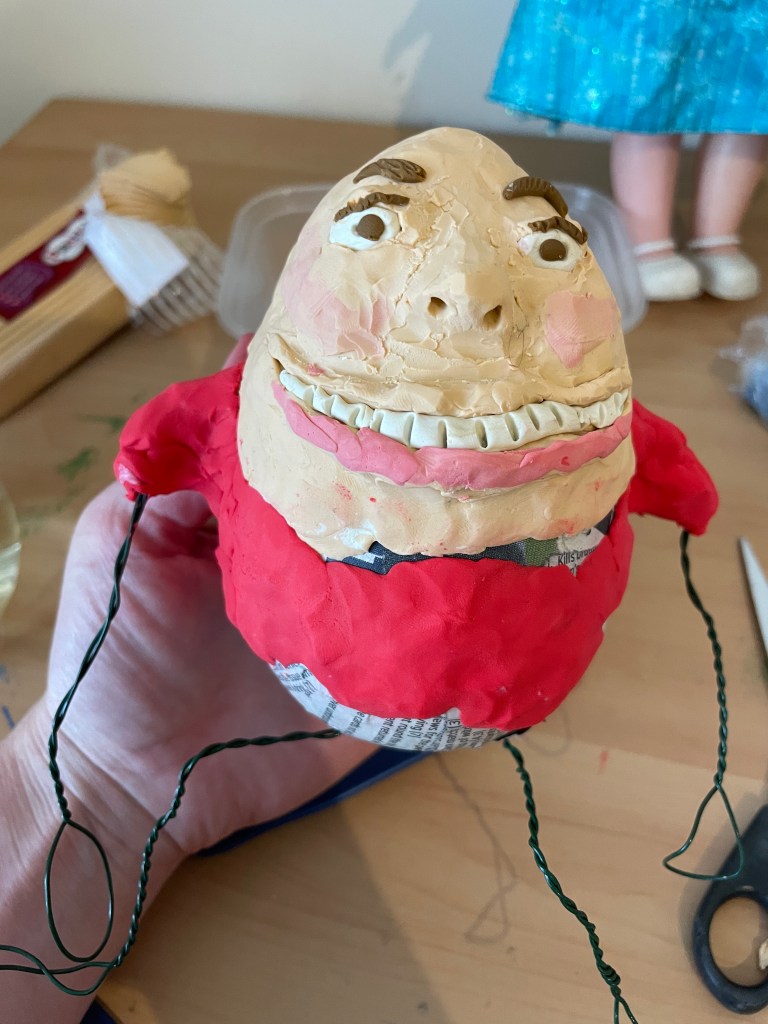
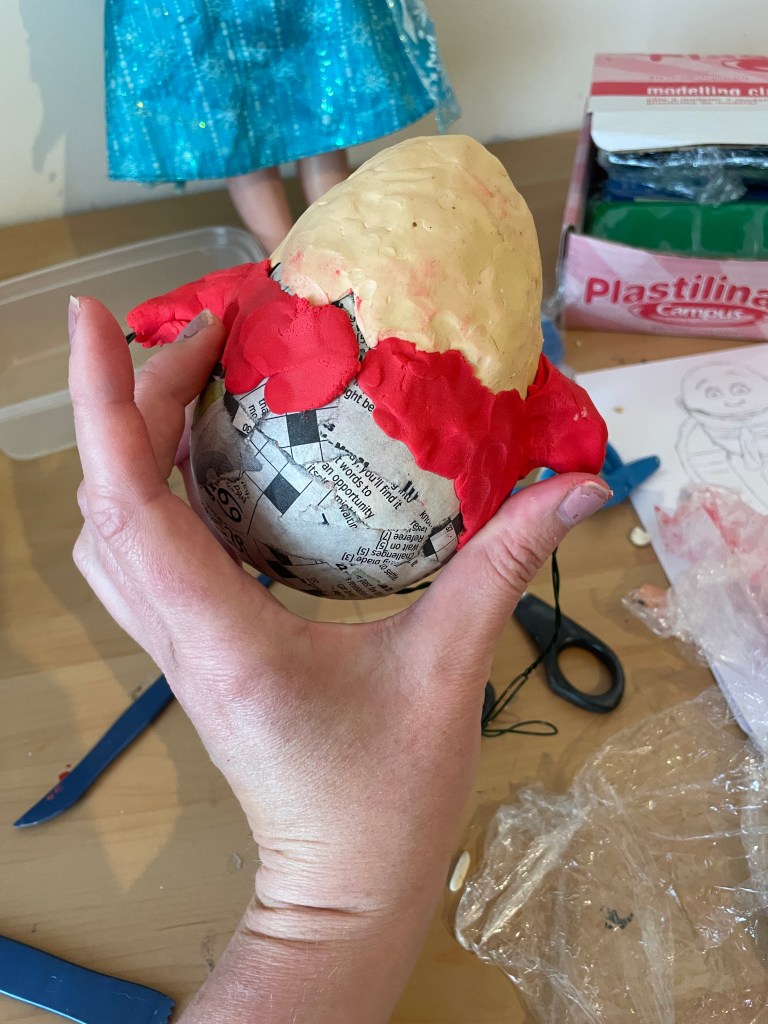
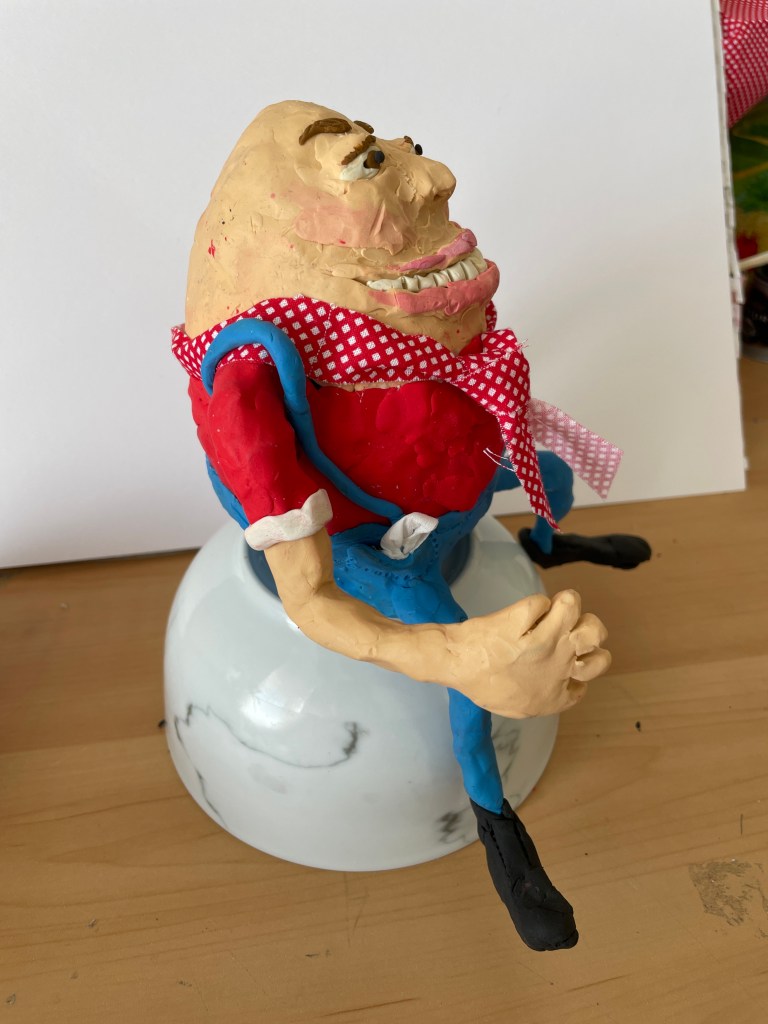
After I bought them, I started sculpting the egg with floral wire for the arms and legs, and I then added plasticine to finish sculpting the area surrounding the egg. When I was done, I added finishing details like a tissue to his pocket and a cravat I created out of some leftover cloth. A slide show of my work in progress is shown below.
Slide show of working process of making Humpty Dumpty
Next, I began drawing and painting the background on an A3 sketchbook. Mixed media was used for this such as watercolour, crayon and pastel some applied with brushes or sponges.
Slideshow of working process of backdrop painting
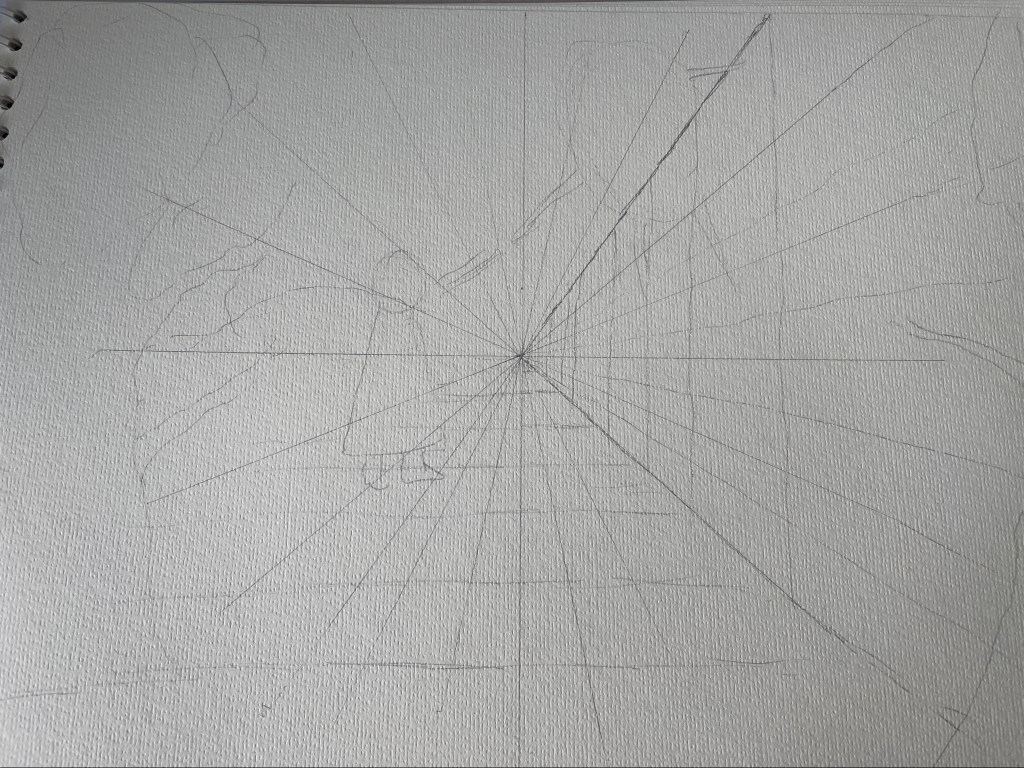
Pencil sketch layout
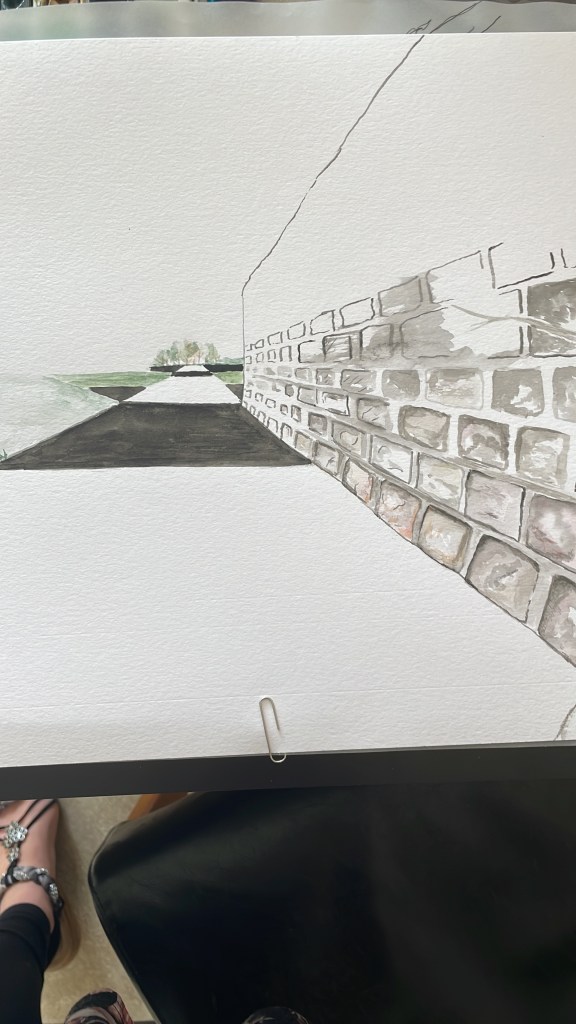
Starting the painting
Painting ready for enhancement in Photoshop
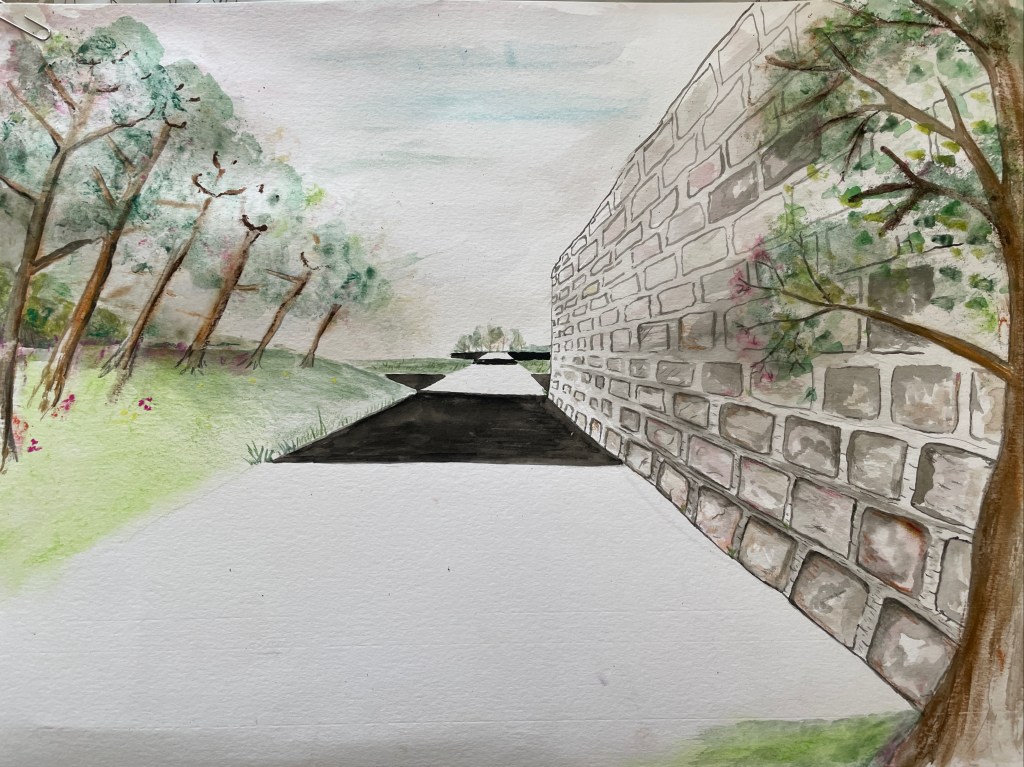
It was now time to use Photoshop to improve the painting and add the characters. This last picture features the vintage doll dressed as Alice alongside phrases from the book “Through the Looking Glass” collaged on top.
Fig. 7 Alice meeting Humpty Dumpty (2024)
The result was a unique and fresh retelling of the classic story. I was pleased with how the many elements blended to create an appealing and eye-catching image.
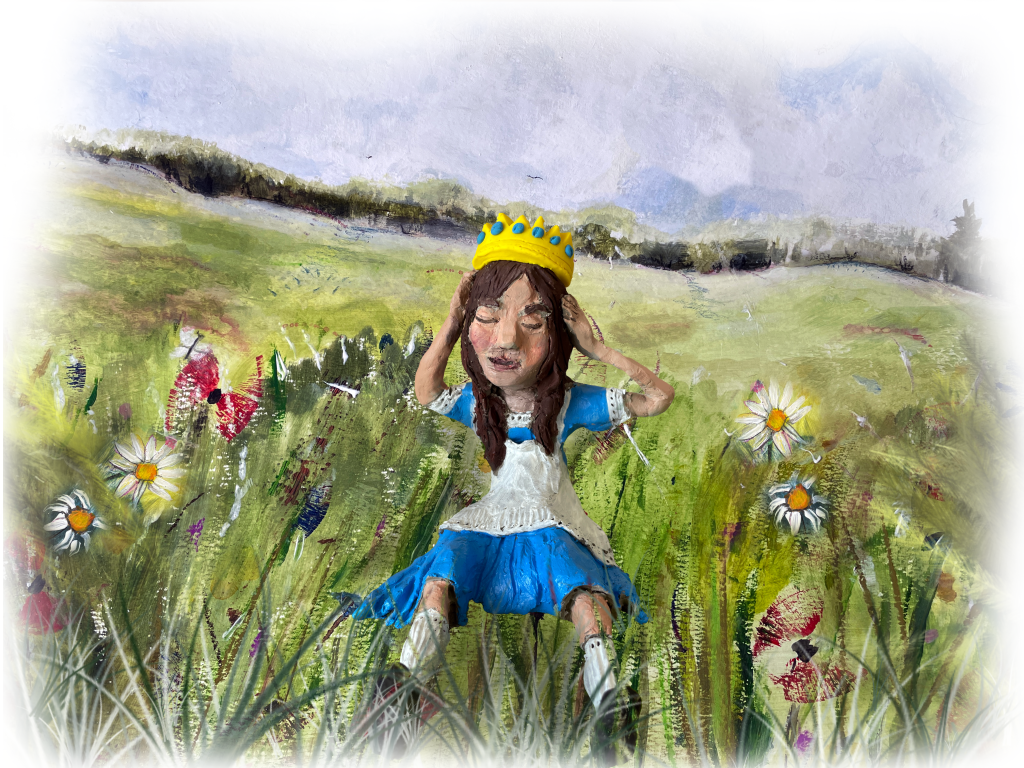
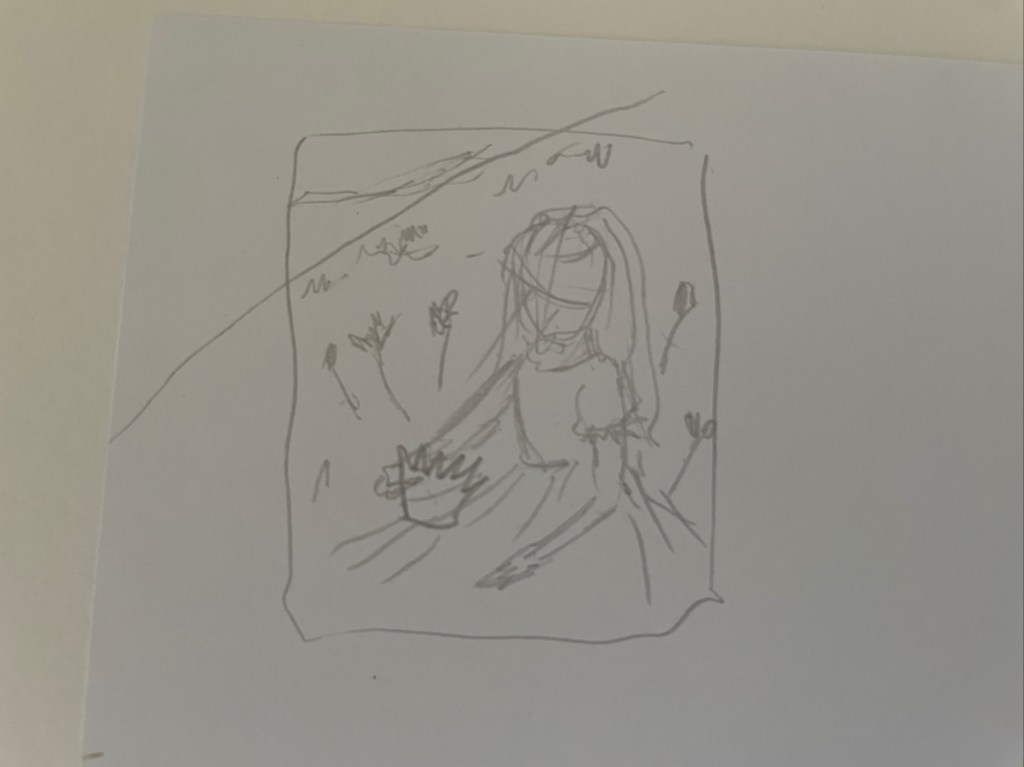
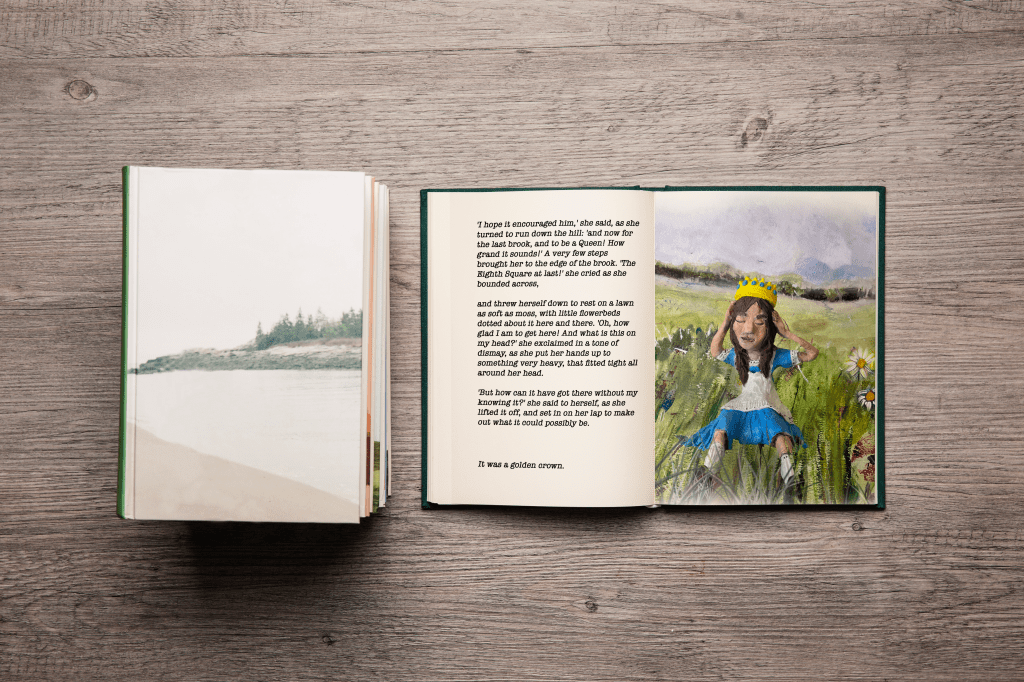
Alice becomes queen
This next illustration is based on the following extract from the book.
The Eighth Square at last!” she cried as she bounded across, and threw herself down to rest on a lawn as soft as moss, with little flower-beds dotted about it here and there. “Oh, how glad I am to get here! And what is this on my head?” she exclaimed in a tone of dismay, as she put her hands up to something very heavy, and fitted tight all round her head.
“But how can it have got there without my knowing it?” she said to herself, as she lifted it off, and set it on her lap to make out what it could possibly be.
It was a golden crown.(Google.com, 2024)
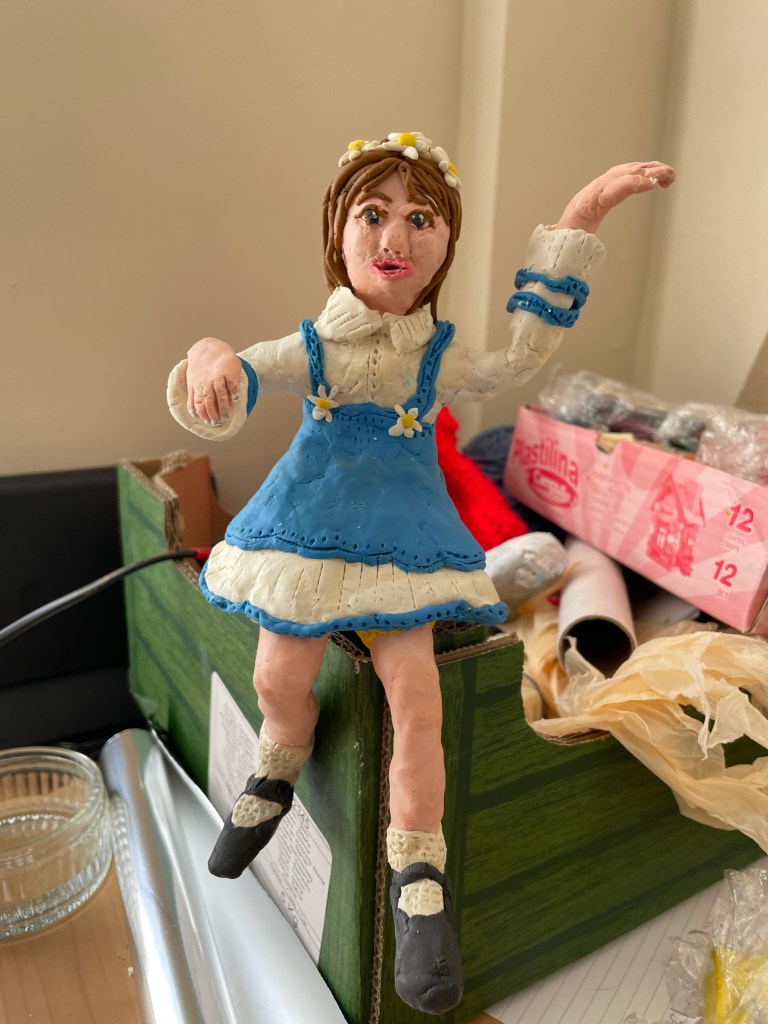
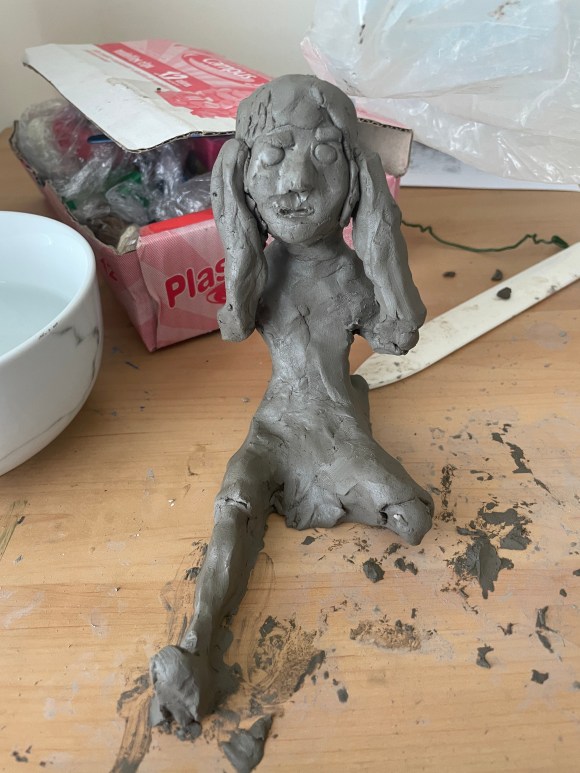
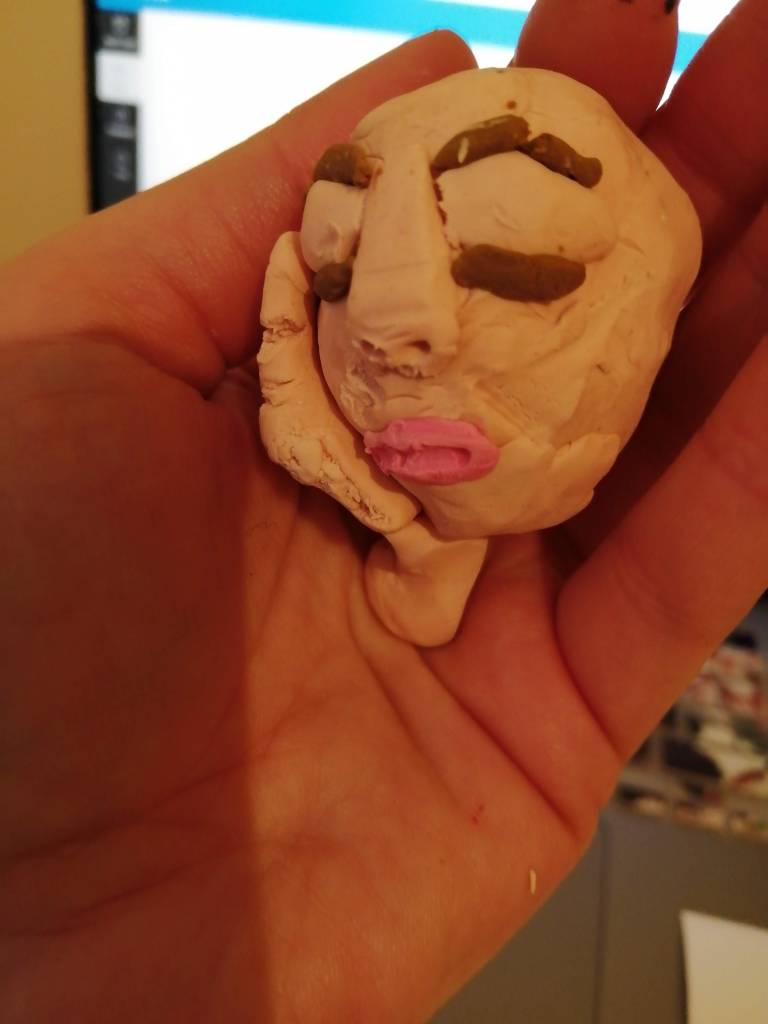
After creating the thumbnail sketches I began considering how to make Alice. I thought of the exercise I had previously completed which was about working small and started trying to make Alice using Fimo clay.
Fig.8 Fimo Experimenting (2024)
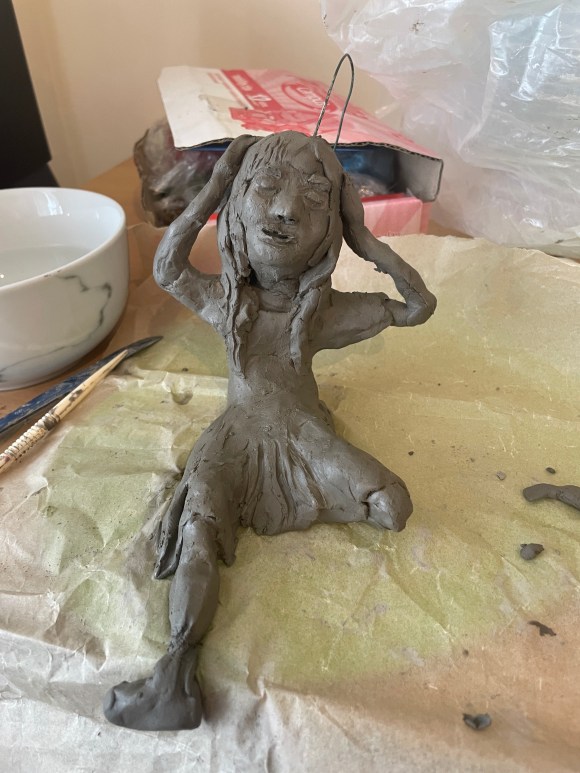
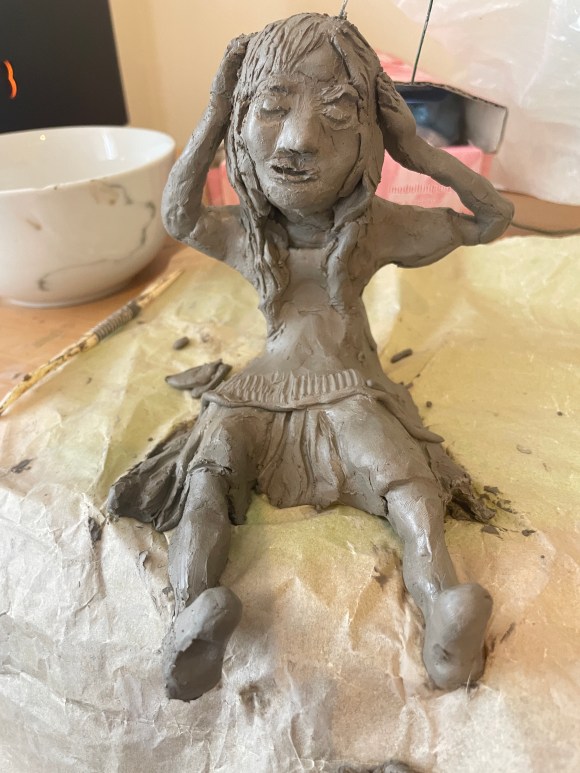
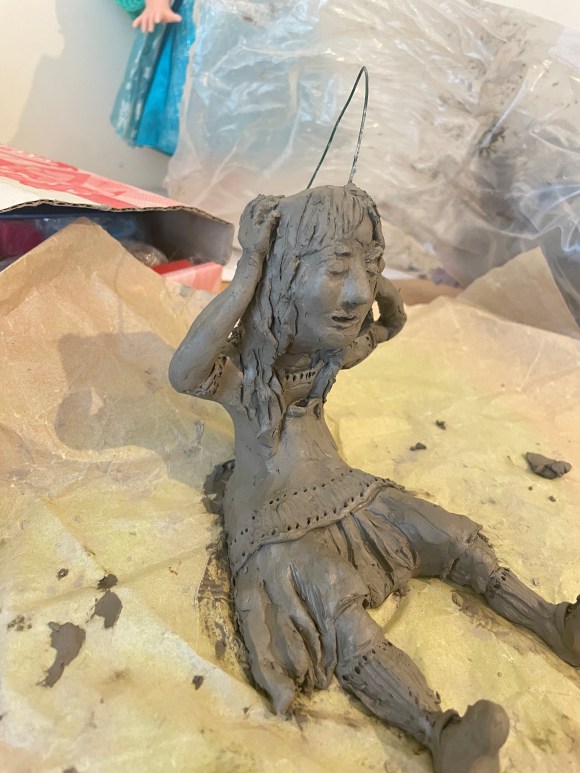
However, I found this difficult and didnt have the right modeling tools for working at such a small scale. Instead I decided to make Alice out of air drying clay. Below is a slide show of my working process.
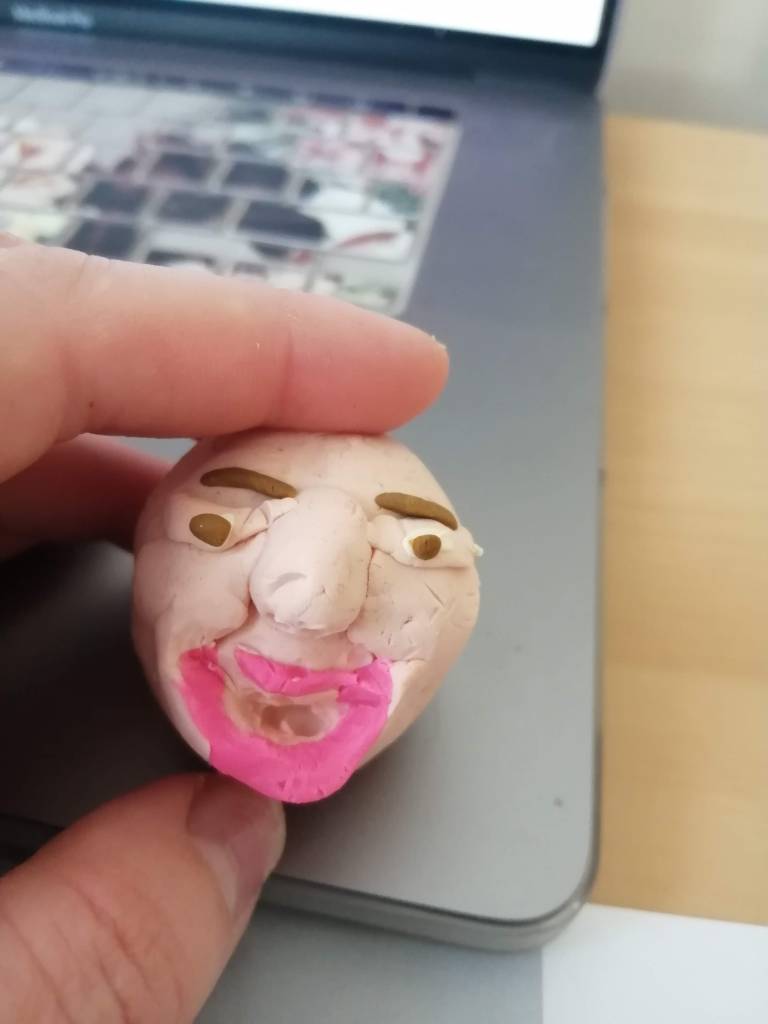
When the sculpture was finished and had dried, I coloured it with acrylic paint and sanded it with a nail file. Finally, I built a plasticine crown and incorporated it into the figure.
Fig. 9 Painted Alice (2024)
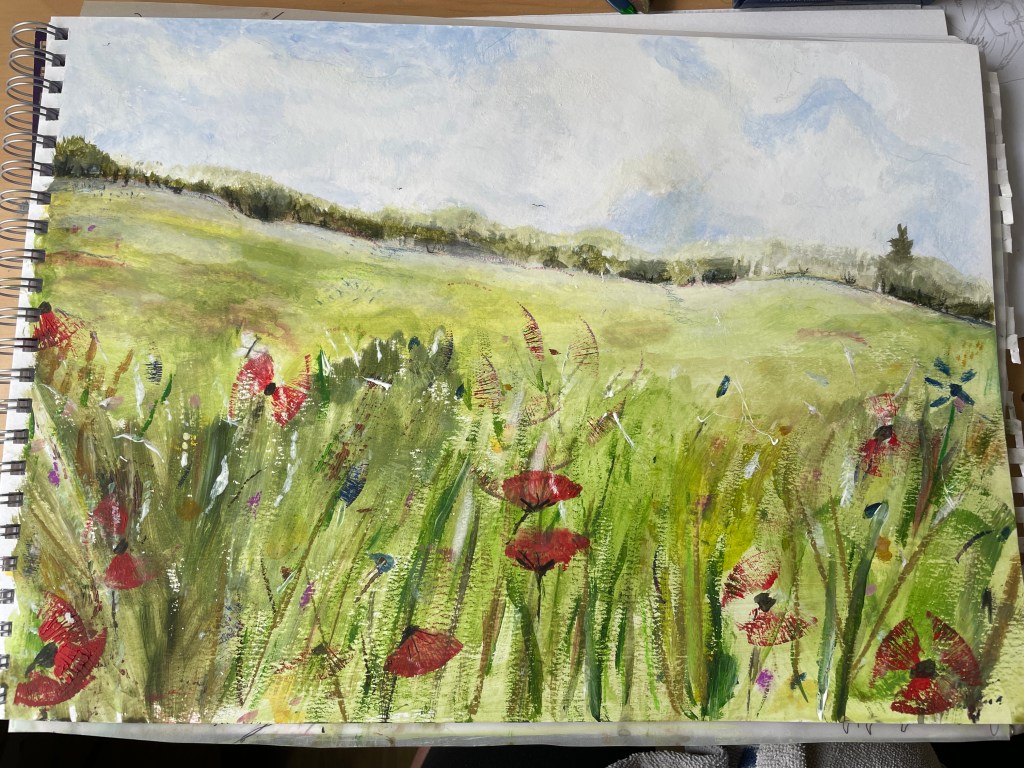
Next, I started drawing a background of a beautiful grassy field in my A3 sketchbook using acrylic paint, pastels and crayons.
Fig. 10 Field painting (2024)
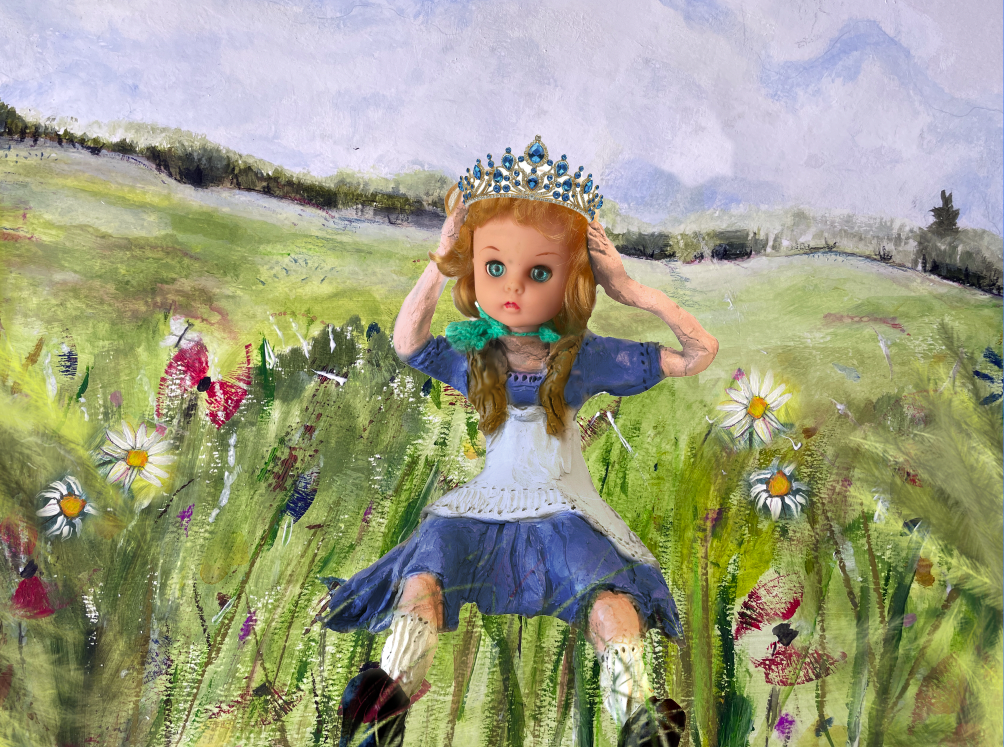
After this had dried, I finished the image by adding the clay sculpture in Photoshop and making some final editing. Whilst editing, I wondered if encorporating the vintage doll somehow would be effective.
Fig. 11 Alice doll in field (2024)
However, I didn’t think it worked in harmony with the hand created elements so went back to my original idea. Below is the finished image.
Fig. 12 Alice sculpture in field (2024)
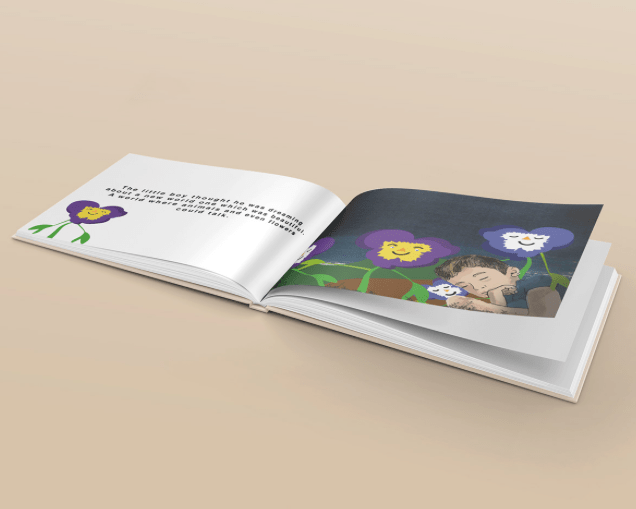
Finally, I created a book mockup for the illustraton.
Fig.13 Mockup (2024)
The final resulted in a unique mixed media artwork that I think has brought the story of Alice and the crown to life in a creative way. The combination of traditional and digital art techniques have added depth and dimension to the overall piece. The use of different mediums allowed me to experiment with textures and colours.
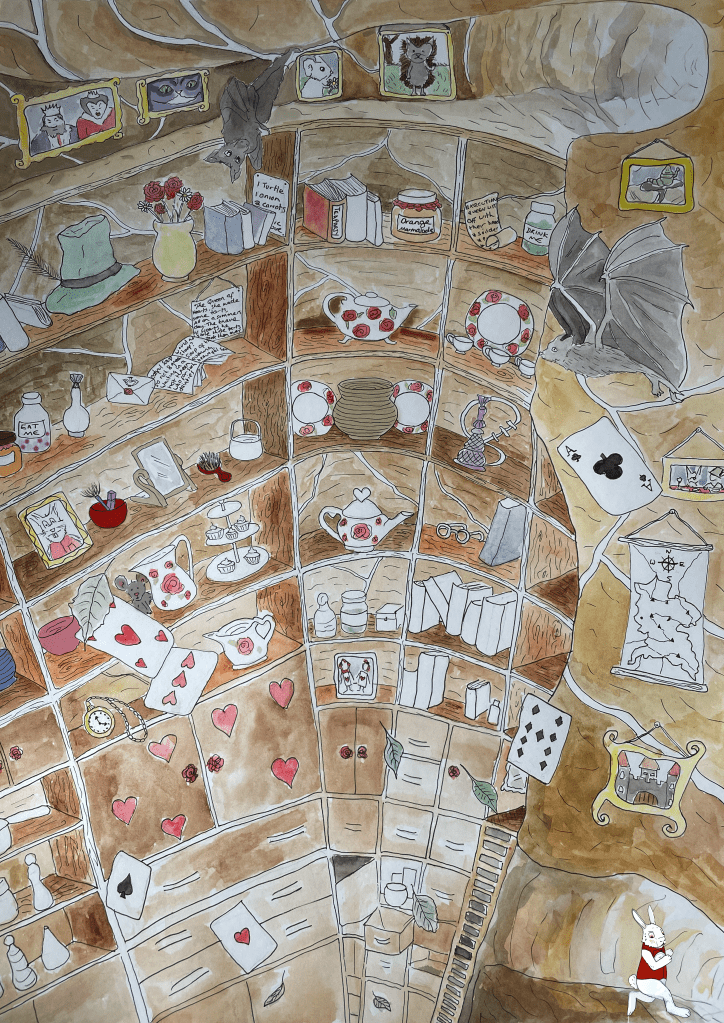
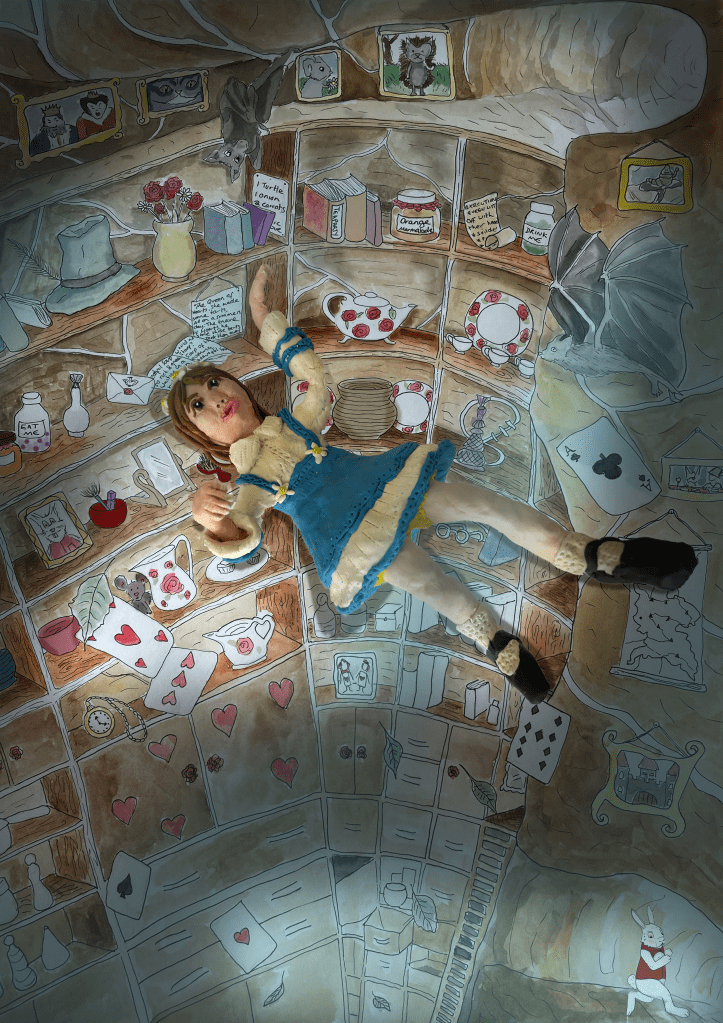
Alice falling down the rabbit hole.
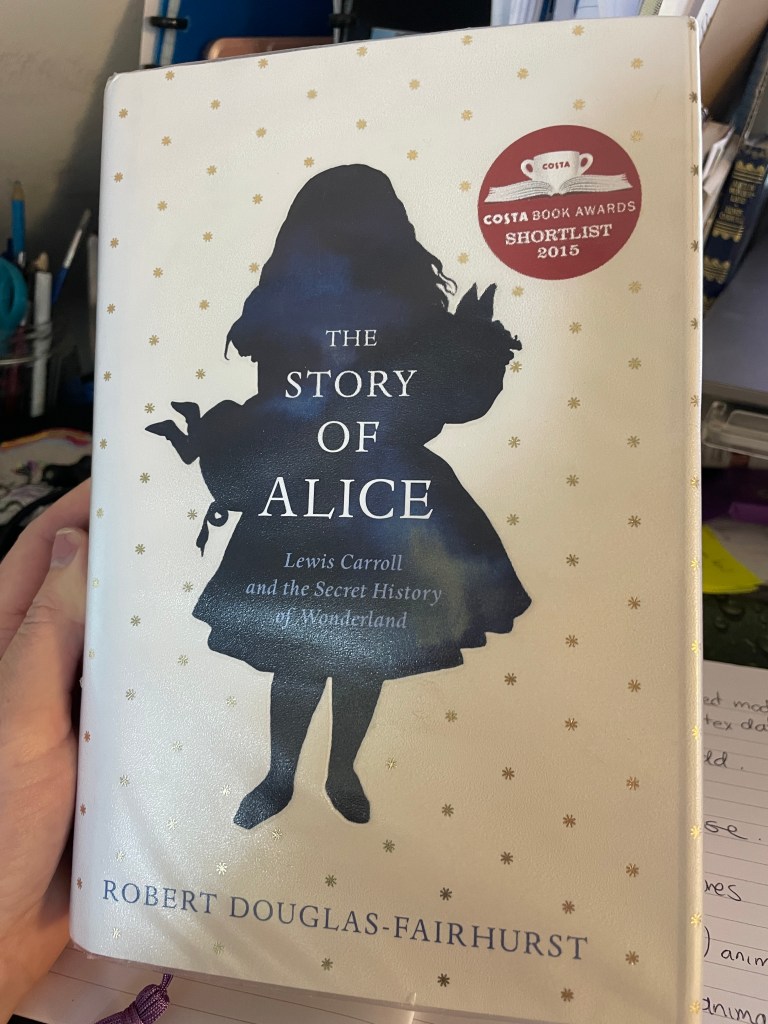
The final image was going to be based on Tweedle Dee and Tweedle Dum. However, there was a change of plan that happed by accident. For research purposes and to hopefully give me more inspiration I researched a book called ‘The story of Alice’ by Robert Douglass and found the only book available was based in a libary twenty minutes away.
Fig. 14 The Story of Alice (2024)
Reseving the book, I drove to the libary with my younger son to collect it. When entering a member of staff was walking around with a VR headset on. Finding this amusing and unusal for the setting I laughed and said what are you doing. He mentioned he was setting up games for a class he was holding for children during the summer holidays. Thinking of my son I asked is there other oppotunitys available at the libary and I was shocked to disover the libary has the following available to use.
360° immersive film
3D design, print, scanning and prototyping
Coding & micro-computers
Virtual & Augmented reality
Advanced digital design & animation
Full Adobe Creative Suite
A design studio for digital design, 3D modelling & animation
Oculus Quest virtual reality headsets
3D scanners & printers
Podcast recording equipment
360° cameras & editing software
Micro-computers & programmable robots
Project & Digital Skill support from our Lab Tech teamwhole Adobe suite, camera equipment and 3D laser cutters.
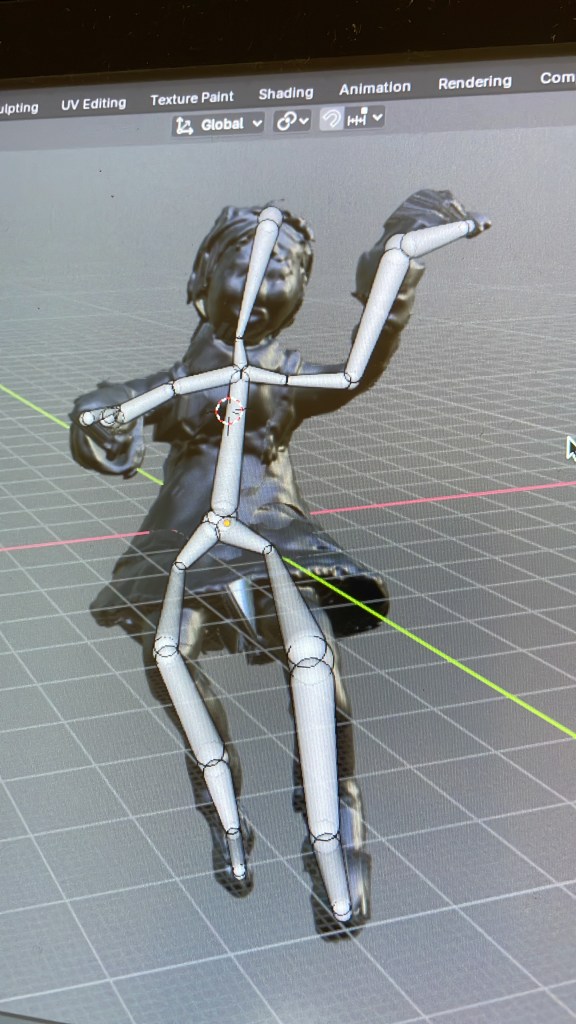
Hearing this I was excited and mentioned my project and showed him some of my work. I had an idea of animating my illustration of Alice falling down the rabbit hole but didn’t know how. He then showed me this could be achieved by scanning and photographing my model and then animating it in a program called Blender.
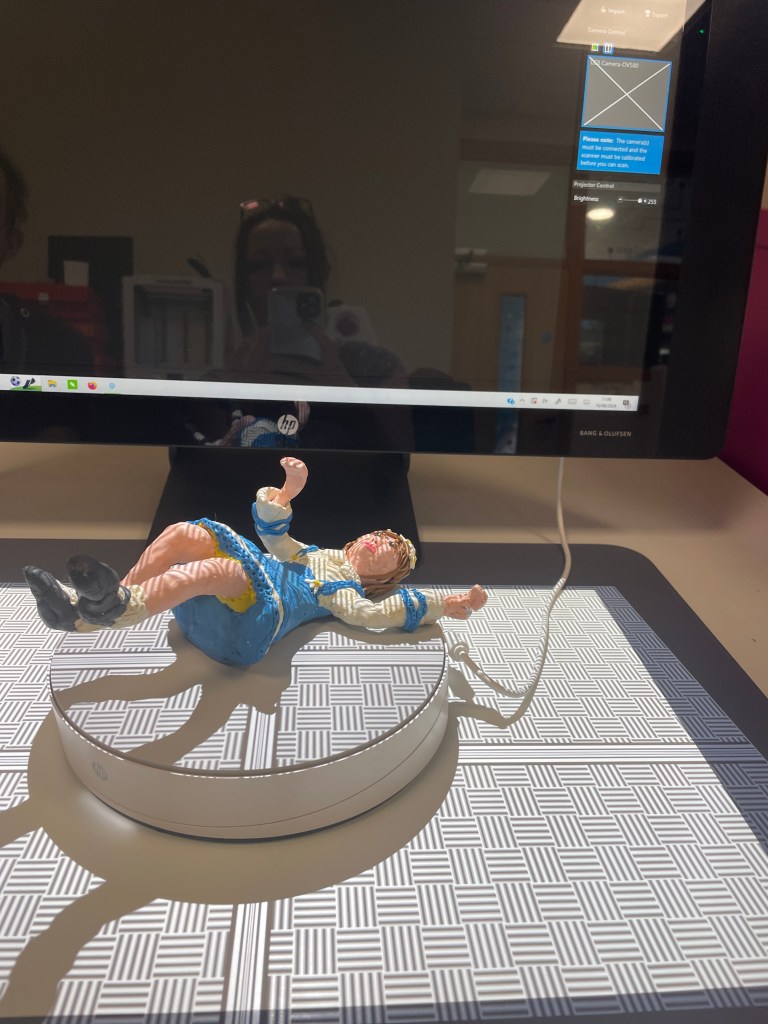
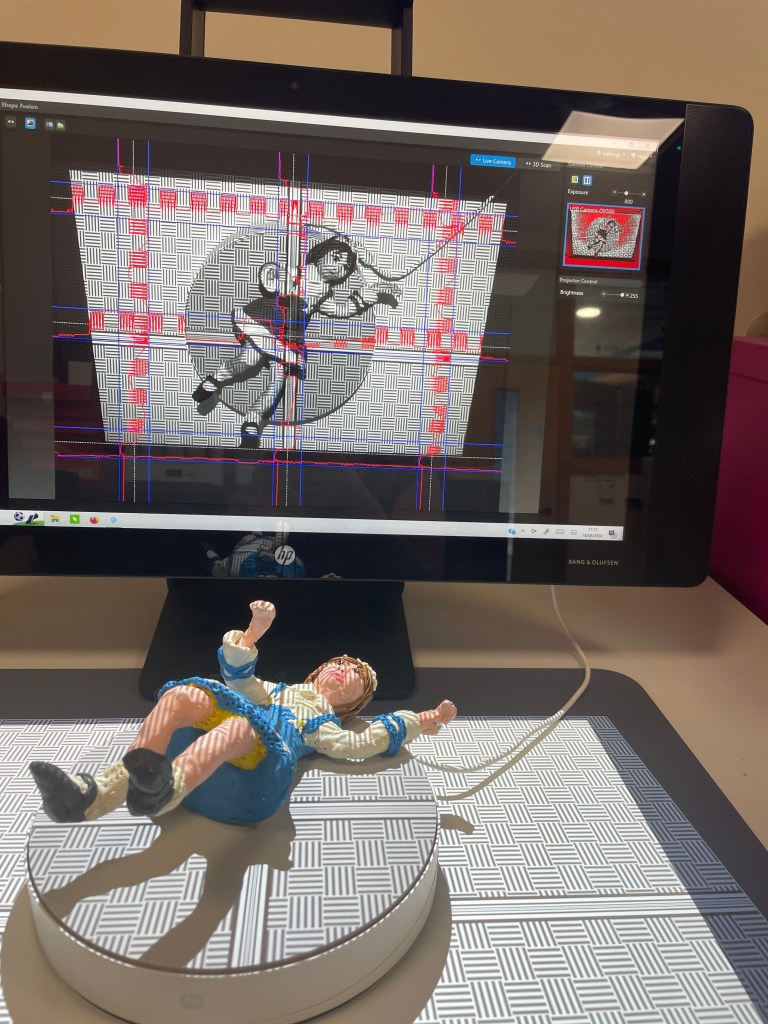
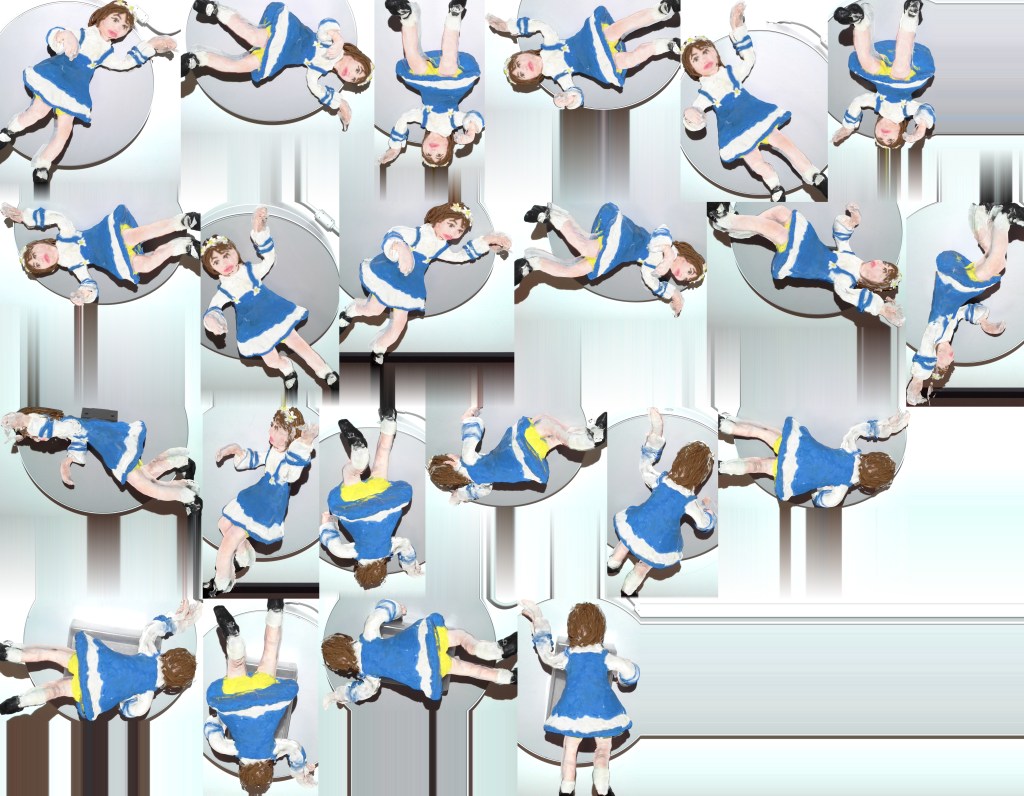
Therefore, I went back to the libary with my model of Alice and used their 360° cameras & editing software.
Fig. 15 Photograhing Alice (2024)
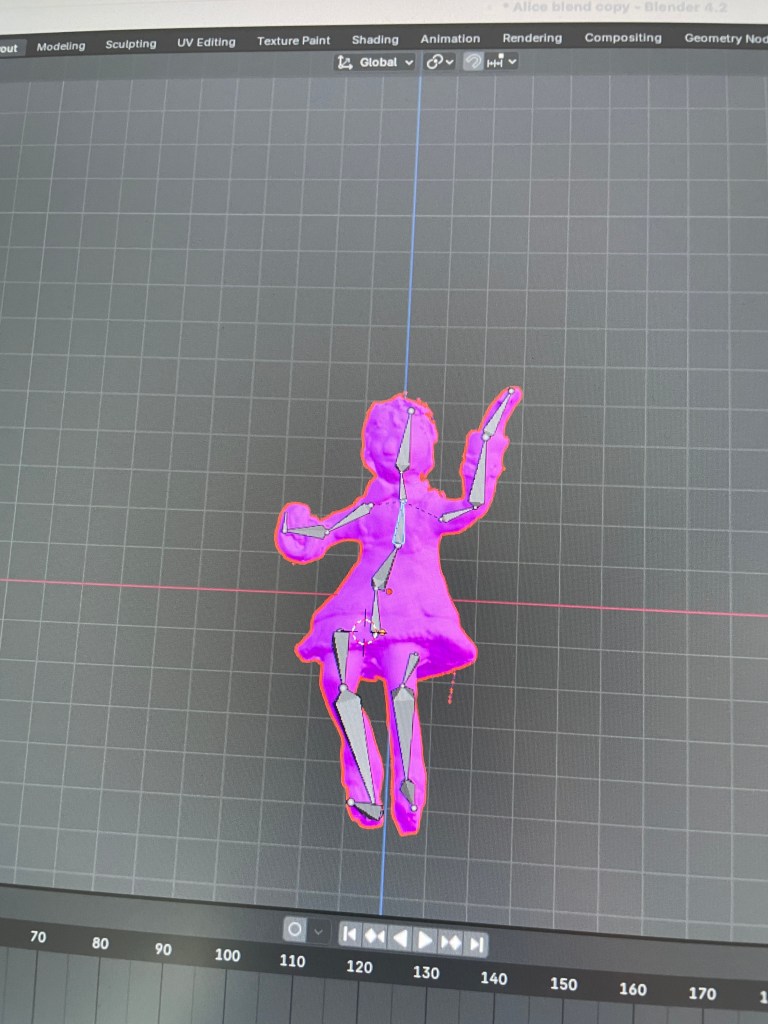
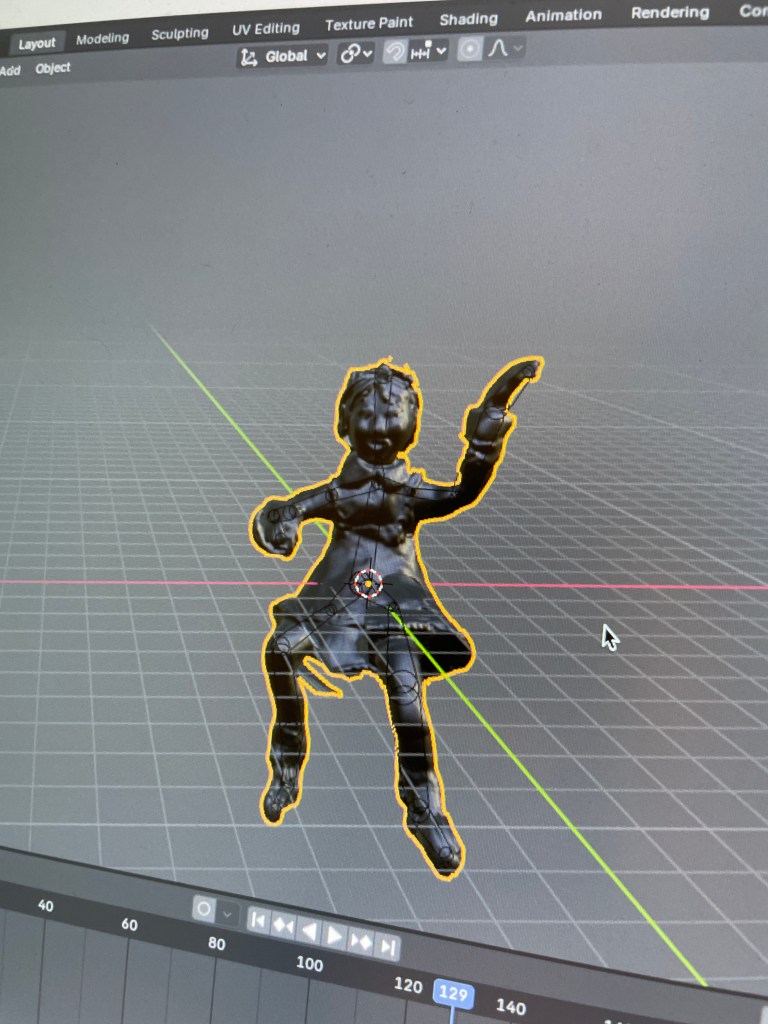
Next, I used these photos of my sculpture to create a 3d model in Blender and began learning how to create an armature for the model.
Fig.16 Rigging Alice (2024)
It did feel like I had bitten off more then I could chew as the programe is completely new to me and very complicated! However, I am determined to complete my idea as I think it will be not only taking me out of my comfort zone, but learning new skills, developing my artistic ability and creating something exciting and original. However, I know it is going to take me many hours to learn.
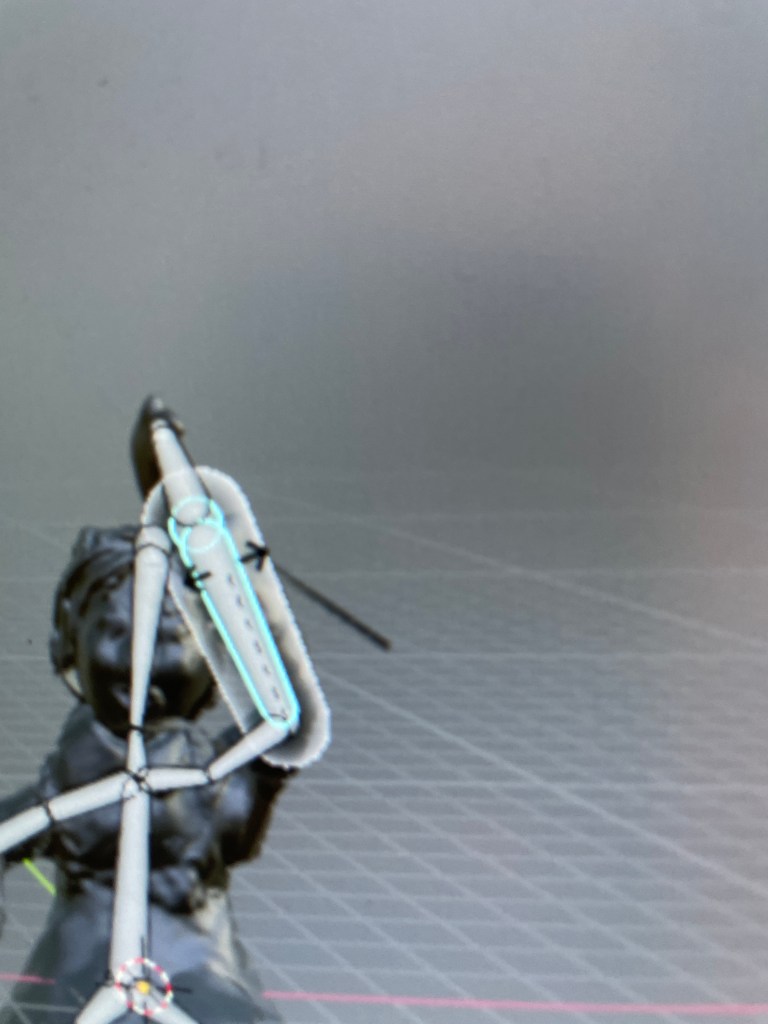
Perservering with Blender, I managed after many attempts to attach the completed rig of armature to the model of Alice.
Fig. 17 Armature Alice (2024)
However, when trying to pose the model in different position it was not working correctly as parts of the model were stuck which can be seen in the images below.
Fig. 18 ArmatureProblems (2024)
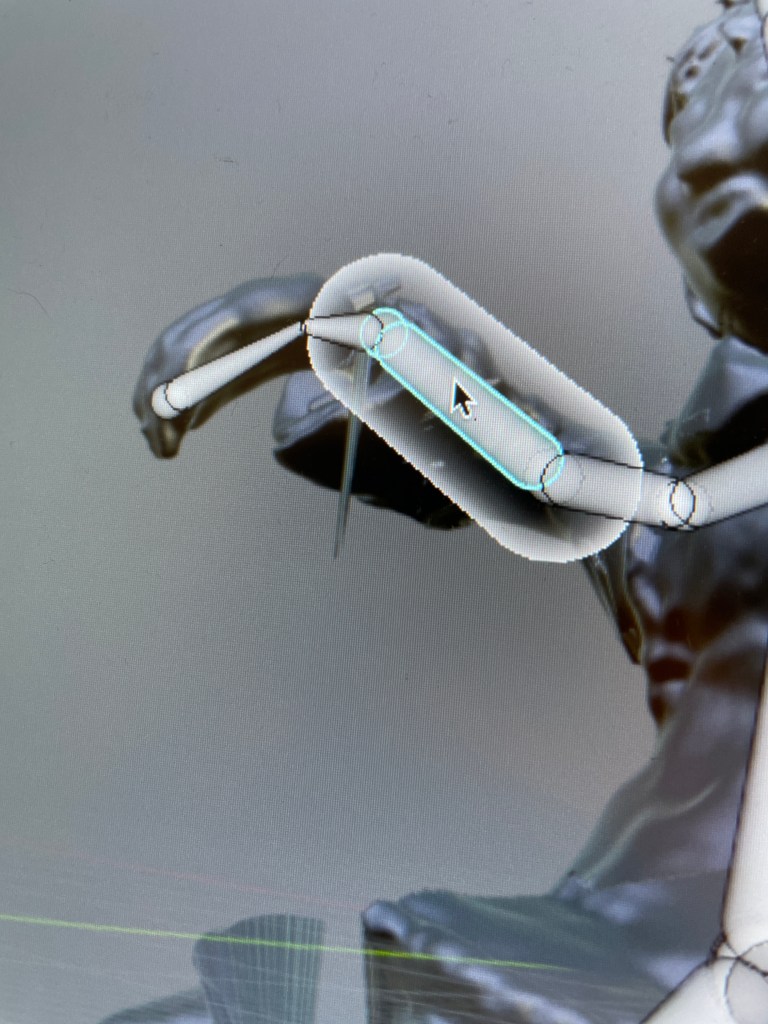
This meant I had to go back through every bone in the armature in edit mode and highlight the mesh that needed to be attached to the bone. This was a very tidious and difficult process.
Fig.19 Fixing mesh (2024)
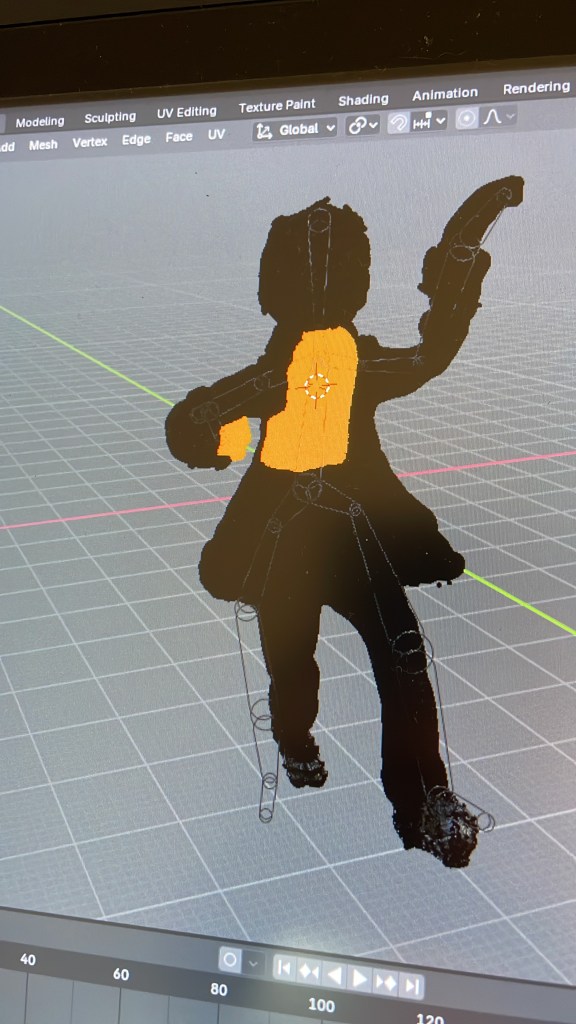
Yet, after many hours I managed to attach all the bones ready to be posed and ready for animation.
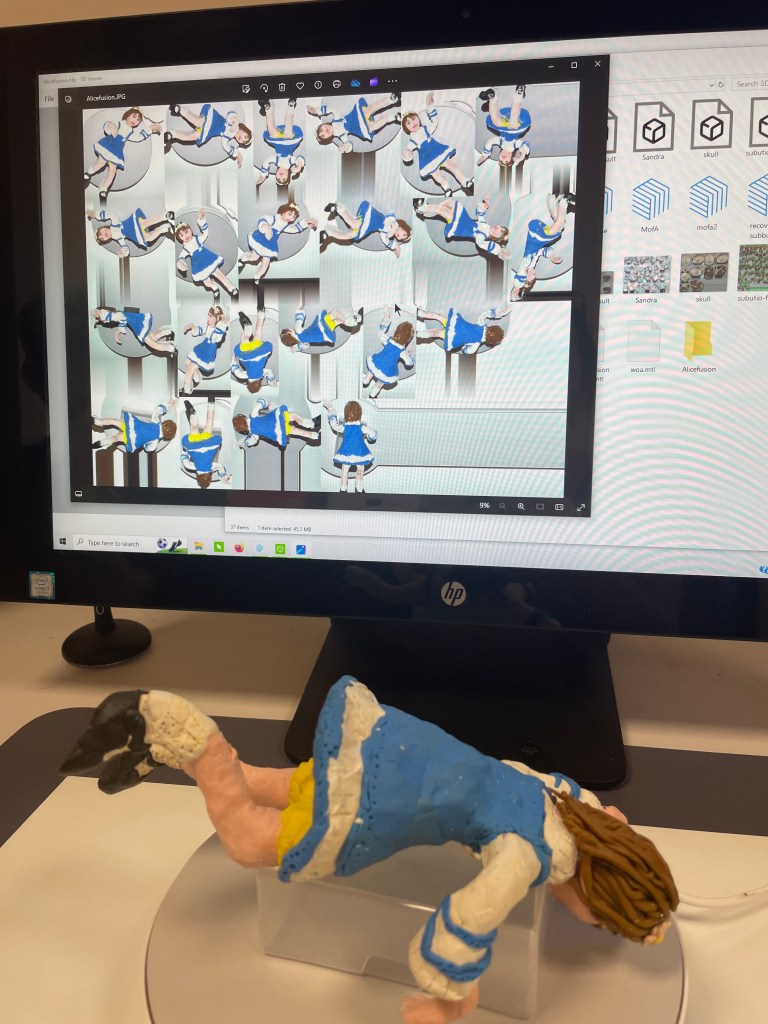
The next stage, is to add back the original textures to the model. Which are ready to be synced to the model.
Fig. 20 Alice Fusion (2024)
Once this is achieved I will create an animation of Alice falling in Blender, which I have done a short test and am confident in creating. Below is a short clip of me experimenting with the animation side.
Finally, combine this with the background image below which will be rolling behined. I anticapte this to be completed in After Effects. Unfortunetly, this is a slow process and a giant learning curve for myself so it hasn’t been completed. However, it is my intention to have it completed for assessment.
Fig. 21 Rabbit hole (2024)
Reflective Statement
This project has been both challenging and a rewarding experience, blending traditional methods with advanced digital techniques to re-tell “Alice in Wonderland” and “Through the Looking Glass.” From the beginning, I was eager to explore the possibilities offered by the advanced technology available at the library, particularly in animating my illustration of Alice falling down the rabbit hole. However, the journey took me far beyond digital exploration, as I also experimented with sculpting and mixed media illustrations.
3D Modeling and Animation
Learning Blender, a program entirely new to me, was perhaps the most daunting aspect of the journey. It is evident it has been a steep learning curve as I struggled with rigging and weight painting my model of Alice. There were moments of frustration, especially when the model didn’t respond as expected during the posing phase. However, each challenge presented an opportunity to deepen my understanding of 3D modeling and animation. The satisfaction of finally seeing the armature function correctly was a significant milestone, reinforcing my determination to continue.
Experimenting with the animation itself, although time-consuming, provided a glimpse into the possibilities ahead. The short test clip I created gave me confidence that I could eventually bring my vision to life. Also, the prospect of combining the animated model with the background in After Effects is exciting. This experience has tested my patience but most importantly, expanding my artistic abilities and I am excited to see what else I can create.
Humpty Dumpty and Alice Sculptures
Aside from my work in Blender, I undertook a hands-on project to create a 3D model of Humpty Dumpty. The process of sculpting Humpty Dumpty, using floral wire and plasticine, was both challenging and fun. I hope my attention to detail, from the tissue in his pocket to the cravat made from leftover cloth, added a personal touch that brought the character to life.
Next, I experimented with mixed media in my A3 sketchbook to create colourful backdrops. The use of watercolors, crayons, and pastels allowed me to explore different textures and effects, which I later enhanced in Photoshop. This combination of traditional and digital media allowed me to refine and perfect the background while maintaining the handmade feel of the original work.
Creating Alice was another important moment. Initially, I struggled with sculpting in Fimo clay due to the small scale, but rather than giving up, I adapted by switching to air-drying clay where I was able to mold and paint Alice more effectively.
Integrating these elements into the final image required careful thought. While the vintage doll initially seemed like an interesting addition, I ultimately realised that it didn’t harmonise with the hand-crafted elements. Returning to my original idea, I was able to create an image that felt more unified and true to my artistic vision. The creation of a book mockup allowed me to see how these illustrations might function in a published format.
In reflection, this project has pushed me to think creatively, adapt to challenges, and blend various artistic techniques to achieve a final result that I am proud of. The experience has been invaluable in helping me grow as an artist, and I look forward to applying these skills to future projects.
Reflection on verbal tutor feedback
“Completing my project based on Through the Looking Glass and receiving feedback from my tutor was both a nerve-wracking and a rewarding experience. I often feel apprehensive about how my work will be received and whether I’ve done enough to meet expectations. However, I was delighted to hear that my tutor was blown away by my efforts, particularly in handmade crafting, the stunning illustrations I created, and my integration of technology. She also recognised my initiative in learning Blender, expressing eagerness to see the animation I am currently working on. My tutor has also encouraged me to start marketing myself, and playfully adviced me to display my sculptures at home rather than sell them. This feedback gave me a renewed sense of confidence in my abilities. Hearing her say, ‘ If you don’t have confidence now you never will, well done Gemma,’ and that she was impressed and blown away by my work was incredibly affirming, and it’s a reminder to trust in my creative instincts moving forward.”
Continiation of Blender animation after tutor feedback.
Knowing my animation hadn’t been finished due to the complexity of the software was frustrating, especially given the effort and time I had invested in it. Throughout the process, I learned new skills in 3D modeling, animation, and video editing, and I was eager to see a completed result I could be proud of.
Determined to finish, I continued working on the animation. After many late nights and setbacks, I was finally able to complete it and share it with others.
To bring the character of Alice to life, I first adjusted the model’s mesh in Blender to ensure smoother movements. I then created keyframes in Pose mode, meticulously positioning each part of the model in various poses across frames. This involved detailed adjustments to ensure that Alice’s movements appeared natural and expressive.
Next, I tackled the challenge of installing a camera in Blender to record the animation. This part of the process took several attempts, as setting up a dynamic camera angle that captured Alice’s descent effectively required careful placement and experimentation.
After exporting the animation, I moved on to After Effects, a new software for me, to create a scrolling backdrop. Learning After Effects was initially daunting, but with time I managed to create a background that complemented the movement of the character. Finally, I added music to enhance and bring the animation fully to life.
While the very short animation is not perfect, I believe it captures my creativity, dedication, and willingness to take on new challenges to improve my skills in both illustration and animation. I hope you enjoy watching.
Douglas-Fairhurst, R. (2015). The story of Alice : Lewis Carroll and the secret history of Wonderland. Cambridge, Massachusetts: The Belknap Press Of Harvard University Press.
Frank Joslyn Baum (2008). The Wizard of Oz (Collecter’s Edition). Atlantic.
Before beginning assignment four I reflected on the ways I have approached making throughout this unit and broke them down into categories so I could continue thinking about strategies to help me stay open minded and be creative.
Approaches
Identifying keywords
Brainstorming
Research
Methods
Thumbnail sketches
Generating ideas
Drawing ideas up
Choosing ideas
Creating visuals
Final artwork
Conceptual strategies
Word association
Word processing
Words to pictures
Considering viewpoint, composition, and content
Ways of making
Painting
Sculpture
Paper folding
Working small
Working big
Collage
Mixed media
Brief
For this assignment there are a choice of three assignment titles that I can develop for this themed project. The university has deliberately made the themes expansive and open so I can interpret them in many ways. These three theme titles are:
A Place
Imagination
The Word
Brainstorming
To begin I read the brief for each of the named projects and decided I didn’t want to do ‘The Word’ project as I felt it led me to a more graphical approach and this is not my speciality. Therefore, this left ‘A Place’ and ‘Imagination’ to decide between. To help me decide on the one that appealed most I created brainstorms for each topic. These can be seen below.
‘Imagination’ brainstorm
Fig. 1 Imagination Brainstorm (2024)
‘A place’ brainstorm
Fig. 2 A Place Brainstorm (2024)
Generating ideas, concepts and images.
After creating these maps, I reviewed my past work with my instructor and explored the possibilities shown in the maps. In the session, I realised that my true fascination lay with the concept of imagination. In my mind map, I had listed John Tenniel and I thought to myself what could be more inspiring than John Tenniel’s enchanting illustrations of “Alice in Wonderland” and the dreamlike story itself, penned by Lewis Carroll and first published in 1865?
Also, after some research, I discovered that all works produced during Lewis Carroll’s lifetime are copyright-free around the world. Although I had no intention of copying anyone’s artwork, I didn’t want to incur any legal problems by using their works as inspiration.
Reflecting on some of my work, I recognised that part of it may have been influenced by Alice in Wonderland. Here are some of these pieces.
Below is an exercise where I created illustrations based on Pareidolia.
Fig. 3 Flower characters (2023)
Below is a an illustration I created for an exercise in Illustration Sketchbooks called Interpretation and communication.
Below is a video of a zine I created made for a previous assignment in the unit Illustration Sketchbooks.
Desk research
To begin with I decided it would be best to read the book before looking at any previous artists works as I wanted to use my own imagination to picture each character. To do this I listened to the following audiobook and made notes while listening to it.
Notes
Fig. 7 Notes (2024)
Chapter One really appealed to me because I felt it set the scene for the whole story and established the atmosphere. It felt quite magical and surreal. When reading the chapter again, I highlighted parts that I thought would make for an interesting illustration.
Fig. 8 Down the Rabbit hole page 4 (2024)Fig. 9 Down the Rabbit hole page 5 (2024)
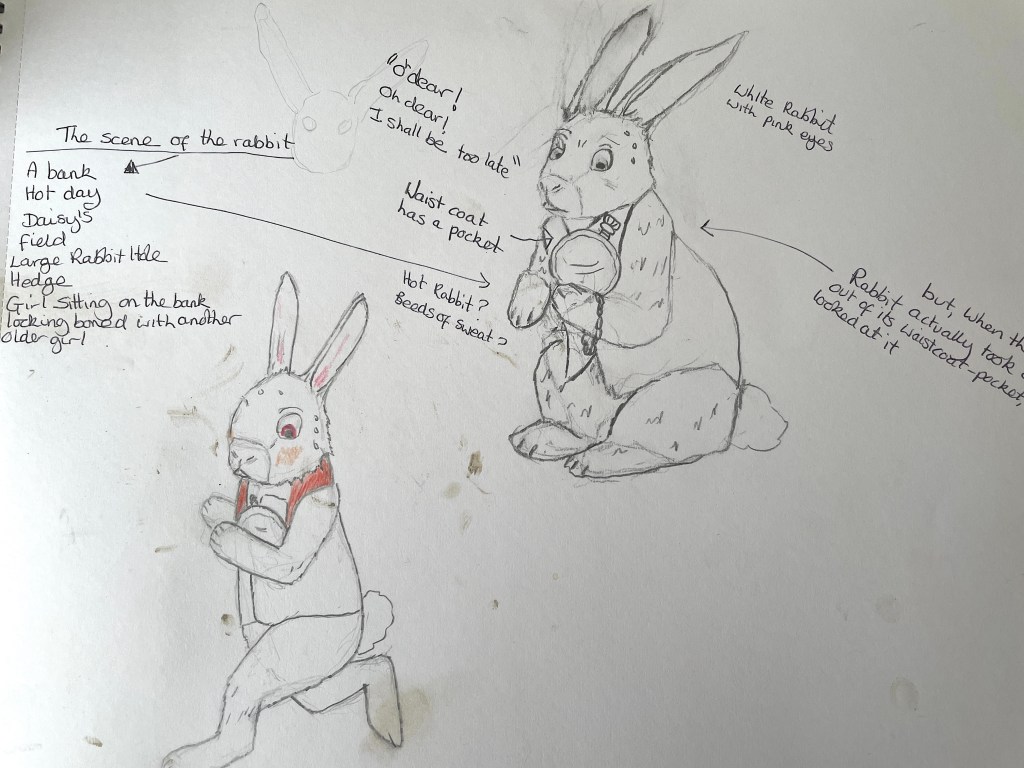
Next, I got out my sketchbook and began sketching out what I thought the white rabbit looked like in my imagination.
Fig. 10 Sketch of white rabbit (2024)
Before continuing I thought it was time to look at other artists work for inspiration.
Multiple artists have created illustrations for Alice in Wonderland, each with their own unique artistic expression. However, I wanted to create something distinctive. Researching, I was inspired by the following artists: Annie Montgomerie, Mary Rose Young, Tenniel, and Rackham.
Annie Montgomerie’s anthropomorphic animal figures are particularly unusual and lifelike. Each figure has its own intriguing story and particular appeal, conveying a sense of nostalgia, uniqueness, and cuteness. Each doll is constructed from vintage items such as broaches, children’s shoes, jewellery, and buttons. Below are some examples. My personal favourites are the chimpanzees as they are my favourite animal.
Fig. 11 anthropomorphic animal figures (2024)
Fig. 12 anthropomorphic sheep (2024)
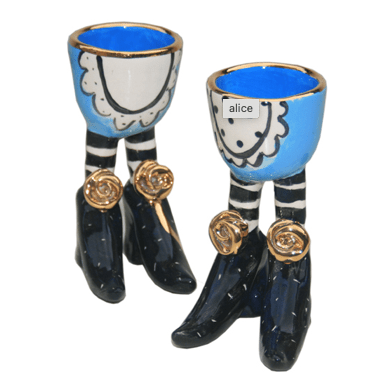
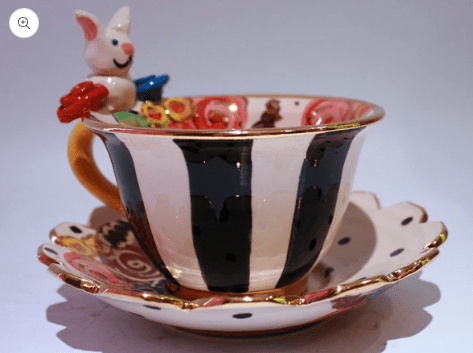
Mary Rose Young is a local artist in the Forest of Dean that I once worked for when I was sixteen, employed to paint designs onto her pottery. However, researching her lately, I discovered she has since made some new designs that are inspired by Alice in Wonderland. What I like about them is their bold colours and whimsical patterns that capture the imagination.
Below are some examples.
Fig. 13 Mary Rose egg cups (2024)
Fig.14 Mary Rose Alice Teacup (2024)Fig. 15 Mary Rose Alice teapot (2024)
Last but not least, I could not leave out the old illustration masters such as Tenniel and Rackham. Their illustrations continue to be timeless and influential in the world of art and literature. Their work has inspired countless artists and continues to captivate audiences of all ages.
Below are some examples.
John Tenniel
Arthur Rackham
Visual research in the world
Through my research, I discovered that the character Alice is based on a real person named Alice Pleasance Liddell.
Wanting to learn more about what inspired the story, I did more research and discovered that the author of Alice in Wonderland, Charles Lutwidge Dodson (pen name Lewis Carroll), moved to Oxford and enrolled at Christ Church College, where he studied mathematics while also living in the city. Lewis Carroll became friends with Henry Liddell, the Dean of Christ Church College, and all three of his daughters when he was studying there. Lewis entertained the girls with stories, and Alice Liddell encouraged Lewis to write down one of them, resulting in the well-known story Alice in Wonderland.
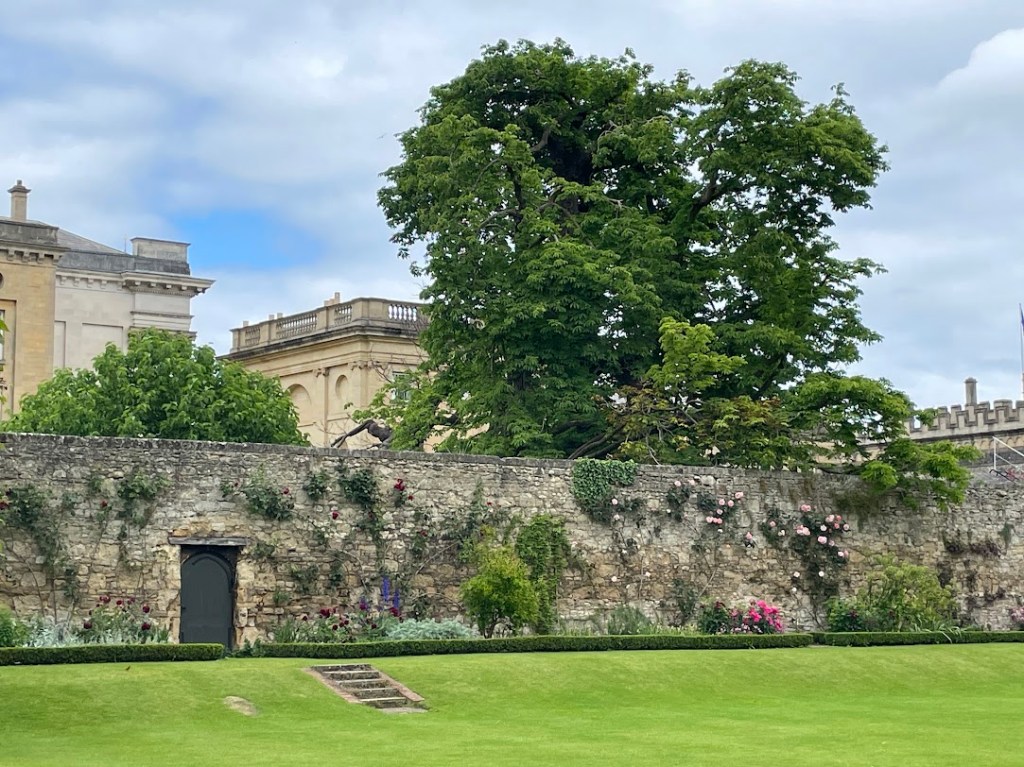
After researching online and reading the story, I wanted to discover what inspired Lewis Carroll. Therefore, I planned a day trip to Oxford with my husband to see the sights that inspired his magical story. As I went over the college grounds and toured the city, I could almost envision the author himself telling wonderful stories to the Liddell sisters. It was a fantastic day that brought the famous narrative to life in a completely new way.
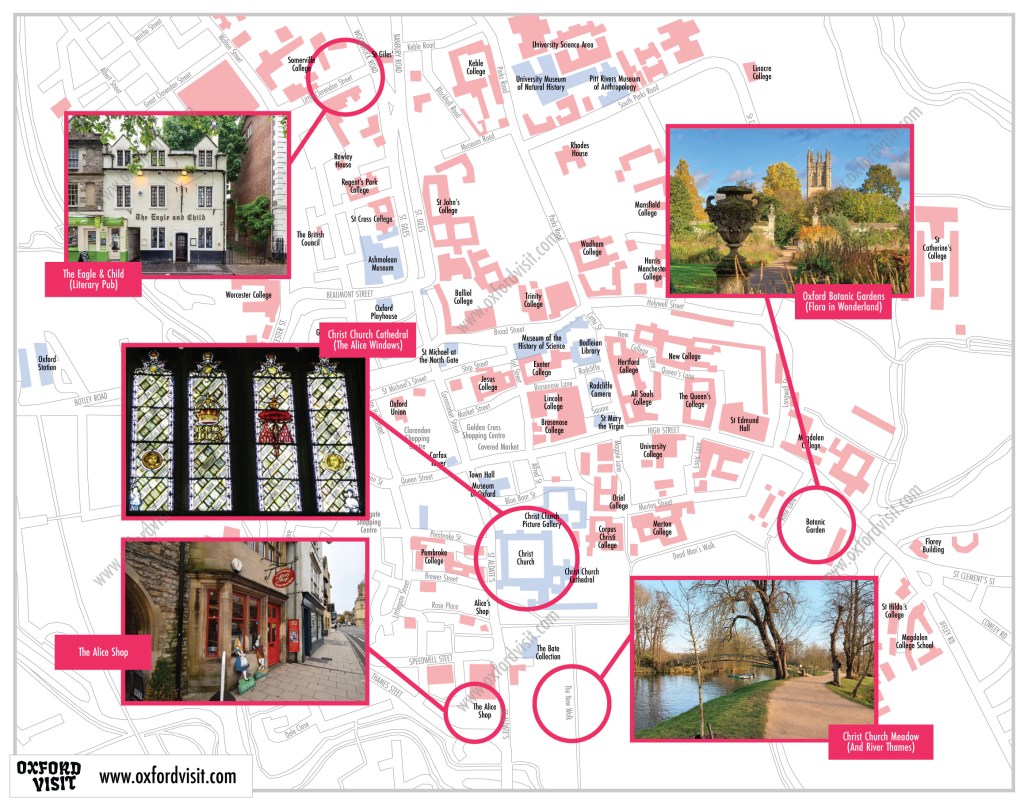
Below is a map I downloaded from the internet to follow on the excursion.
Fig. 16 OxfordMap (2024)
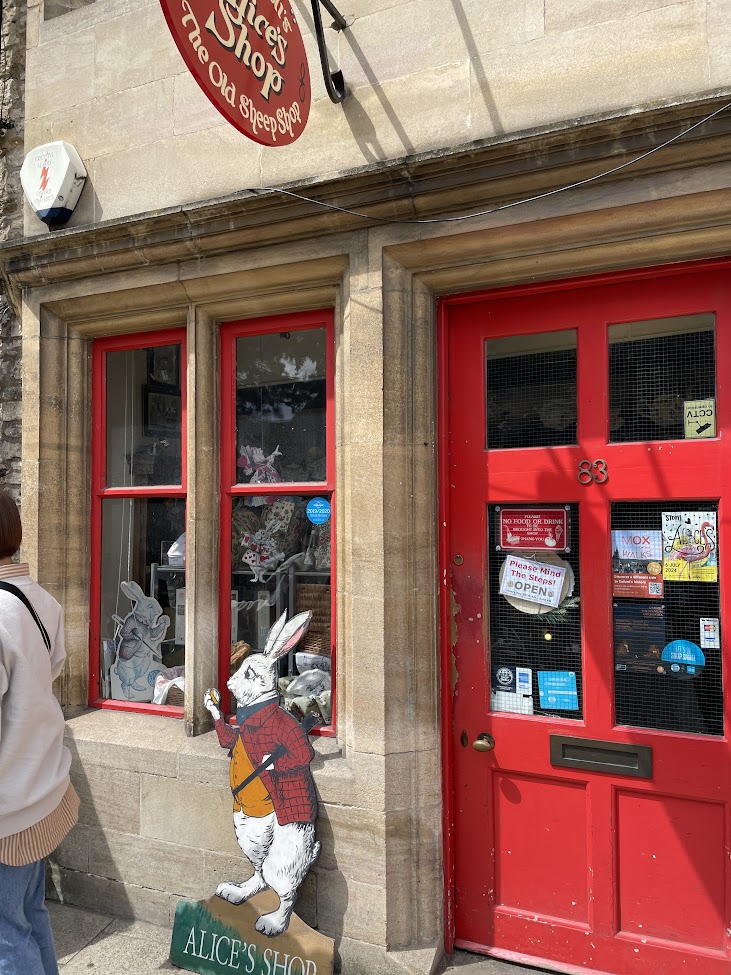
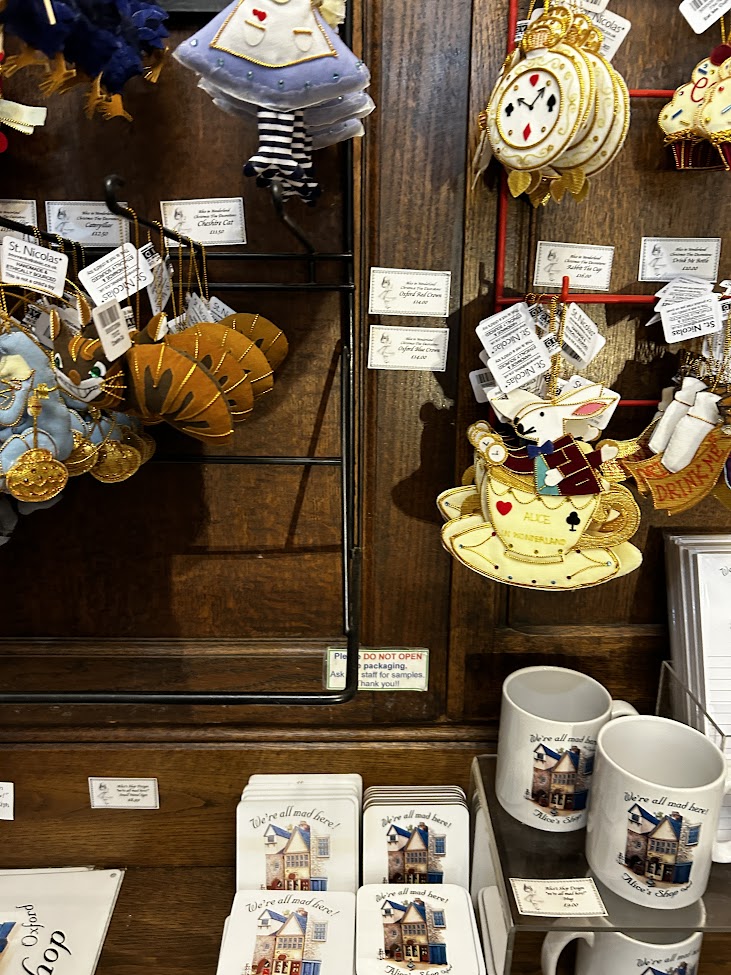
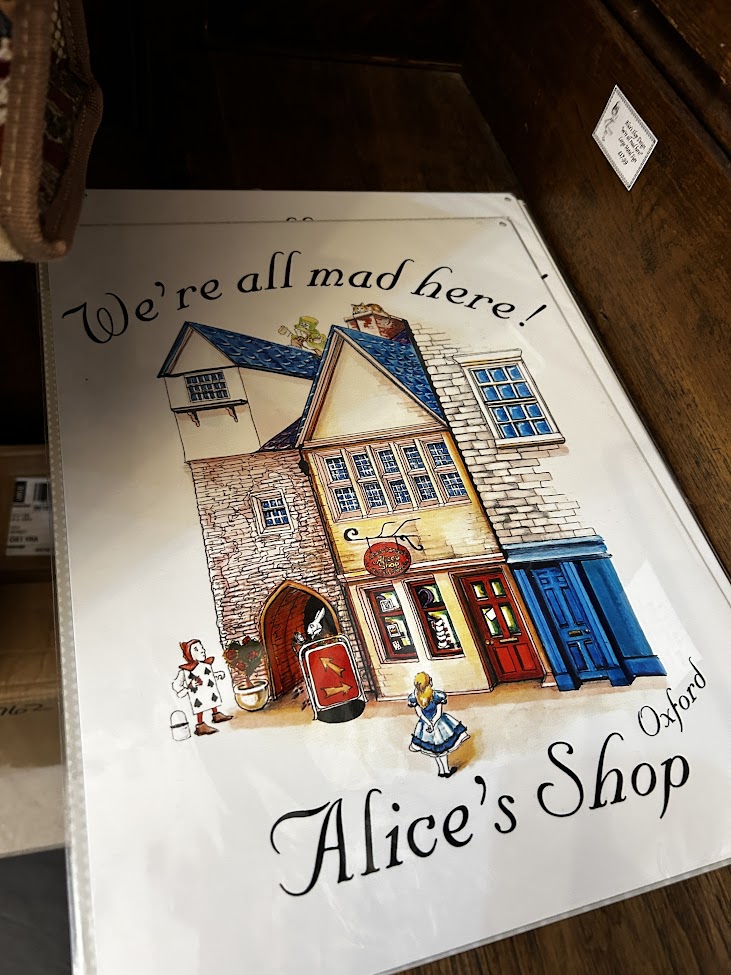
To start the strip we visited Alices shop this used to be Alice Liddell’s local sweet shop.
Fig. 17 Alices shop (2024)
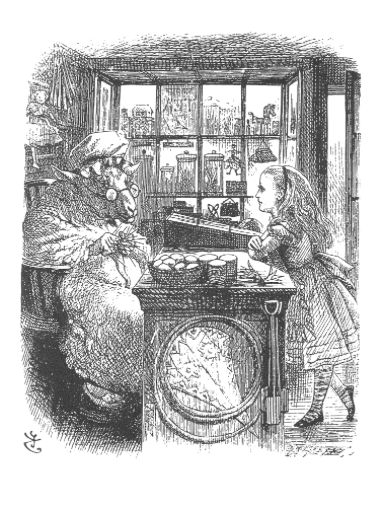
Illustrations of the interior of the shop also appeared in the book Through the looking glass.
Fig. 18 Pencil sketch of Alices shop (1871)
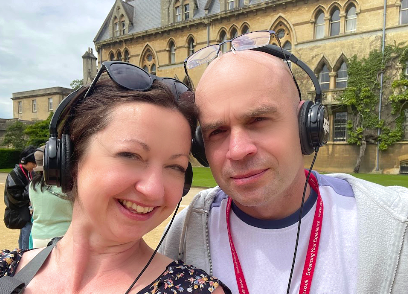
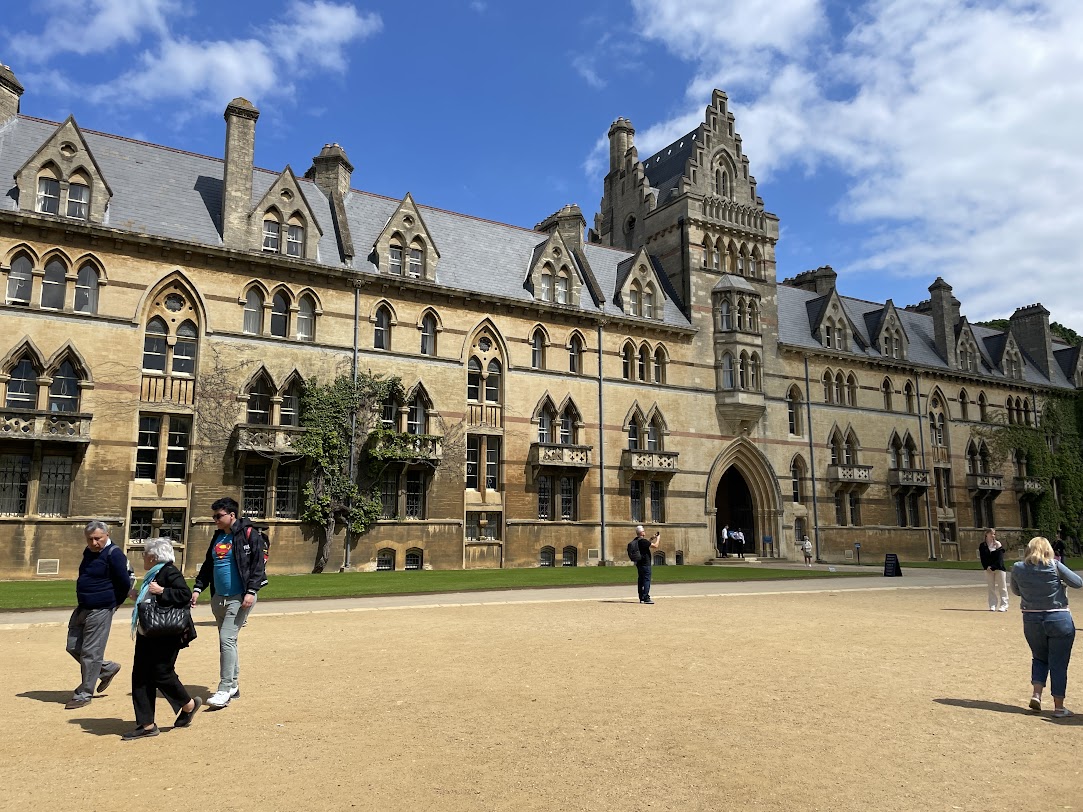
Opposite the shop is Christ Church College which we entered and paid to do an audible tour.
Fig.19 My Husband and I (2024)
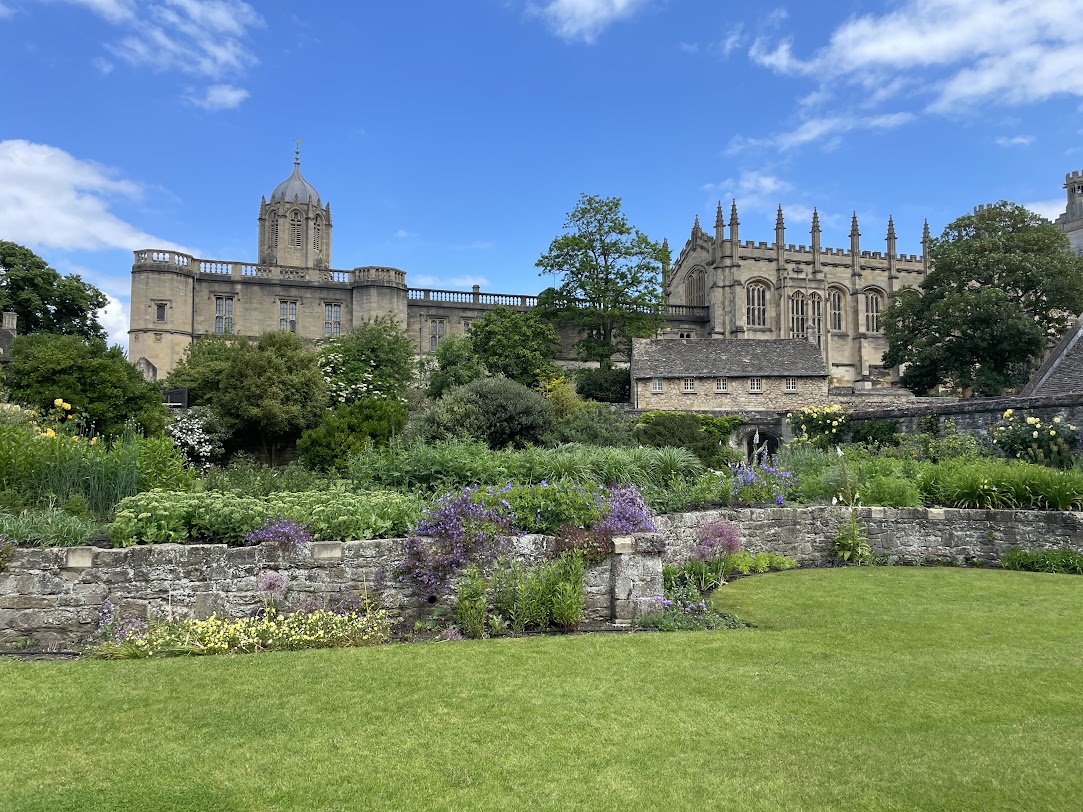
Below are exterior photographs of Christ Church College.
Fig. 20 Exterior photos of Christ Church (2024)
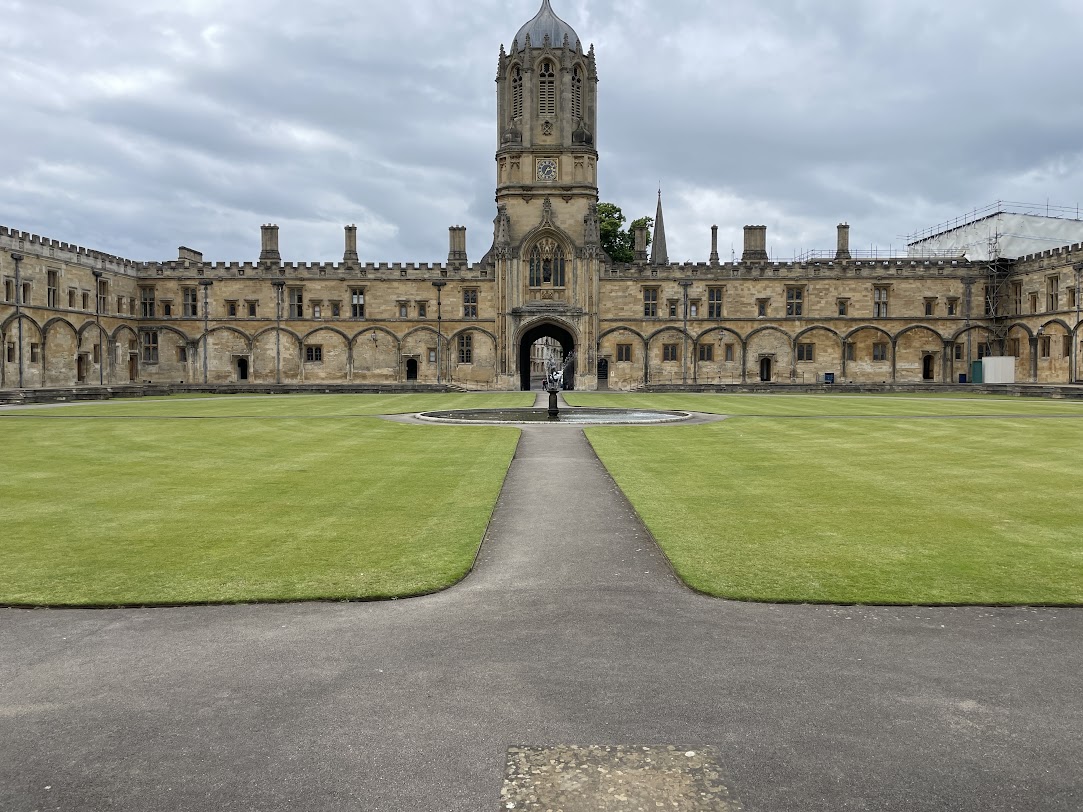
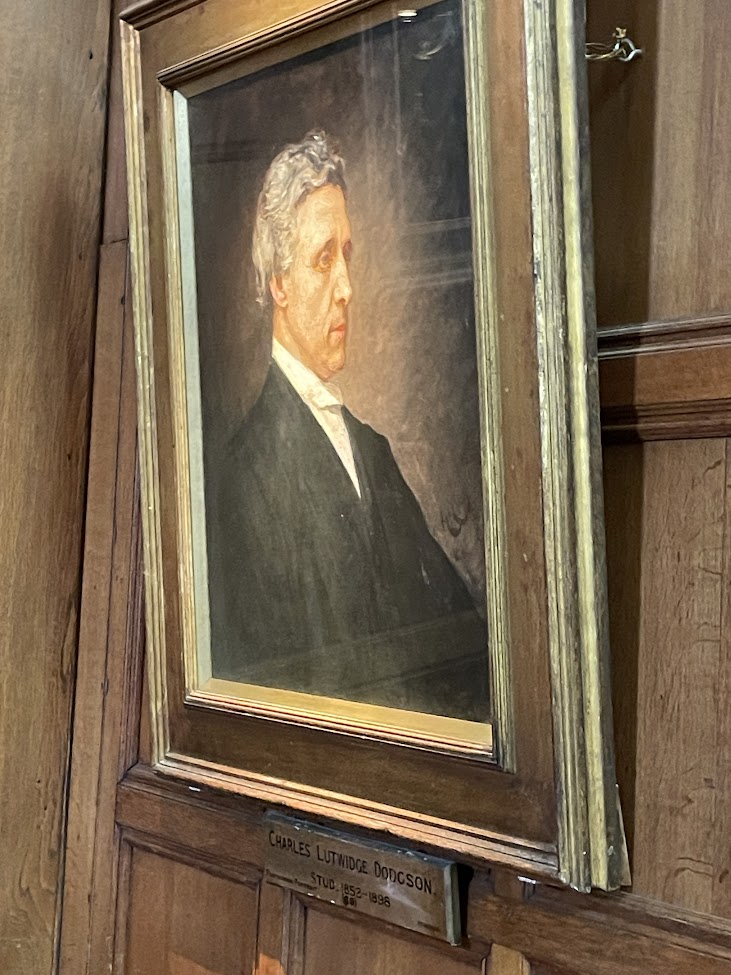
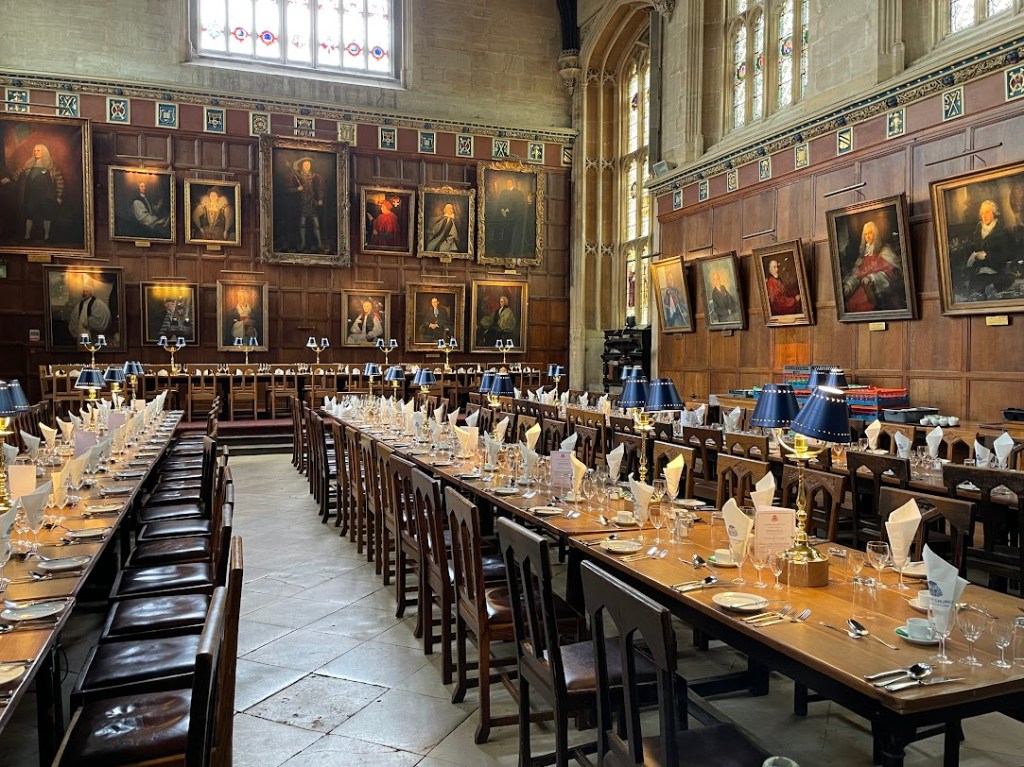
We then entered the interior of the building and visited the Great Hall, which is still used today by students for the meals. Hanging near the entrance to the hall was a painting of Lewis Carroll.
Fig. 21 Charles Lutwidge Dodgson (1899)
Whilst in the hall I pondered if the great hall with its long magnificent tables may have influenced Lewis’s imagination with the Mad Hatters Tea party?
Fig. 22 The Great Hall (2024)
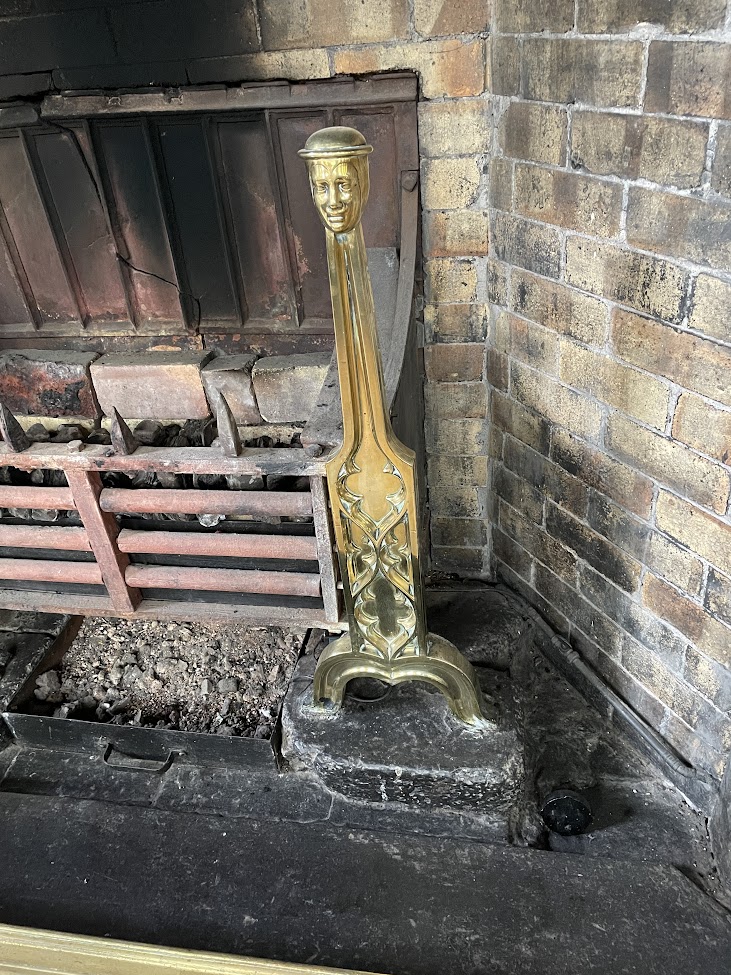
Halfway into the hall on the left hand-side was a fireplace, next to it sat brass andirons shaped like two ladies with long necks. I would imagine this inspired Lewis’s writing when he wrote about Alice’s neck growing longer and longer when she eat the left part of a mushroom.
Fig. 23 andirons (2024)
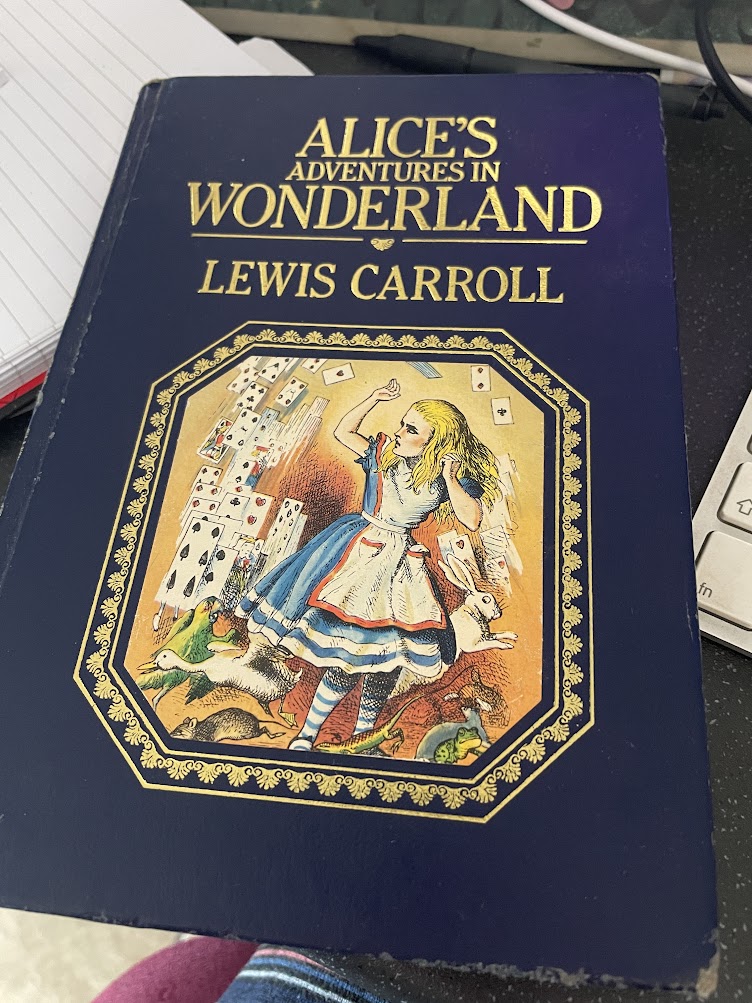
After visiting Oxford my son said “would you like to borrow my book?” I had forgotten I had given him Alice Adventures in Wonderland a few years ago. Pleasantly surprised the book contains both coloured and black and white illustrations by John Tenniel.
Fig. 23 The pool of tears (1982)Fig. 23 Front Cover(1982)
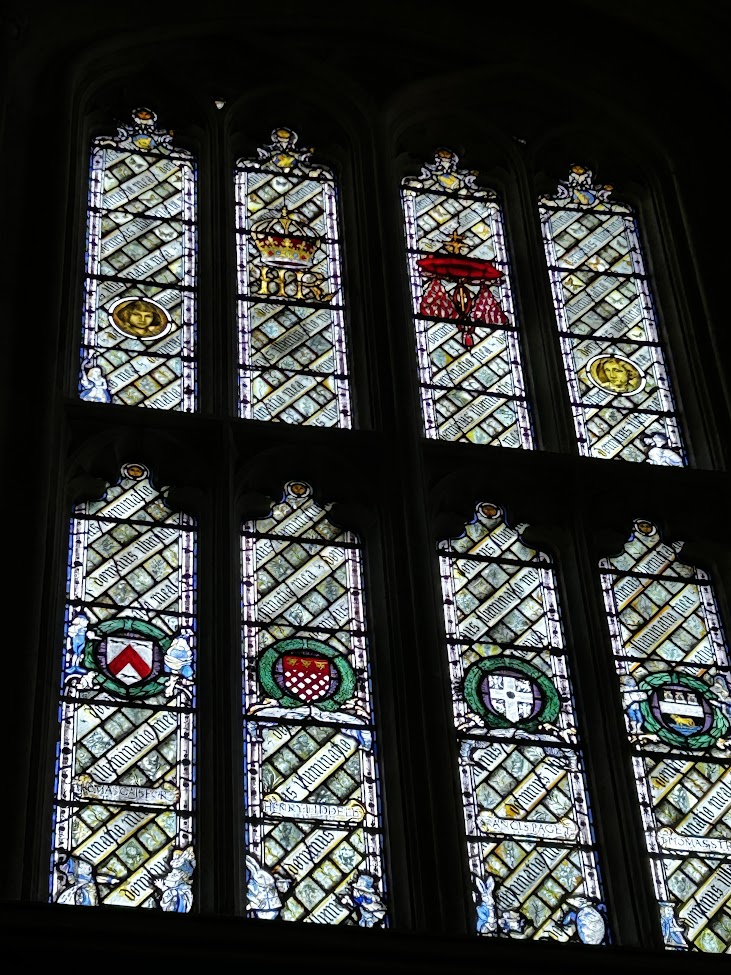
Above the fireplace in the Grand Hall is a stained glass window that features characters from the book including a portrait of the real Alice. You will have to look carefully to see each character. This window was added to the college in the 1920’s to celebrate Carroll.
Fig.24 Stained Glass Window (2024)
Next, we moved on to the adjacent cathedral and I asked a tour guide if the cathedral had any significant influence on the story. Pleasantly surprised the man showed me to the garden of which was a small door. This was the door that Lewis Carroll used as inspiration for in the book.
Fig. 25 Alice’s door (2024)
“A little door about fifteen inches high: she tried the little golden key in the lock, and to her great delight it fitted! … she knelt down and looked along the passage into the loveliest garden you ever saw.”
(Carroll, 1982)
The tree behind the wall is also considered to feature in the book when Alice meets the disappearing Cheshire Cat.
This Leeds me to my favourite inspiration that Lewis used and it is hidden well. Situated within the Cathedral high up on one of the pillars was an engraving which looks very familiar could this be the Cheshire Cat inspiration?
Fig. 25 Cat (2024)
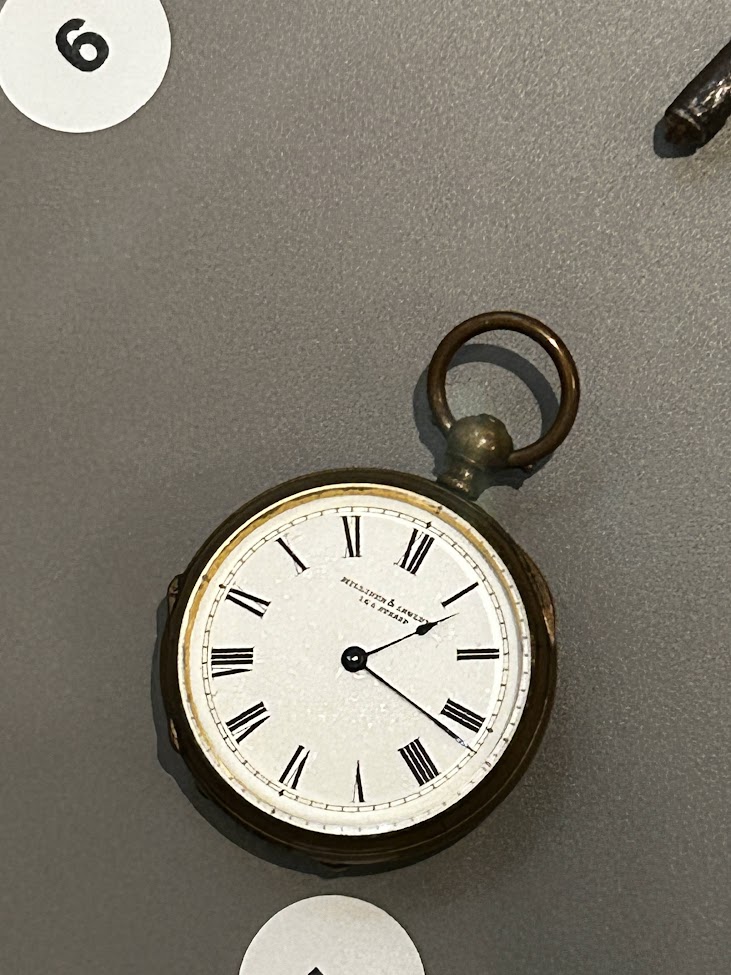
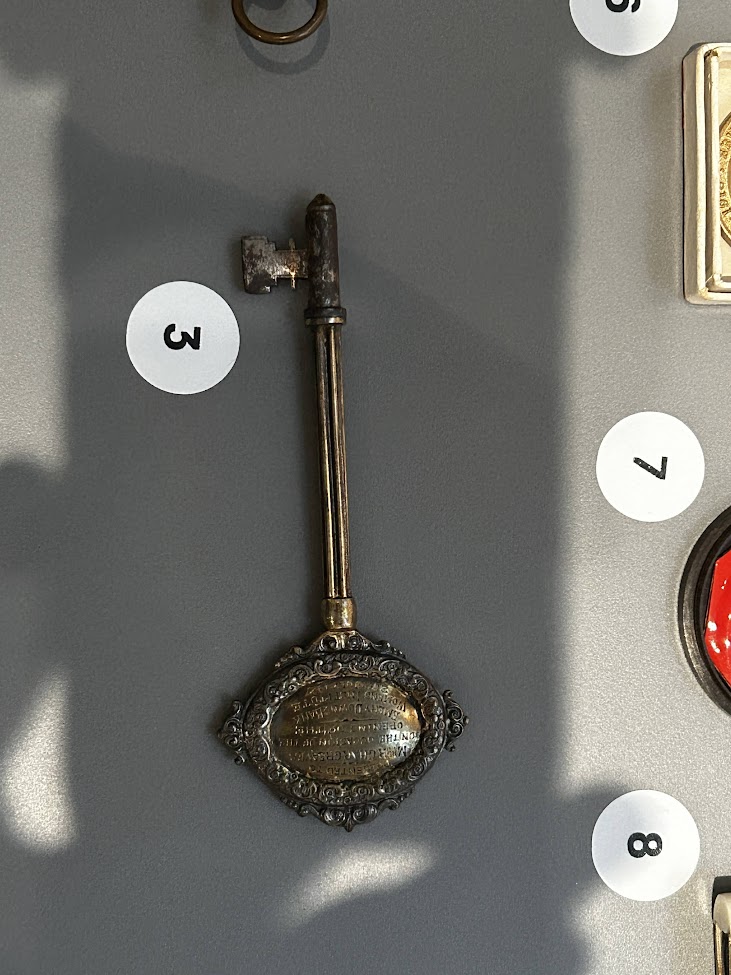
Next, we went to the Oxford Museum near Christ Church Cathedral and discovered artefacts belonging to Alice Liddell. These were a key presented to Alice at the opening of the Emery Down and Bank Women’s institute, Lewis Carroll’s pocket watch and Alice’s pocket watch.
Fig. 26 Pocket Watch (2024)
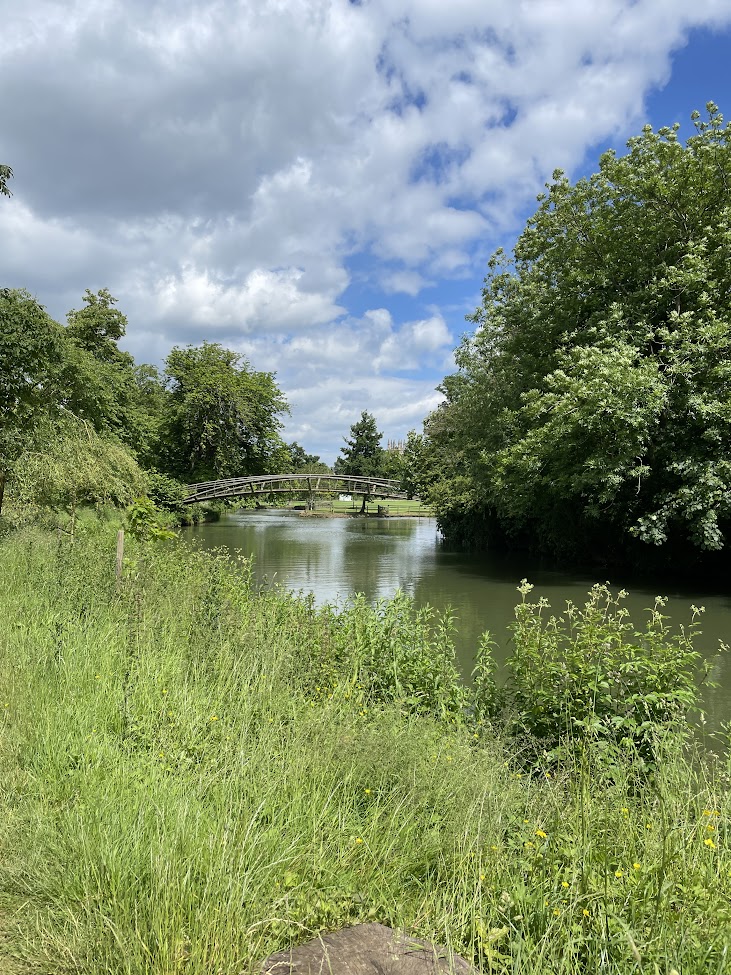
Finally, we attempted to visit the botanical gardens, which Lewis Carroll would frequently visit with Alice, but they were closed. However, we did walk along the river and see where Carroll used to take the three daughters on boat rides and tell them stories.
Fig. 27 Bridge (2024)
Visiting Oxford and seeing the influential elements that Lewis Carroll drew upon for his story have been worth seeing and have inspired my own imagination. I am eager to explore different visual interpretations of my own work and see how they compare to the original source material.
Making
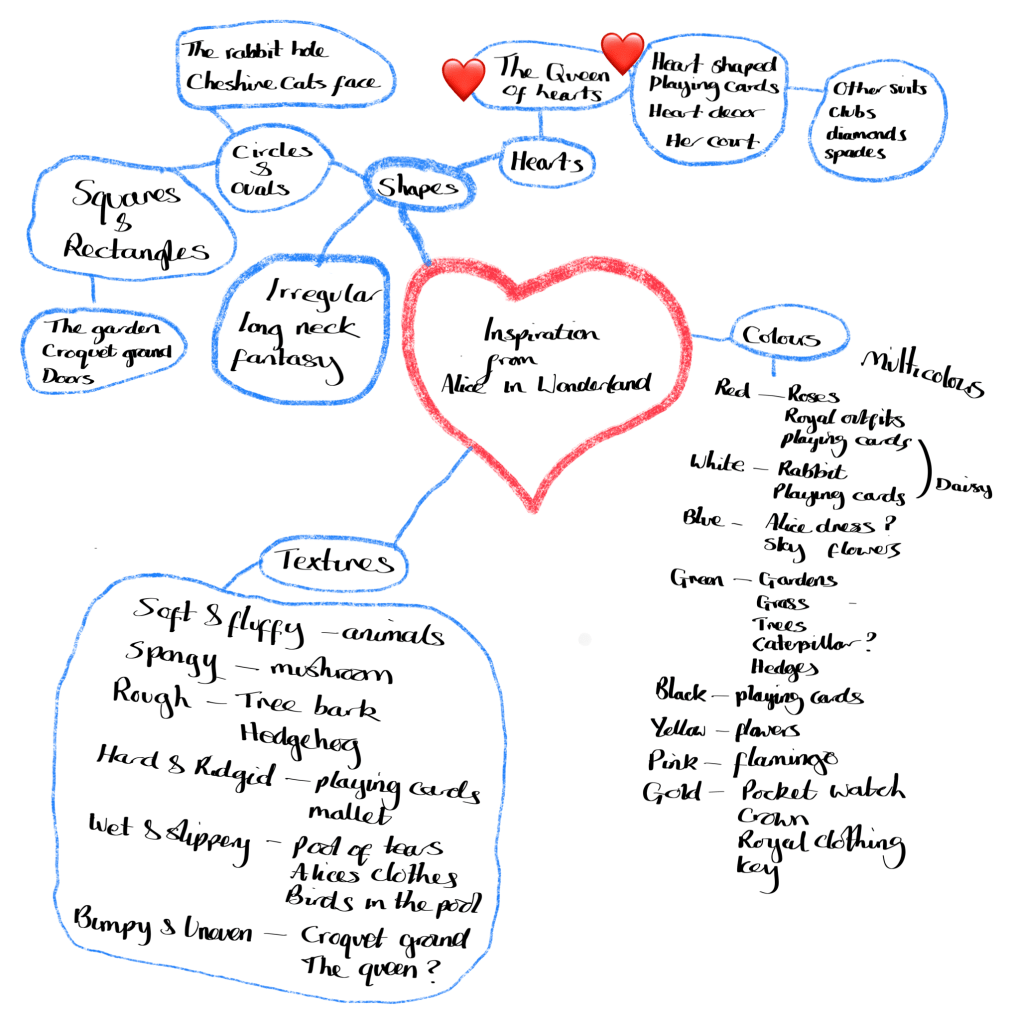
Looking back at my sketchbook of the rabbit I drew, and refreshing my recollection of the artists I had studied, I decided to try to create something unique. To do this, I began compiling a list of everything that had inspired me, from colours to shapes to textures, and considered how I could combine them in new and unique ways.
Fig. 28 Inspiration notes (2024)
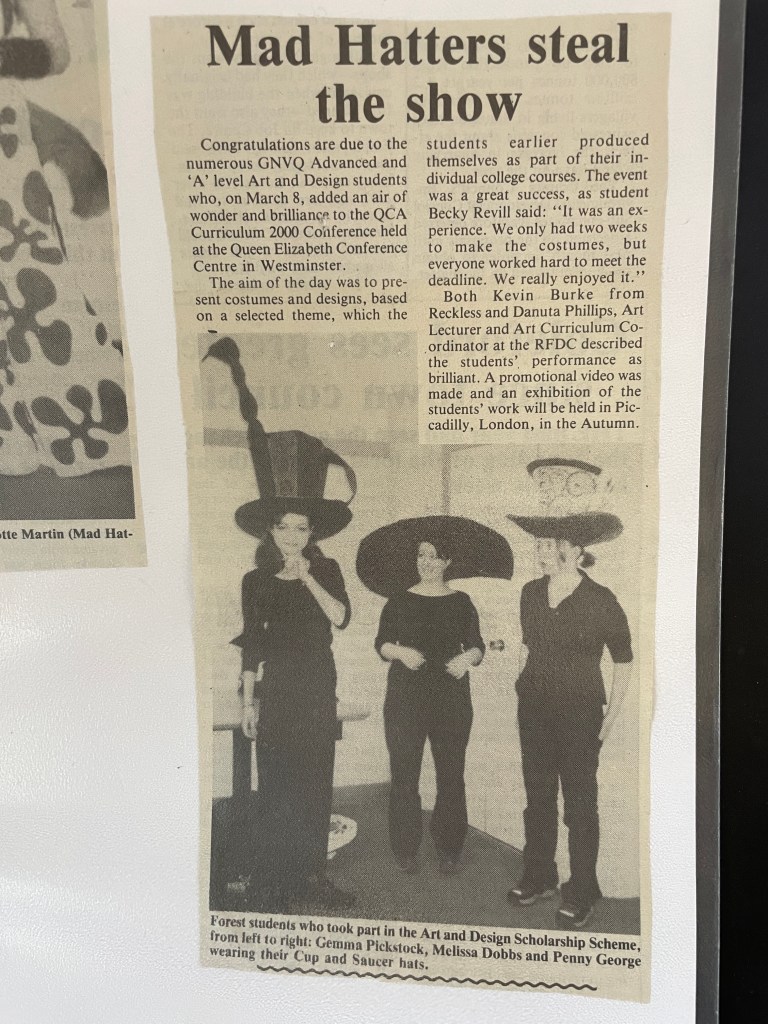
Looking back over my sketchbook at the rabbit I drew and refreshing my memory of the artists I had studied, I decided to try to create something new. To achieve this, I made a list of my inspirations, including colours, forms, and textures, and brainstormed ideas. After, I also thought about designs for the Mad Hatter’s hat, which reminded me of a project I worked on in college when I was sixteen. This was to make a hat for the Mad Hatter’s Tea Party.
Fig. 29 Newspaper clipping (2000)
Could I expand on this notion now? Other ideas were the Cheshire Cat’s fading smile and tail, the Queen of Hearts’ fondness of red flowers, the talking caterpillar, the card soldiers, and Alice frequently changing sizes.
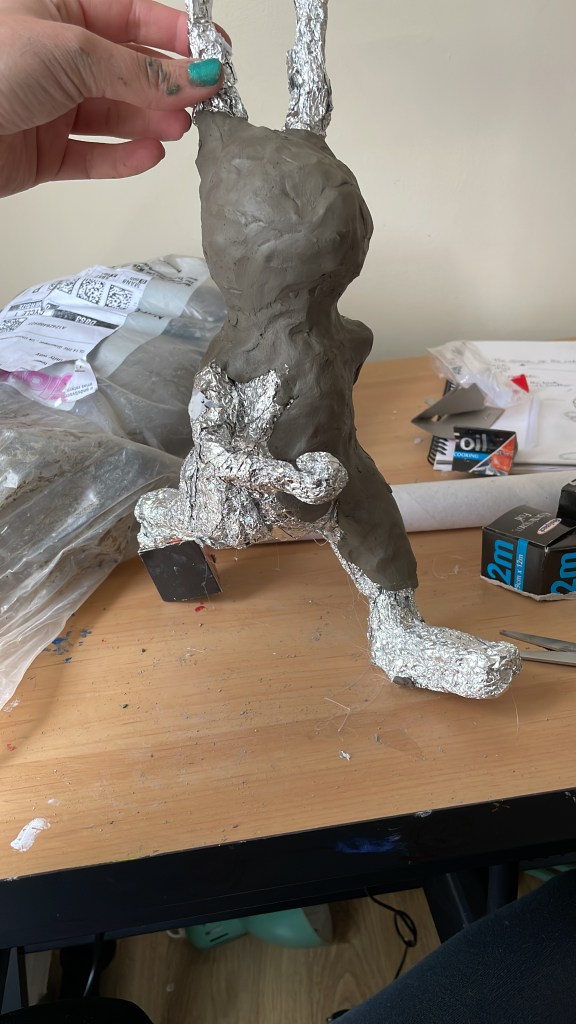
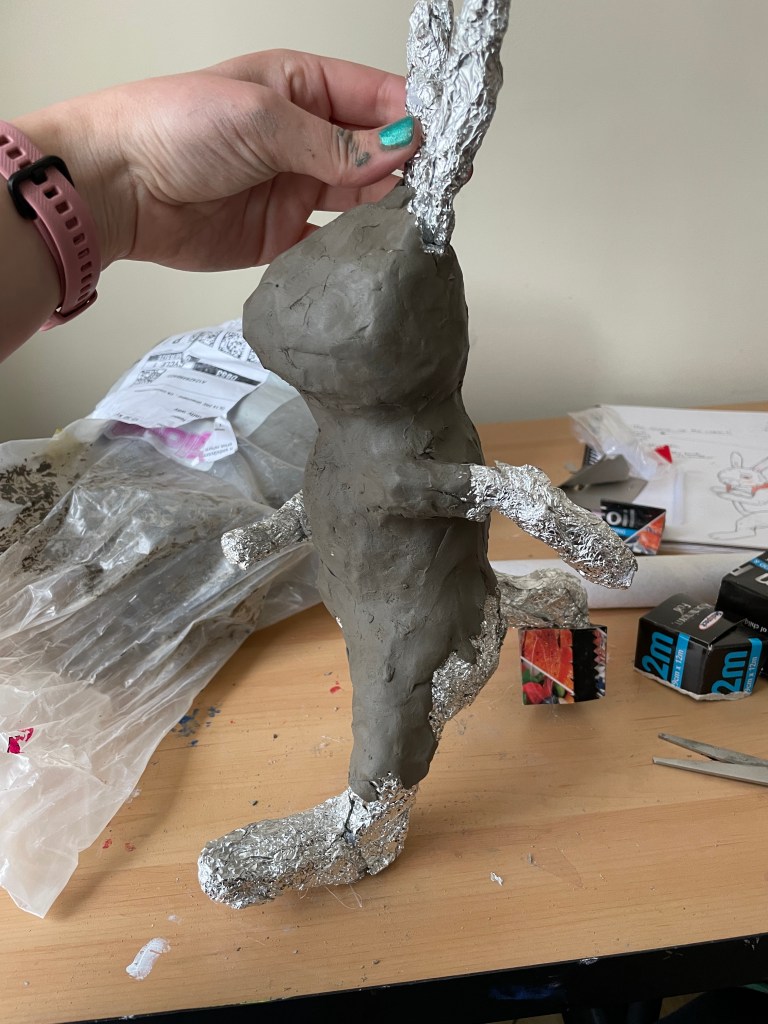
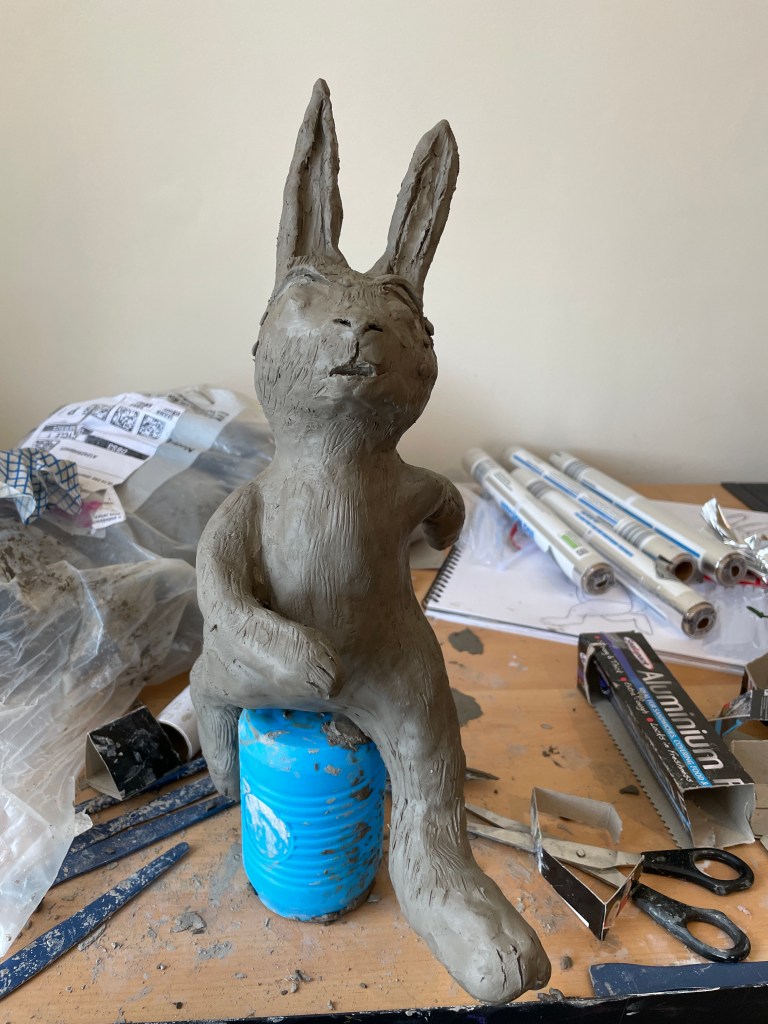
The first piece I created was what I imagined the white rabbit would look like, and I used my initial sketch as a reference. Thinking about the artist that I researched previously, I decided that I would create the character out of clay. I began by creating a foil frame that I then stuck the clay to and carefully sculpted the white rabbit.
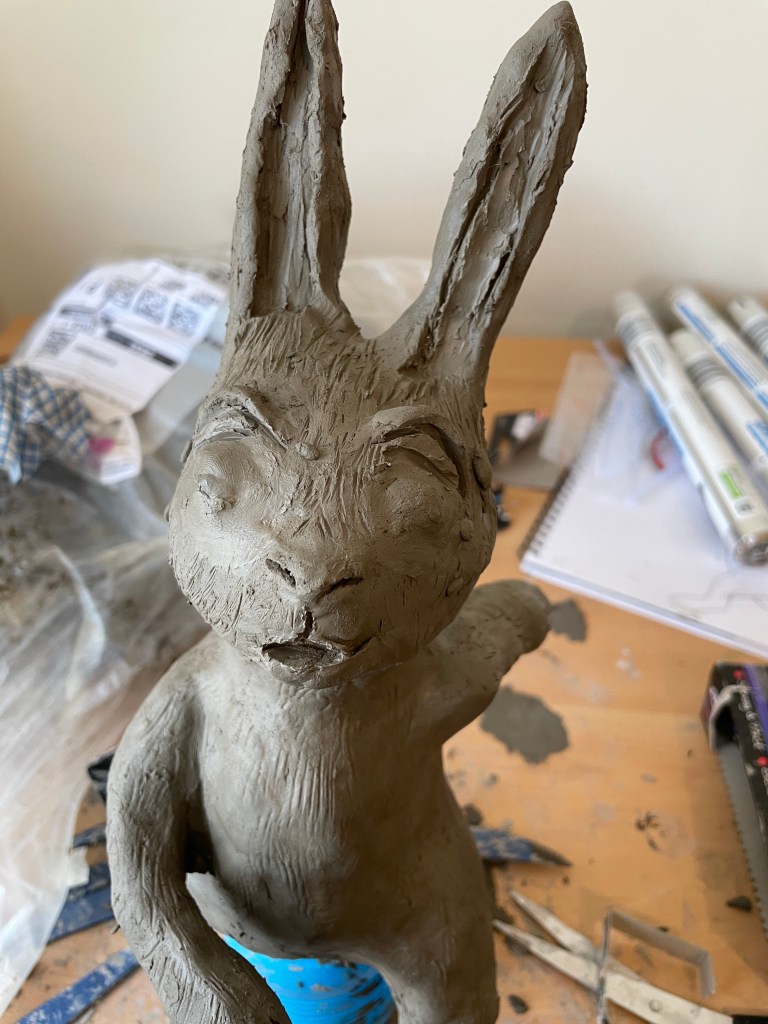
Fig. 29 Rabbit sculpture (2024)
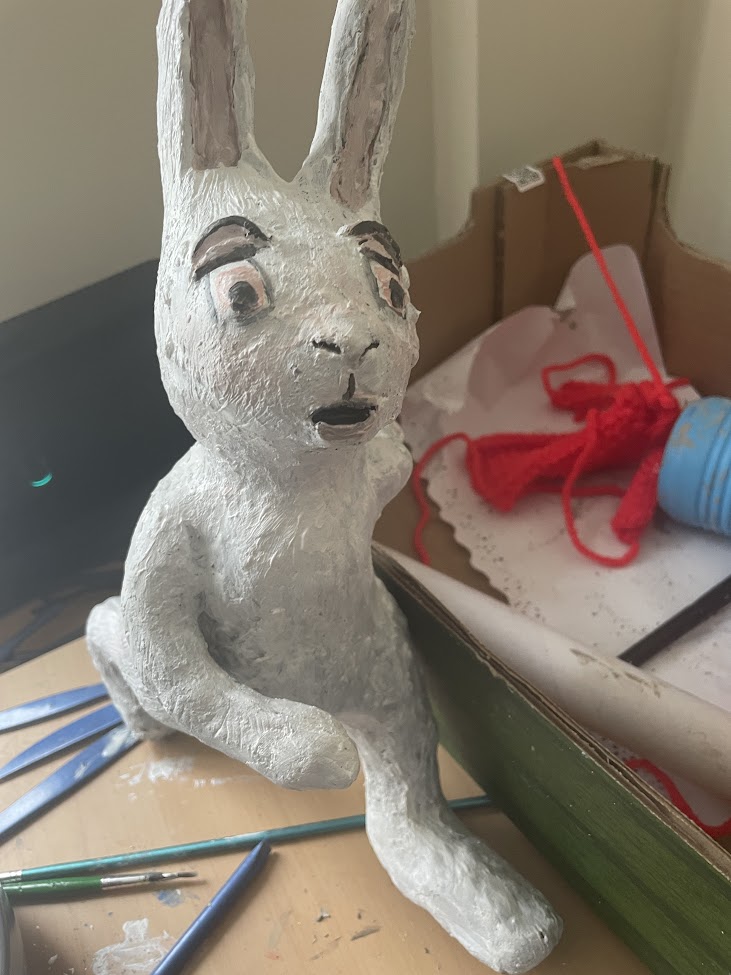
As I worked, I found myself immersed in the creative process. After the clay had dried and hardened, I was disappointed to see that it had numerous cracks. To try to mend it as best I could, I mixed PVA and clay slip and painted it over, filling the gaps. After the mixture had set and dried, I painted the rabbit white with a pink nose and black eyes.
Fig. 30 Painted rabbit sculpture (2024)
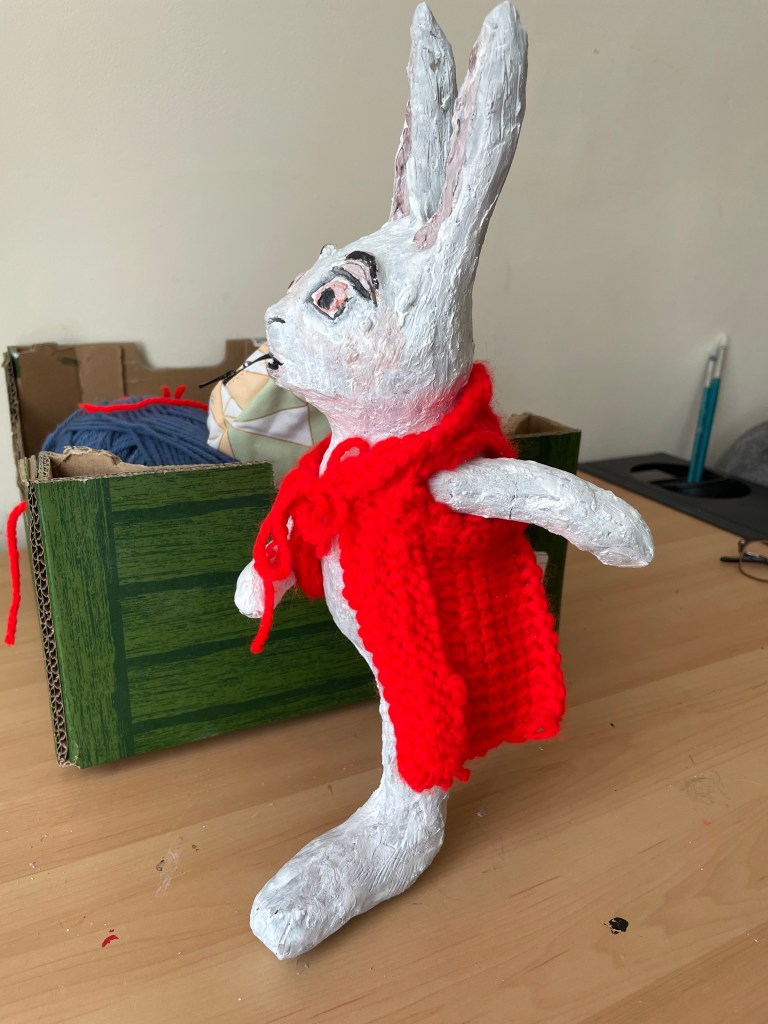
Thinking about the artist Annie Montgomerie’s animal creations and the garments they wear, I thought about doing something similar and making the rabbit’s waistcoat myself. I’ve had a secret desire to learn how to crochet. Never having tried before, I joined a social club at a cafe with a friend, where two older ladies taught me the basics of Tunisian crochet. For the majority of that hour, I had an empty needle and a knotted ball of wool, but by the end, I had managed to make a simple square. Using the newly acquired skills, I crocheted a waistcoat for the rabbit and attached my own pocket watch, which I purchased as a child.
Fig. 30 Finished rabbit sculpture (2024)
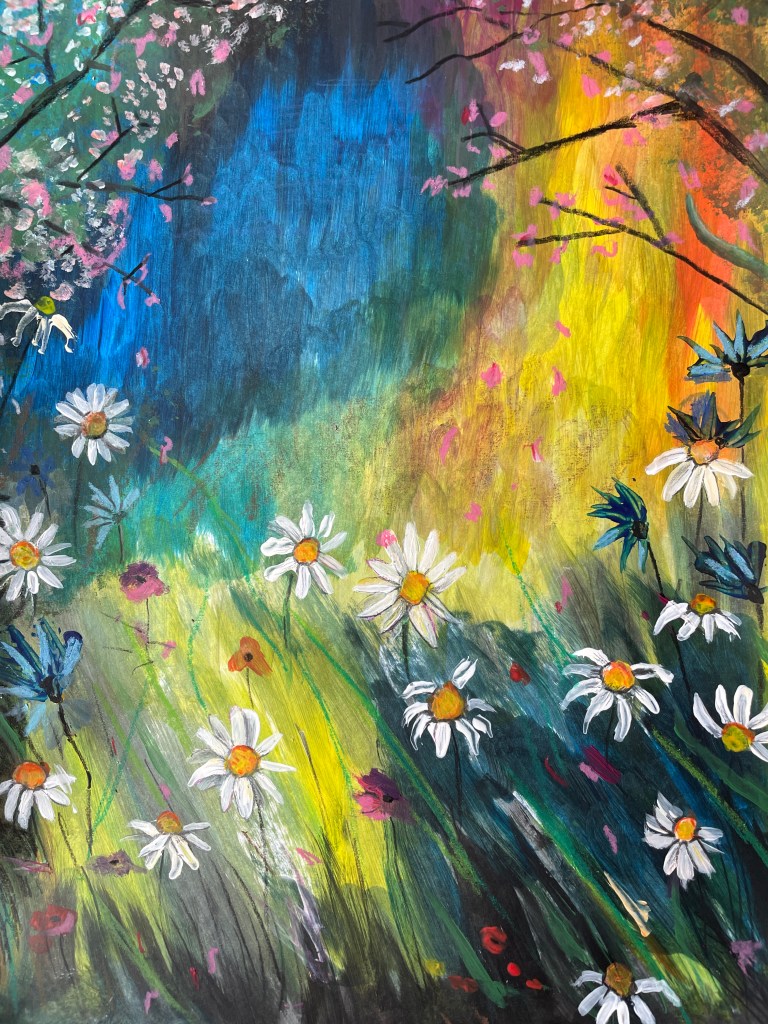
Next, I wanted to create a whimsical background for the rabbit, and I wanted it to feature daisies, which were described in the story. I decided to incorporate the daisies into a colourful backdrop using acrylic paint, using different shades of green, blue, and yellow and a small amount of pinks and reds for other flowers.
Fig. 31 Daisy Painting (2024)
Next, using Photoshop I combined the background and the rabbit and added some enhancements.
Finished artwork
Fig. 32 I’m late (2024)
Finally, I created a mockup of a book featuring a page from the story of Alice in Wonderland using my illustration.
Fig. 33 I’m late mock up (2024)
The outcome was as I had envisioned, which made me happy. Creating something colourful and unique that came from my imagination was incredibly satisfying; looking at the mockup brought my vision to life, made me happy, and made me feel it is possible to become a children’s book illustrator.
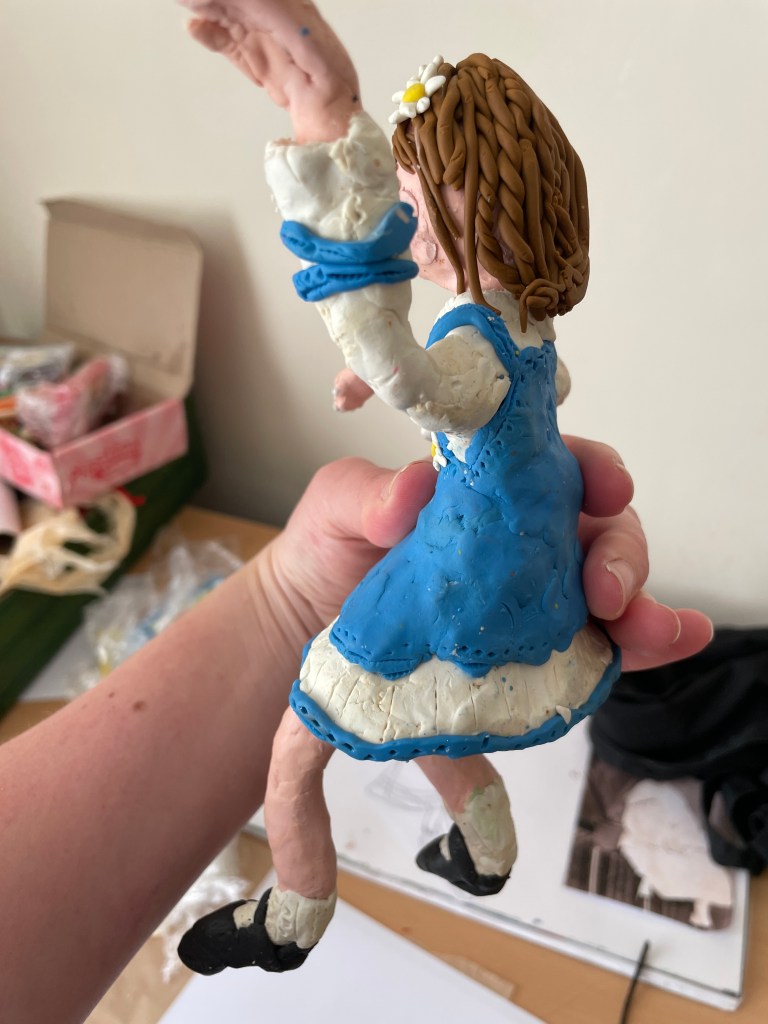
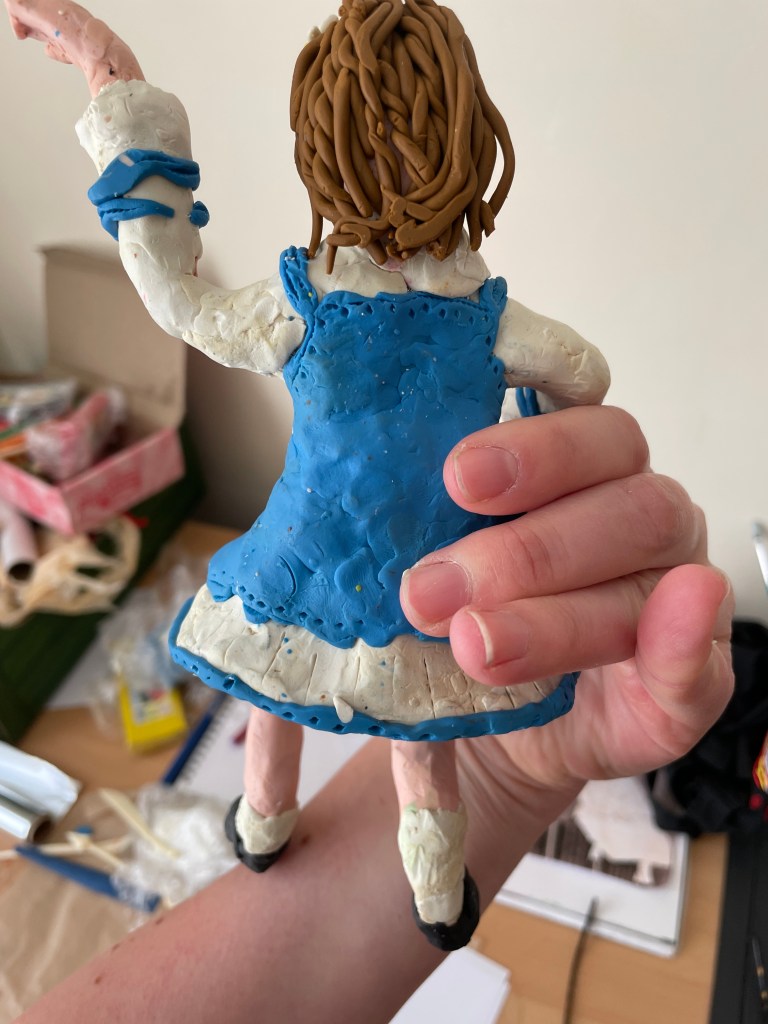
Wanting to explore the theme of Alice in Wonderland further, I decided to create my own interpretation of the character Alice. However, I wanted Alice to represent the real Alice Liddell, who had brown hair and eyes, not blond and blue eyed. To do this, I began exploring ideas in my sketchbook.
Fig. 33 Alice model ideas (2024)
Thinking of the scenes from the book, one of my favourites is when Alice falls down the continuous rabbit hole that features cubards, shelving, and books. As a child, I remember reading this chapter, and it really sparked my imagination, so I decided this would be my next project.
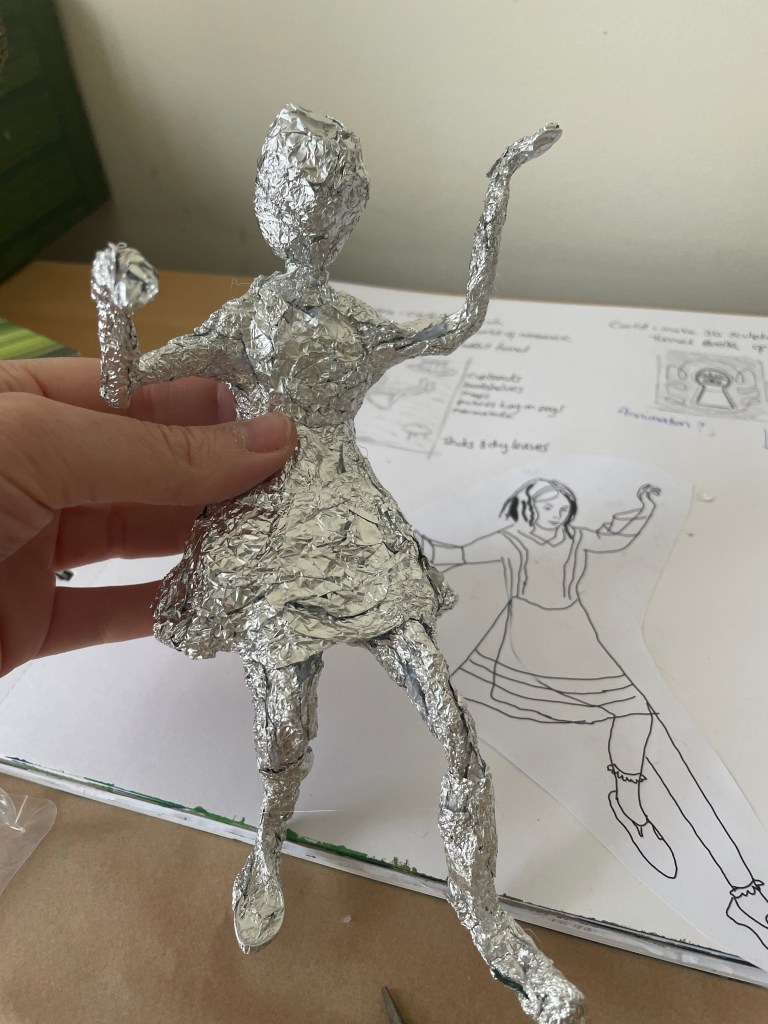
Again, I wanted to make it a unique illustration and decided to make Alice out of plactercine. Before starting, I drew many thumbnail sketches of possible compositions for the overall illustration.
Fig. 34 Thumbnails (2024)
From these thumbnail sketches I selected the one shown below.
Fig. 35 Chosen Thumbnails (2024)
Next, I began making a wire frame for the Alice sculpture using florist wire.
Fig. 36 Wire sculpture (2024)
Next, I began covering the wire with tin foil and creating the shape for Alice.
Fig. 37 Foil Sculpture (2024)
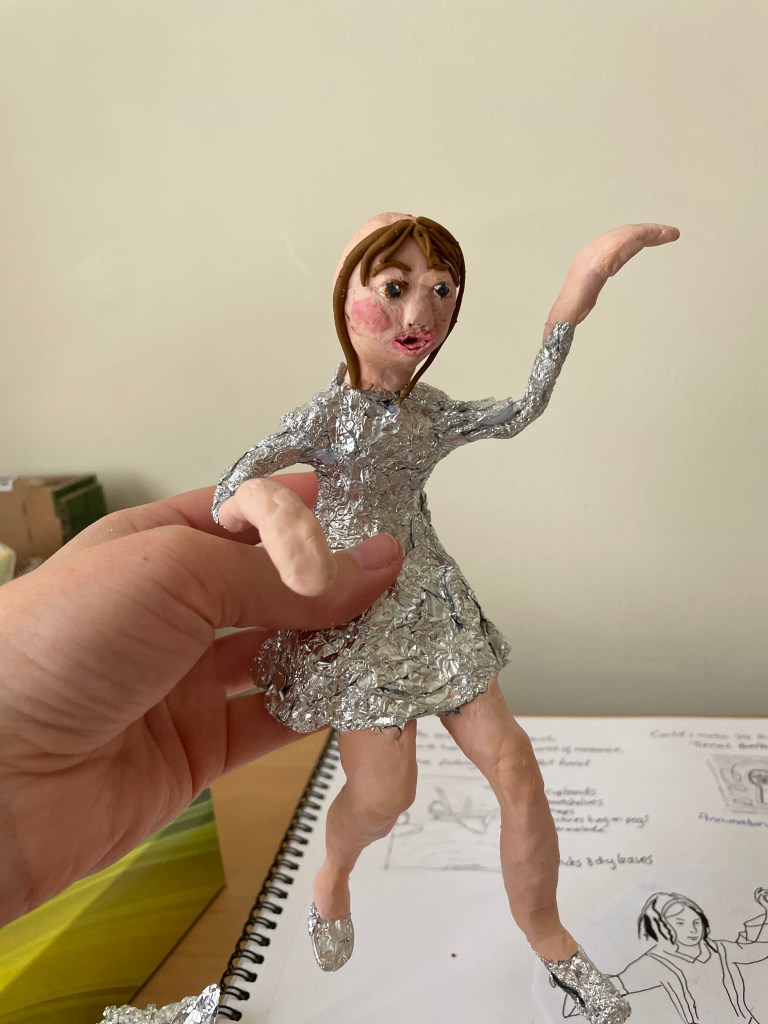
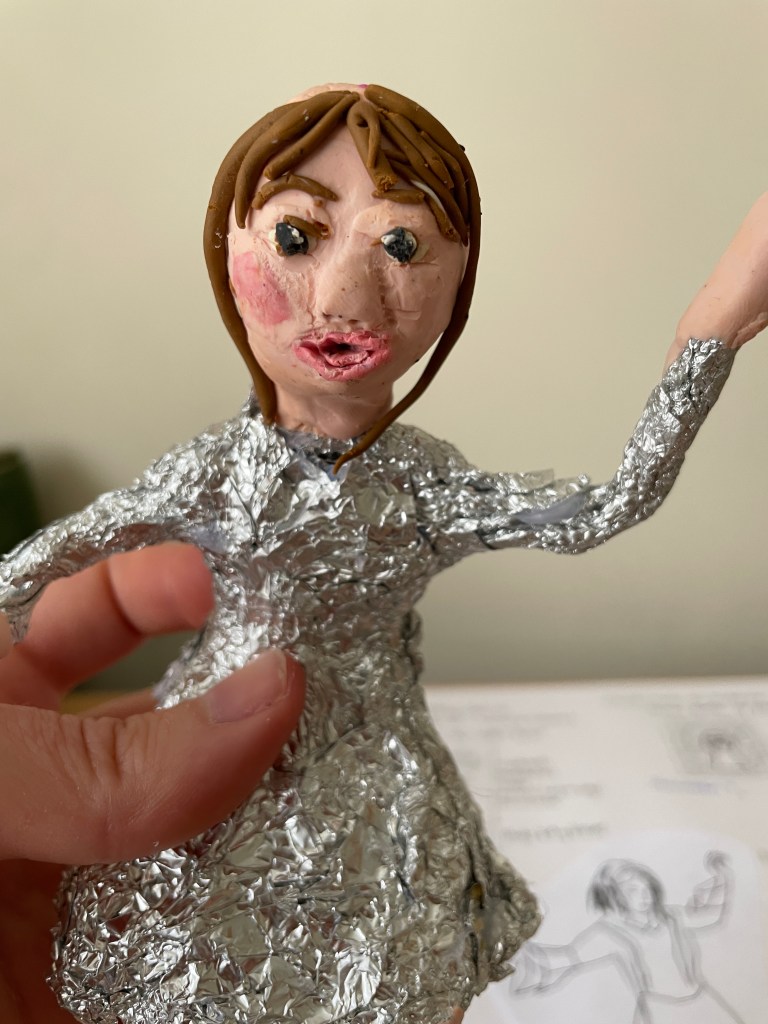
Once I was happy with the shape I began sculpting with the coloured plastercine.
Fig. 38 Plasticine modeling (2024)
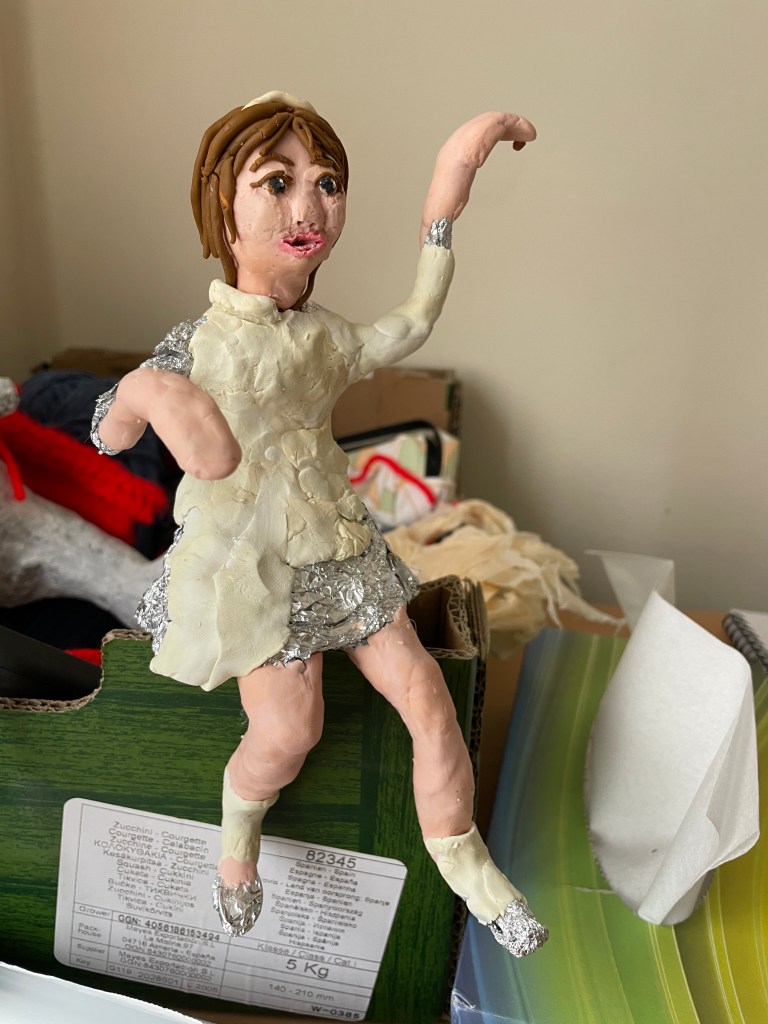
Below are images of Alice finished.
Fig. 39 Finished Alice model (2024)
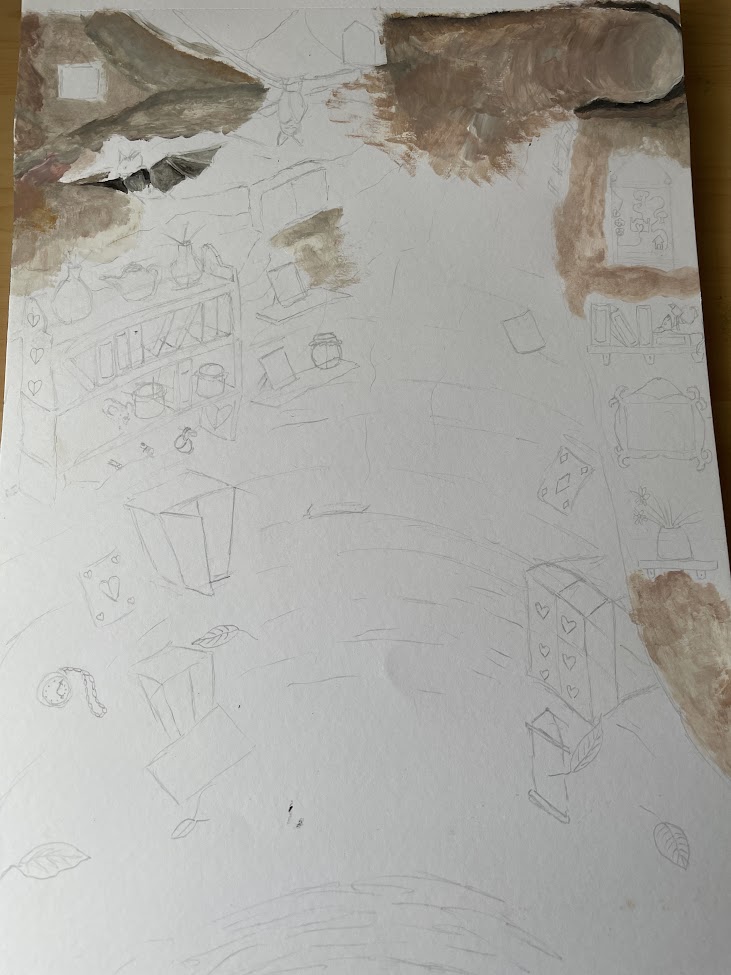
Next, I begain painting the background for the final illustration using Acrylic paints.
Fig. 40 Failed background (2024)
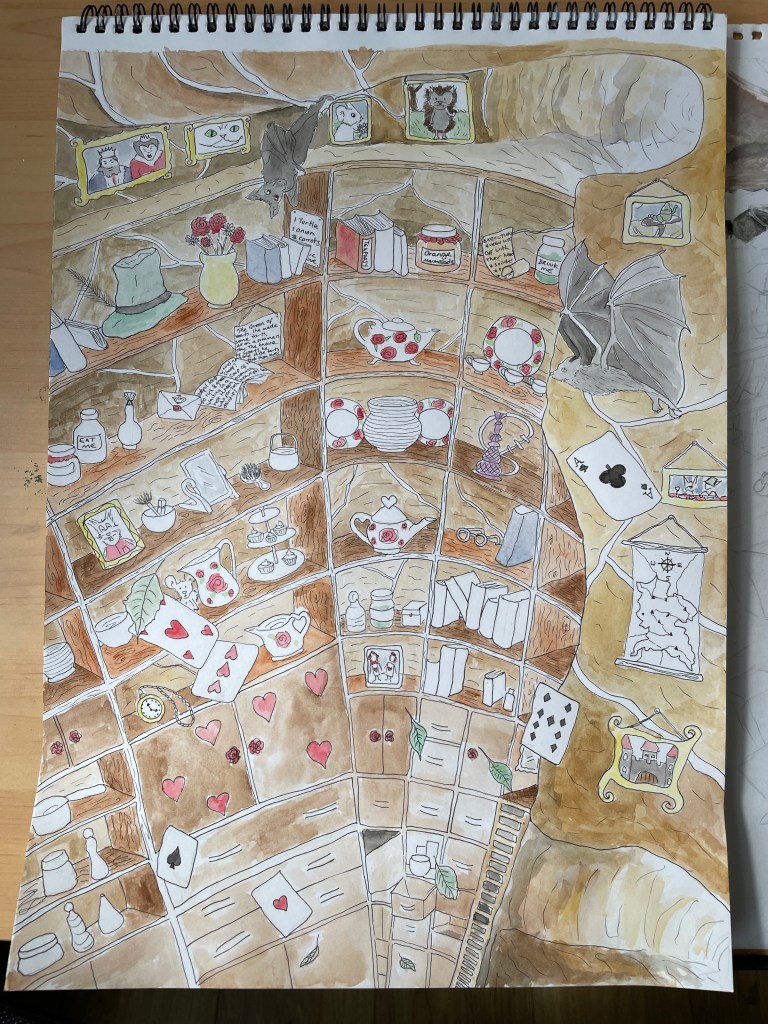
However, once I began, I realised it wasn’t the right medium for the task. There is a lot of detailed information I wanted to include in the illustration, and I felt acrylic paint would lose this aspect. Therefore, I began again, but this time using watercolour and black fine liner pens.
Fig. 41 Watercolour background (2024)
Previously, I had drawn a sketch of a rabbit, which I thought would look great running away through the passage. Below is the rabbit I sketched.
Fig. Mixed media white rabbit (2024)
Using Photoshop, I added the rabbit and made some enhancements to the background.
Fig. 43 Completed Background (2024)
Next, I added Alice to the scene with some shaddows.
Fig. 44 Completed Illustration (2024)
To finalise the illustration I made another mockup to see how it would look.
Fig. 45 Mockup of Alice falling down the well (2024)
After finishing this illustration, I then asked family and friends their opinions, and here are their statements.
“I’m finding it impossible to fault; it looks professional to me.”
“Excellent. You can use it to advertise.”
“Smart, first edition, please.”
“Looks good looking down the well.”
“That looks great, well done.”
Finally, my favourite comment! –
“Well done; it looks brilliant; she still has Botox lips though.”
After reading all these comments, I was very happy that I had such good feedback, as I wasn’t entirely sure if it worked. The positive feedback from family and friends reassured me that my illustration was well-received and effective. It gave me confidence in my work and motivation to continue creating further work.
This assignment has been really enjoyable and one that I could continue as I have so many other ideas for scenes in the book. It has been enjoyable to explore ideas from my own imagination.
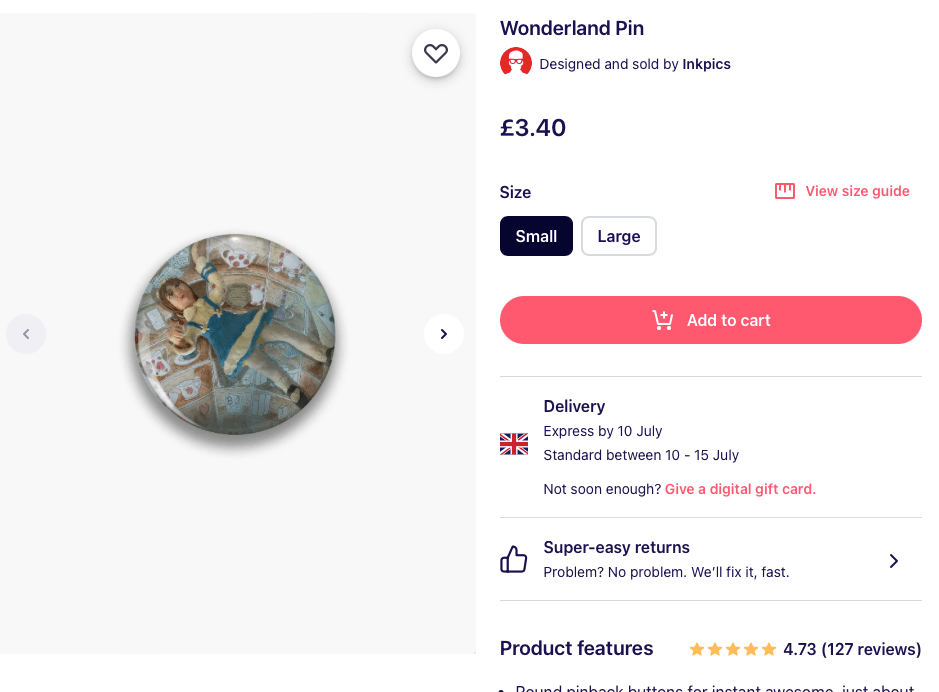
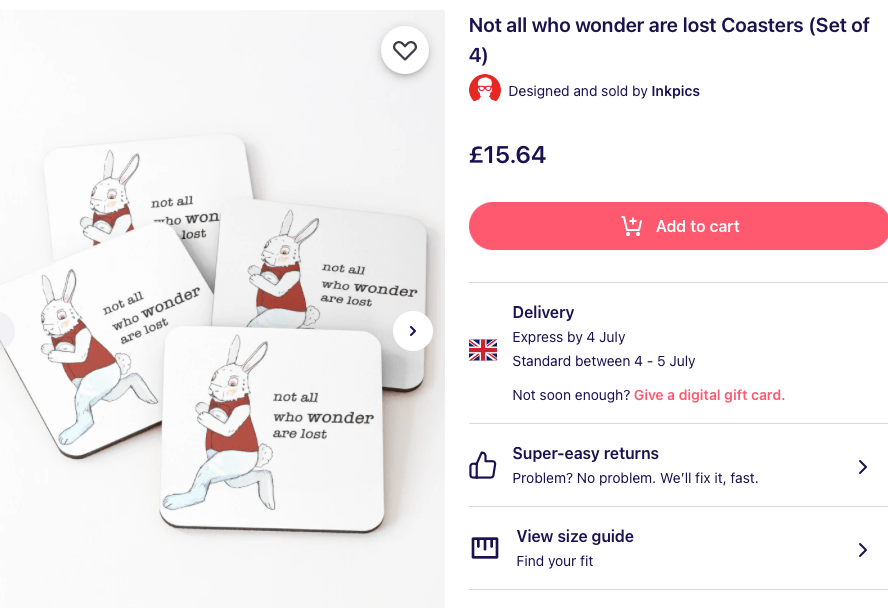
Using a Website called Redbubble I set up a shop called Inkpics where people can purchase items with my artwork on certain products. This was fun to see my work online and available to purchace. Below are some exmples of some of the products available.
Fig. 46 Wonderland Pin (2024)Fig. 47 Not all who wonder are lost (2024)
Creating products to sell online has made me realise the possibility I have with my illustration work and that I need to start setting up my own personal online shop and website. This way, I can showcase my designs and artwork to a wider audience and potentially reach more customers. I am excited about the opportunity to turn my passion for illustration into a profitable business venture.
Illustration list
Fig. 1 Fowler, G (2024) Imagination Brainstorm [freeform screenshot] In possession of the author: Gloucestershire.
Fig. 2 Fowler, G (2024) A Place Brainstorm [freeform screenshot] In possession of the author: Gloucestershire.
Fig. 3 Fowler, G (2023) Flower characters [WordPress screenshot] In possession of the author: Gloucestershire.
Fig. 4 Fowler, G (2023) Mockup page 1 [WordPress screenshot] In possession of the author: Gloucestershire.
Fig. 5 Fowler, G (2023) Mockup page 2 [WordPress screenshot] In possession of the author: Gloucestershire.
Fig. 6 Fowler, G (2023) Video of Bad Magic zine [Youtube video] In possession of the author: Gloucestershire.
Fig. 7 Fowler, G (2024) Notes [Freeform screenshots] In possession of the author: Gloucestershire.
Fig. 8 Fowler, G (2024) Down the Rabbit Hole page 4 [Photograph of printed text] In possession of the author: Gloucestershire.
Fig. 9 Fowler, G (2024) Down the Rabbit Hole page 5 [Photograph of printed text] In possession of the author: Gloucestershire.
Fig. 10 Fowler, G (2024) Sketch of white rabbit [Photograph of pencil sketch] In possession of the author: Gloucestershire.
Part three of this course has been enjoyable but very challenging. I have had to learn many new skills, such as animation, paper folding, painting on a large scale, and working at speed. The workload has been intense, but I have enjoyed pushing myself to try new things and expand my artistic abilities. Despite the challenges, I have found immense satisfaction in seeing my skills evolve and improve and watching my projects come to life.
Animation is a new skill that I have learned in this part of the course. Previously, I once attempted a small gif; it only consisted of four panels and was not very good. Therefore, I am proud that I stepped out of my comfort zone, tried again, and learned new skills that I would like to develop further in the future. I am excited to continue growing and improving in this area; the only worry is how time consuming it is.
Working on a large scale was also a challenge that pushed me to be more resourceful and creative in finding solutions. It was the first time I had ever painted a landscape scene. I have always thought it would be too difficult and have avoided even trying. However, I was surprised and happy with the end result, and it is even framed and now hanging in my kitchen.
Finally, one exercise that I found very challenging was Exercise 4: Small. Attempting to make characters out of oragami was very frustrating at times. Yet, after persisting, the end result produced some aesthetically pleasing results in the form of book covers. These projects have reminded me of the importance of trying new things and stepping out of my comfort zone.
In exercise 4, I combined different elements from different projects that I felt had a successful outcome at the end. To make them work, I had to crop and adjust different parts of the illustrations. Again, in assignment 3, I combined the work produced from exercise Fast and exercise Big. Using different elements allowed me to push my creative boundaries and think outside the box when it came to completing the assignment. Overall, I have learned that taking risks and experimenting with different techniques can lead to innovative and unique outcomes in my art projects. I am excited to continue exploring new methods and styles in future assignments to further develop my artistic skills.
During this course, there have been many artists that I have researched, and there are two that I will remember, which are Marina Abramovic and Tehching Hsieh. Both of these artists have pushed the boundaries of performance art and challenged traditional notions of endurance and time. Reading about them both shocked me and intrigued me. However, I do not want to produce art like they have; it is not something I personally would want to do, but what I have learned from them is to persevere, take risks, and keep challenging myself to push past my comfort zone and explore new possibilities.
Your assignment task is to undertake a more sustained and focused project that goes through various iterations and processes of making, addressing the theme of ‘movement’ in either the production of the work or in its content. This idea of ‘movement’ could produce an artwork that moves quickly or slowly, or moves from being large to small, or from colour to black and white, for example, or indeed any combination of all those qualities. The important thing is that you are documenting a process of making and change.
Using the material you have already produced for the exercises, you will combine elements of your work to produce ONE of the following options. The content is up to you, but it should take about 4 days to produce from beginning to end:
Animation: This could take many possible forms. You could develop a ‘flick book’ approach, a stop-motion animation, or a digital animation or gif.
A ‘zine’ or small book.
A short film or video.
At least three character illustrations with suitable backdrops and details of character traits.
Keywords from the brief
A project that goes through various iterations and processes of making, addressing the theme of ‘movement’
moves quickly or slowly,
The important thing is that you are documenting a process of making and change.
Using the material you have already produced for the exercises, you will combine elements of your work to produce ONE of the following options.
Animation:
A ‘zine’
A short film or video.
At least three character illustrations with suitable backdrops and details of character traits.
Mind map
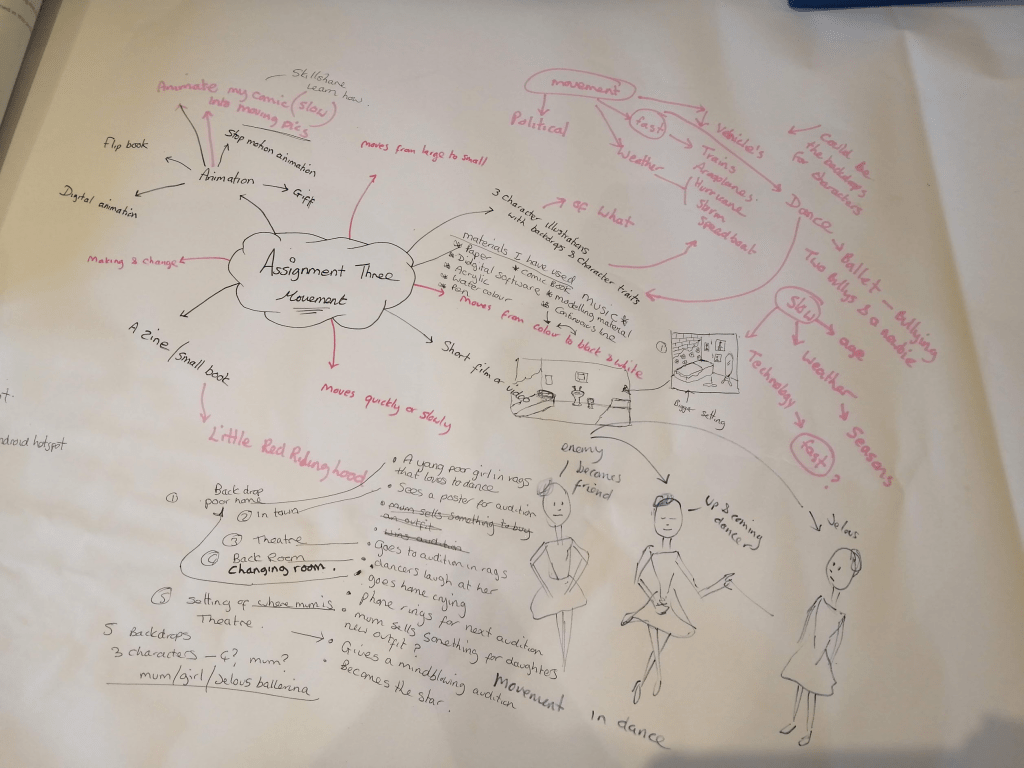
To begin, I made a mind map of all of my likely ideas for this assignment to assist me in determining the best course of action for the project.
Fig. 1 Mind map (2024)
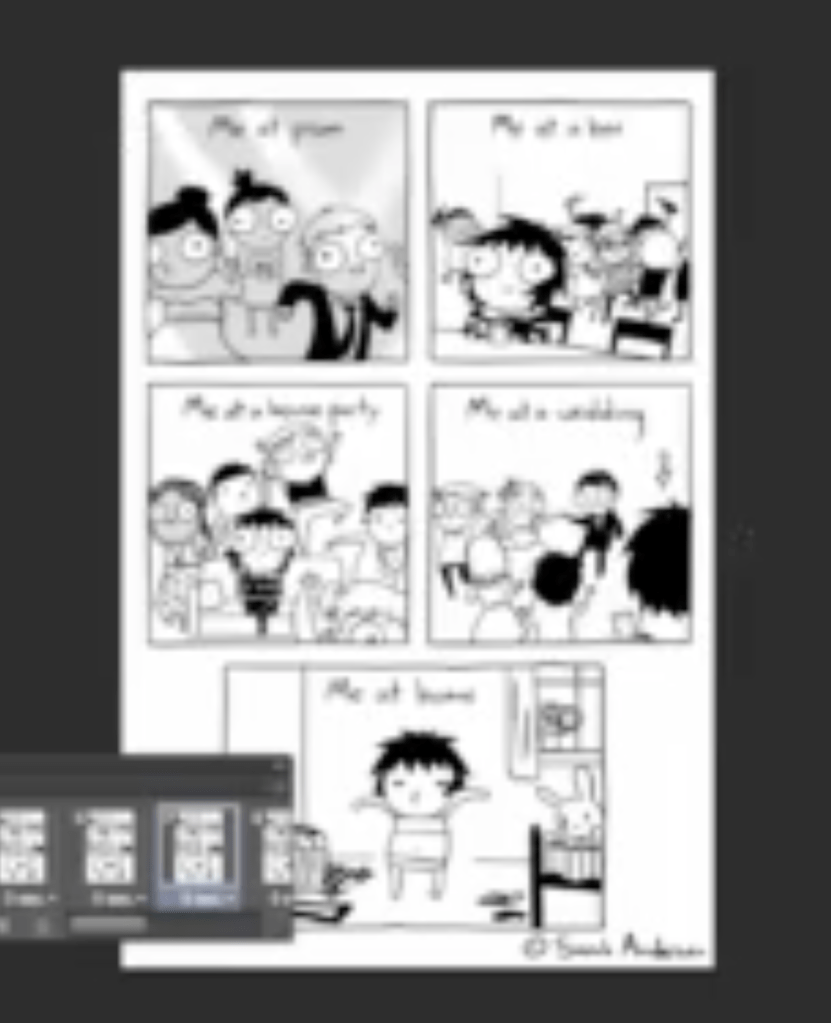
The first thought I had was to animate a comic I had created for a prior exercise. I used Skillshare to study how I could achieve this and discovered a great video created by Sarah Andersen, a webcomic artist and illustrator. The screenshot below is an example of her work. In the final panel, she animated the girl to dance.
Fig. 2 Skillshare (N.D)
Following this video, I attempted to create my own comic using my past work as a reference. However, after spending a significant amount of time attempting to animate various parts of my work, I discovered that when it came time to publish it, it would not load properly. Below is an example of a successful panel.
However, after being unable to get it to play properly, I decided to reconsider my assignment ideas.
Another concept I had was to make an animation about a young girl who enjoyed dancing but had never been able to pursue her goals due to poverty and perhaps bullying. I liked this idea because I thought there was no better way to demonstrate movement than through dance.
Research
Firstly, I researched into animation and found artists that are inspirational, such as:
Walt Disney
The first person that sprung to my mind when thinking about animation is of course Walt Disney. Having loved watching his timeless animations as a child such as Snow White and the Seven Dwarfs, made me want to know more about how he started in the world of animation so I followed this thought on with some research and watched the video below.
It was intriguing to see how he began his career as an animator by accepting a cartoonist position with the Kansas City Star and Kansas City Journal. Initially, he was contracted to create stick figure cartoons with cutout paper. Two years later, Walt worked with his colleague Ub. They collaborated to create a series of short animated films known as “laugh-O-Grams.”
What inspires me the most about Walt Disney is his perseverance in the face of hardship. Although the laugh-O-Grams were a success, he then went on to make short animated films like Alice’s Wonderland. Unfortunately, he ran out of money and was declared bankrupt. Many individuals would have given up at this point in their careers, but he persevered and founded Walt Disney with his brother. He continued with the Alice project, which was a hit, and later went on to make further animated features. As the short films grew successful, Walt and his brother established a new studio. However, he continued to struggle when a competitor named Charles Mintz offeredHowever, he continued to suffer until a competitor called Charles Mintz offered Walt Disney’s employees higher pay and took the majority of his workforce. It was then that Walt returned to a prior project about a mouse named Mortimer and transformed it into the beloved figure we know today as Mickey Mouse. I find it really encouraging that he pursued his passion for illustration and animation despite the difficulties he had in the beginning.
William Kentridge
William Kentridge, a South African artist, is also recognised for his charcoal animations. His approach for creating these videos involves drawing with charcoal on a sheet of paper, photographing it, then erasing portions of the drawing and adding other marks and gestures, and repeating this process until he has completed the stop motion animations concerning political subjects.
Below is a video of William explaining his working process for his animations
Ballerina
Considering the context of what I want my project to be about, I thought about an animated film made in 2016 called Ballerina that I once watched with youngest son. It is very poignant to the idea I have. The film is about two children who escape from an orphanage and go to Paris. In Paris the young girl pretends to be someone else to gain entry into the Opera Ballet School. The film follows Félicie’s journey as she navigates the many challenges while trying to pursue her dream of becoming a prima ballerina.
Below is a short trailer of the film.
I rewatched it to see the different ballet moves during the film and thought about how I need to understand the movement of a dancer for the project to be a success.
Next, I researched different dance poses within ballet and saved them into a mood-board to use later for reference material.
When it comes to creating a basic animation, I know what I need to do because I’ve already done some preliminary study on how to produce a simple animation using Adobe Photoshop. Also, this time, I’ll export the work as a movie file, so perhaps I won’t have the same problems as before.
Story plan
Next, I needed to come up with a story plan for my short animated video. I had already written about an idea of a dancer who struggled with bullying in my mind-map. As this is a subject matter that I have dealt with personally as a child it was something I felt passionate about. During secondary school I suffered survere bullying both emotionally and violently for many years. It made me think could I create something for other children to look at and find some inspiration to carry on with their dreams and succeed in life?
This is when I began writing out a story plan.
Story plan
Title
Twirling through turmoil
Characters
Main character – a shy, pretty, slim girl with a passion for dancing who comes from a poor background.
Class mates – Nasty, ugly, cruel children with no compassion
Teacher – A woman that believes in the young girl and gives her strength.
Beginning of the story
Emotional start about a young girl struggling to believe in herself after children teasing her.
Middle
Teacher asks the girl to stand up and talk about something she enjoys.
Sorting out the problem
The girl finds strength in what she believes in and stands up in front of her bully and shows them her passion of dance.
End
The class mates cheer the girl after amazing performance and want to be her friend.
Setting
In school
Next, I wrote out the story before starting to design the main character.
Draft story
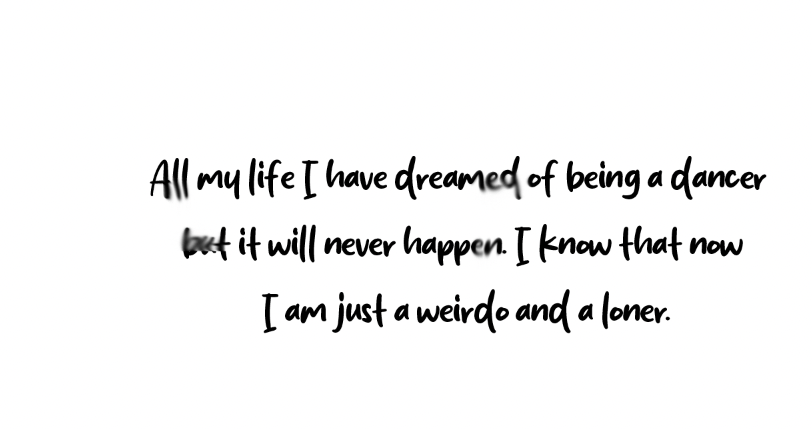
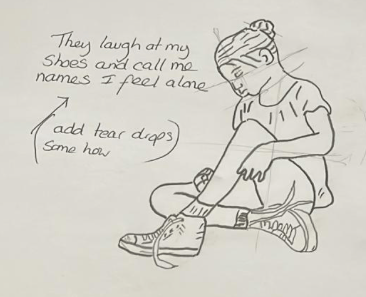
As I write in my diary tears hit the page, I don’t fit in with the other kids at school.
All my life I have dreamed of being a dancer but it will never happen. I know that now I am just a weirdo and a loner. They laugh at my shoes and call me names, I feel alone.
(Next, is a page of insults that the bullies call the girl.)
Then one day at school, my teacher asked us all to stand up in turn and talk about something we enjoy.
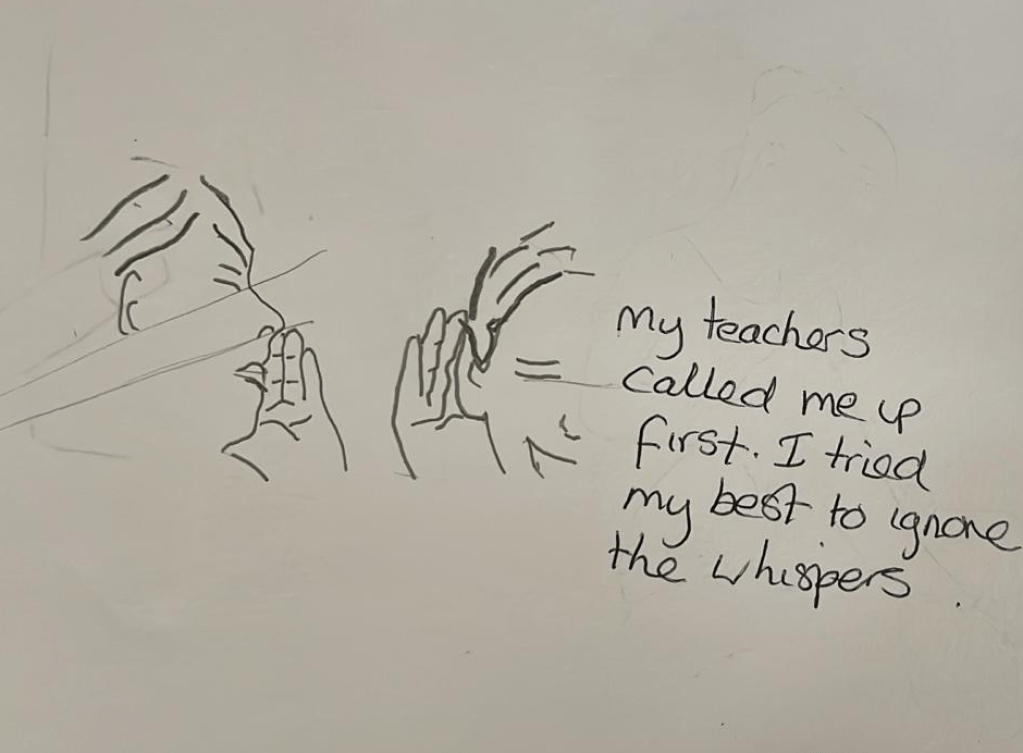
(The girl talks to her self) Could I talk about dancing? Show them I can dance and that I’m not weird?
We were allowed 15 minutes to use the computers to find examples. my teacher called me up first I tried my best to ignore the whispers.
(Another page of insults from the bullies mocking her)
I felt sick as I scanned the room and looked at their faces.
“Well this is going to be boring” said one bully
(could use past images of faces from previous exercise)
“Look, Bean Pole is next, she is so ugly” said another bully.
“I can’t believe weirdo is going to talk.” said another.
My teacher gave me a big smile and a wink.
Although I was shaking and could hear them laughing I had to stand up for myself and what I believe in. I told myself it doesn’t matter if I don’t have the best shoes or the best clothes. I need to stand up not just to show my talent but to stand up to them.
(Illustration of lake)
I can do this! (she tells herself)
I began to stand up and my voice shook as I said ” I love to dance”
(This is where the animation begins of the girl standing up and dancing)
The whole class clapped and the whispers had changed
(A page of praise from the bullies)
From that moment my life changed for the better.
Putting it all together
For this story I wanted it to come across like the young girl was writing in her diary. So I decided to keep the layout and illustrations simple and mainly use black and white.
Using photoshop I selected the font Sugar Cream and typed out the main story.
Fig.3 Diary page 1 (2024)
Using Photoshop’s blur tool, I blurred parts of the letters to simulate teardrops hitting the page.
After I completed writing out the story, I began deciding which drawings I wanted to include in it. I attempted to choose places that evoked strong feelings and began illustrating in my sketchbook.
Looking back at through my work for this unit I thought the clay sculptures would be fun to add to the project and I decided to use them to represent the bullies.
Fig. 6 Clay model 1 (2024)Fig.7 Clay model 2 (2024)Fig. 8 Clay model 3 (2024)
For the part of the story that reads:
“I decided to shut my eyes and think of my special place. A place where I have peace and can be myself.“
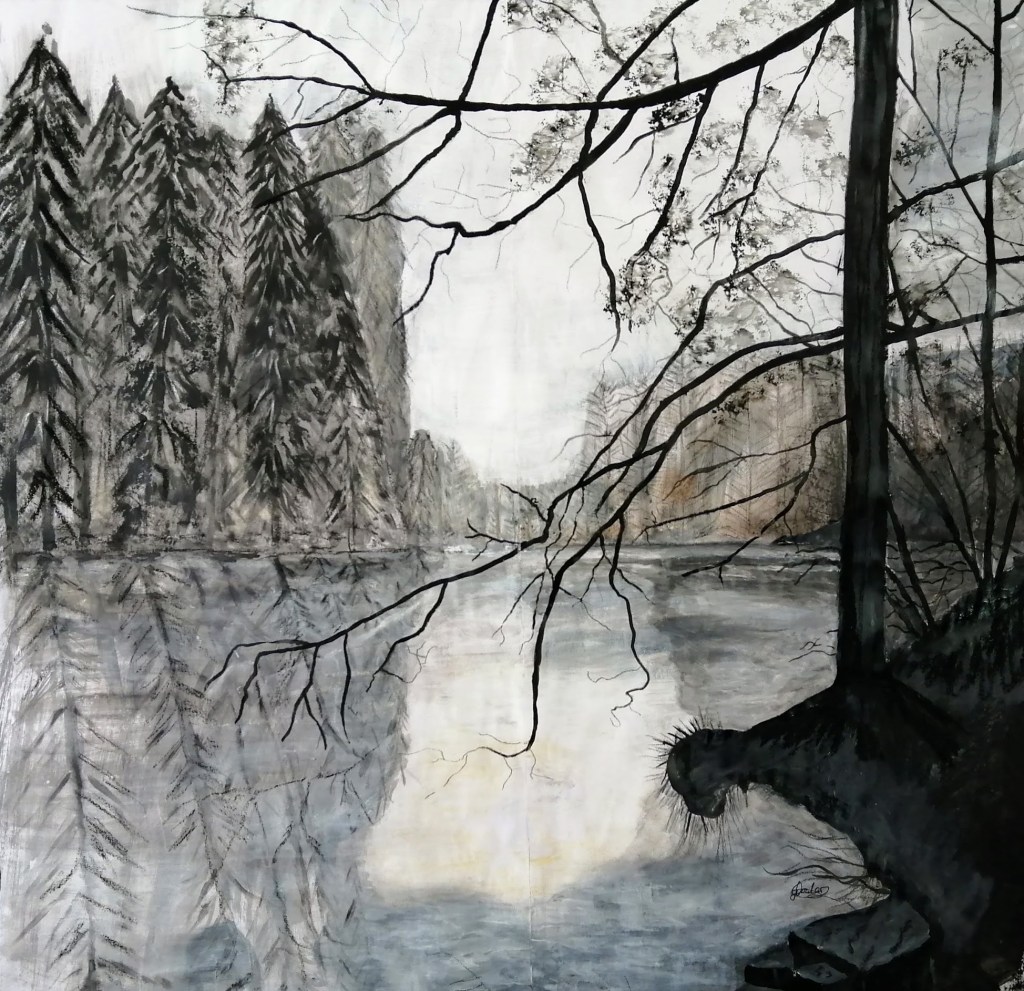
I decided would be a lovely place to add my illustration of a lake that I had previously created for one of the exercises during this course.
Fig. 9 Lake (2024)
Next, using Photoshop I began animating the image of the young girl shown below.
Fig 10 Sketchbook 3 (2024)
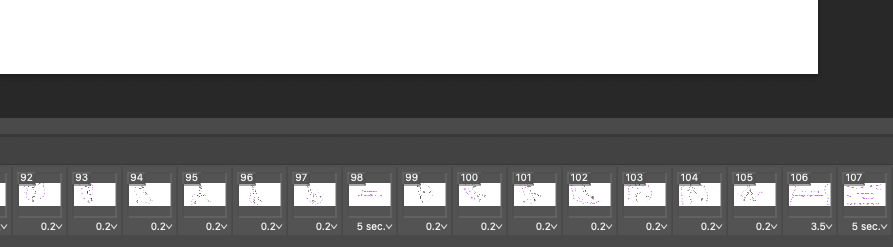
Using this sketch as the first panel I then lowered the opacity and began a new drawing on a new layer slightly moving each limb. It was very time consuming and I now have even more respect for animators and the amount of work they put into their projects. Once all the frames had been finished there were a total of 107 frames to make up the video.
Fig. 11 Animation panels (2024)
Next, I had to work out how long it would take to read each panel and adjust the time accordingly. To give the animation more atmosphere and emotion I added music called Loneliness LongGrand Project from Pixabay.
Below is the final animation I hope you enjoy watching.
Reflection
This has been an incredibly hard assignment. I have spent a lot of time trying to technically understand how to create an animation. It took a lot of time researching online and watching many tutorials. I am relieved that I have finally completed it. However, I know I would like to go back to it and add more frames to make it flow more smoothly, make some adjustments to some of the drawings, and add more of an ending to the production. I am proud of the progress I have made, but I know there is still room for improvement. Going back to refine my work will hopefully only make it better in the end. I have learned so much throughout this process, and I am excited to continue learning more about creating animations and developing my skills. Overall, I am happy with the outcome of this assignment and am eager to see how I can make it even better.
For this assignment I had to prepare a presentation of my work that I believe is engaging and varied in addition to reviewing the work completed during part 2 of Visual Exploration and thinking critically about how I work.
Key words from the brief:
Look back through all of the work you have produced in this part of the course, especially the final outcomes of each of the seven exercises.
Make a Powerpoint, Keynote or other slideshow presentation that selects and presents what you think is an interesting and varied collection of work.
The slideshow could be seen as a selective sketchbook or portfolio that underpins some of the thought processes and decisions you have made throughout this part of the course.
You could add notes from your learning log or a voiceover to explain or discuss your thinking in more detail.
illustrate your commentary by showing examples of your work and also how you work
These should draw on your visual responses to the exercises so far, but can also make reference to your previous work.
Use the slideshow to visually present your creative making process, which may include showing your working space
Five to seven minutes long
For the presentation I looked at various ways I could present such as filming myself, creating a PowerPoint presentation and using other presentation software. Finally, I settled on using Adobe Express as I felt this gave me a way to present my work clearly and be able to talk about my work using a voice over. Below is my presentation.
Presentation
Reflection on the assignment
What have you learnt about your practice by reflecting on creative processes?
Upon completion of the work I have created in part two, I have come to the realisation that I am motivated by illustrations that trigger feelings or somehow communicate a message.
However, I’ve also recognised that I found some of the work difficult, like beginning the collage project. As said in the presentation I have not enjoyed collage in the past however, after I gave it some context, I started to like it.
What I enjoyed about this part of the course is it has made me experiment with new ways of working and each one has helped me to generate new and exciting ideas.
How did the experience of making a video go for you – did it communicate you and your practice successfully?
Creating a presentation using Adobe Express was a technical challenge for me as I have never used the program before. It was difficult to know how long to talk about each slide without talking too much. To overcome this I typed out what I wanted to say for each piece of work and made sure each slide didn’t go over thirty seconds. Once I got to grips with it I found it enjoyable and exciting to see a show about my work come together.
Animating some of the work and text made the slideshow more interesting visually and I hope it captures the viewers attention. Being able to add my voice to the presentation allowed me to express myself and explain my working process. Hopefully this helped me to connect with my audience at a deeper level.
As all the work had been completed when creating the presentation, I decided not to do a live video as I didn’t think it was necessary. However, in the future I would like to create a similar video but add in a couple of short clips of me drawing or painting. I think this would add an interactive element to my presentation allowing viewers to witness my creative process in action.
Reflect on your outcomes but more so on your creative process – what worked for you, and how might you adapt these approaches for future projects?
Exercise 3 was enjoyable it is something I have not done before and got me really thinking about what I could draw whilst having a constraint. Only having the word ‘making’ to use as inspiration was quite challenging, yet I was pleasantly surprised at the final outcome.
Exercise 4 was a fun activity where I had to generate a series of mind-maps to generate associations based on a single concept. It was surprising how many ideas I was able to come up with and proved to be a useful tool for the future, for example when having a mental block.
It was enjoyable to experiment with digital painting and to gain new skills, but I am disappointed that I still have a lot to learn in this area. Due to my lack of technical understanding in this field, it will take some time for me to make a digital drawing that I am proud of. However, I will continue to practise this whenever possible.
In the last month I have recently purchased an ipad and bought the drawing program Procreate which I am excited to learn to use as I think it will be beneficial for my illustration practice.
Exercise 5
For this exercise I had to play the word association game using Word on the computer. I have never done this before and it was quite interesting to see what list of words I came up with. I also enjoyed making some of the illustrations such as the sea scene.
Exercise 7 is a debatable one for me. On one hand I have never liked doing collage work or looking at other artist collage work. Yet, by doing this exercise it has pushed me outside of my comfort zone and I have been able to express different thoughts and messages in my artwork. I was able to do this by carefully thinking about the composition of mixing textures, colours, and illustrations. It allowed me to open up to new ways of thinking and spark creative connections.
Which pieces of work do you feel have been most successful and why?
Exercise 4
Exercise 4 led to a successful outcome with the creation of a fantasy illustration of a wizard. It has shown me how effective mind-mapping can be in sparking creativity and generating ideas. Being able to overcome mental blocks when they arrive and finally being able to turn it into a positive and imaginative result I think is a success.
Overall all these exercises have pushed my creative boundaries and I can see they are valuable for my personal and artistic growth.
Have the exercises helped you to think about things in new ways or try out new ways of working? What have they been and how has your viewpoint changed?
Yes these exercises have helped me think about new ways of working and have created successful outcomes by doing them. For example, the mind mapping exercise, the word association game exercise, the cutting up exercise and the collage exercise have all been able to enhance my creative problem-solving skills, overcome mental blocks, and discover new approaches to my work that I can take forward in my practice.
What area(s) would you like to develop further?
The reason I am on this degree is not only my love of illustration but that my aim is to illustrate children’s books and book covers in the future. With this in mind there have been a couple of fantasy illustrations that I have drawn in the unit and I realised I became totally absorbed when drawing them. I would quite like to have another go at this perhaps for a fairy tale children’s book and spend time experimenting with ideas and creating an array of character designs.
As said above in exercise five, I was able to express myself, be imaginative and create art that had meaning. This is something I would like to do more of but perhaps not in the form of collage.
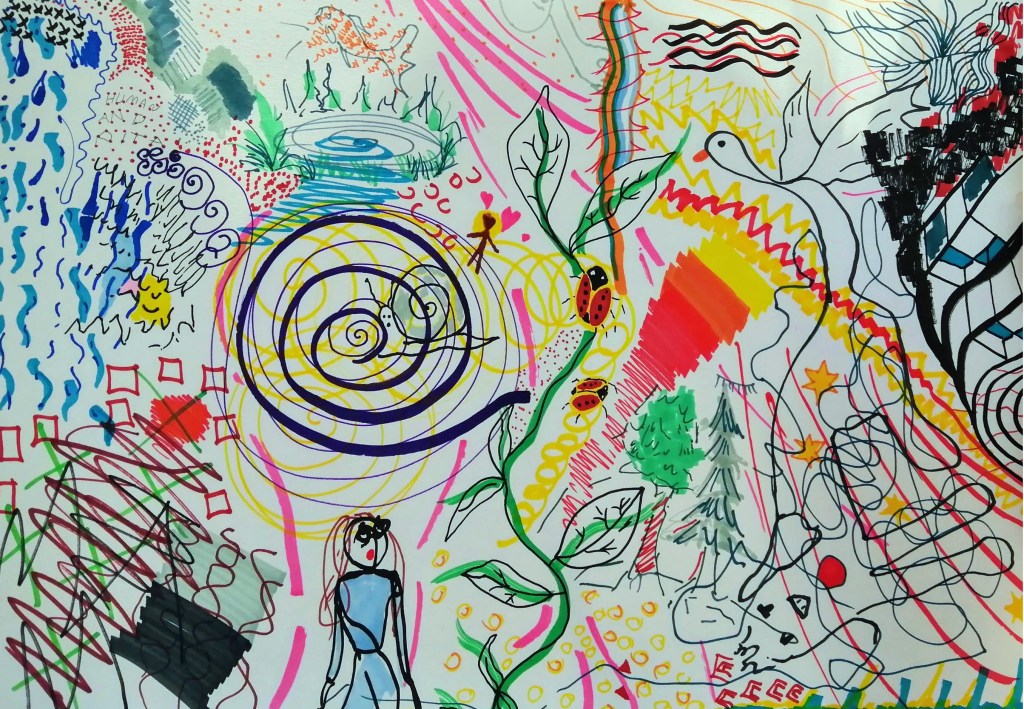
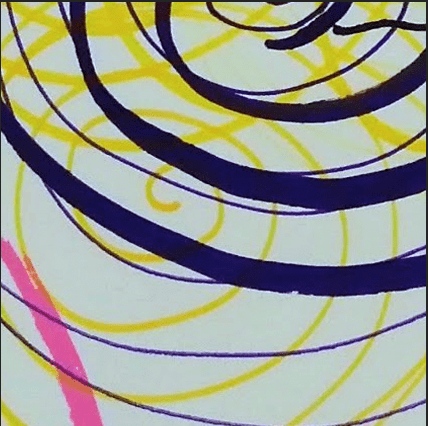
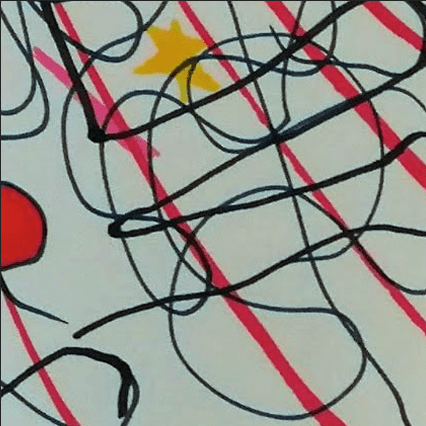
Take a blank piece of paper, ideally A2 size, and an ordinary HB or 2B pencil and begin to make marks in the top left-hand corner of the paper. At first make small, short marks, but as you begin to work across the paper start to make them larger, stronger, and more varied. Continue to work across the paper and begin to fill it with these gestural marks. Vary the length, density, and shape of the marks as much as possible as you draw across the sheet of paper. Perhaps small ‘zones’ of the paper will consist of short, vertical marks, while another area might be formed of curling doodles or small circles. Fill the whole sheet of paper with marks, lines, and shapes, although you may need to sharpen the pencil as you go. It might take some time, maybe a few hours or even a day or two, to completely fill the paper. Don’t try to fill the sheet of paper in one go, you can take breaks and return to the paper over a period of time. The intention of this exercise is to reach the point where you are not thinking about the next mark, but simply enjoy letting the pencil and the marks you have made guide you along with no conscious effort.
When you have finished, and the sheet of paper is filled with detail and variation, take two ‘L’ shaped pieces of card and frame five sections of the paper, about 12-15cm square. Think about the variation of marks, density and visual content of each of the five selected squares. Take photographs of them and give them one-word titles that relate to the emotional or sensational affect you think they have.
OCA Text book, Visual Skills 2, Assignment one, option 1.
Keywords from the brief
A2 paper
Make marks top left corner
Small short marks
Then make marks larger stronger and varied.
Very length, density, and shape of marks
take two ‘L’ shaped pieces of card and frame five sections of the paper
Take photographs of them and give them one-word titles that relate to the emotional or sensational affect you think they have.
Despite the fact that the brief stated that this task should be completed with a pencil. I did not want to because that is my safety net, something I am used to and find simple to use. Pencils are also my safety net because they allow me to erase any mistakes. As a result, I wanted to test myself by making marks that I could not erase.
Looking around, I picked up some coloured markers and sat down in front of the card.
As you can see in the photo below, it was quite intimidating.
However, when I reread the brief, it stated to begin in the upper left corner and make small marks. I did this by making small dots, and as I did so, I became more daring to try different strokes, patterns, and shapes. I also listened to music and occasionally made marks in relation to the song’s beat. Below is a photo of the filled-up card.
I then scanned in the drawing and cropped five sections of the image in Photoshop. I used Photoshop to measure and rotate the canvas because it was easier.
The selected five images and one-word titles I have given them are listed below.
Anger
Depression
Happiness
Dizzy
Stress
Reflection
While drawing, I kept thinking about the artists I had previously researched and tried to remember that this was a playful exercise, not a beautiful drawing.
As previously stated, I purposefully used pens to challenge myself not to be afraid of making mistakes. This was a significant challenge for me. However, once I put pen to paper, I realised it was not as bad as I had imagined, and it did not matter what mark I made anyway.
What I liked about this work was that it took what I thought was a lot of scribble and turned it into some interesting. Smaller images were made that now show deep emotion. These smaller images could be developed further in the future, for example, the image of Dizzy could be used on a mug that says Don’t worry, it is almost Friday. Alternatively, the happiness image could be printed on children’s tops.
It would be interesting to compare it using different mediums if I did it again.
I have learned from this assignment that being playful can open my mind to innovative ideas and creativity, as well as help me not be afraid to start a project. This is something I will keep doing when I am stuck for ideas.
It was fascinating to see how, when I created new images from one drawing, there could be an emotional response to the image that had not previously existed.