Categories
Coursework Part Three: Making

Exercise 2: Slow

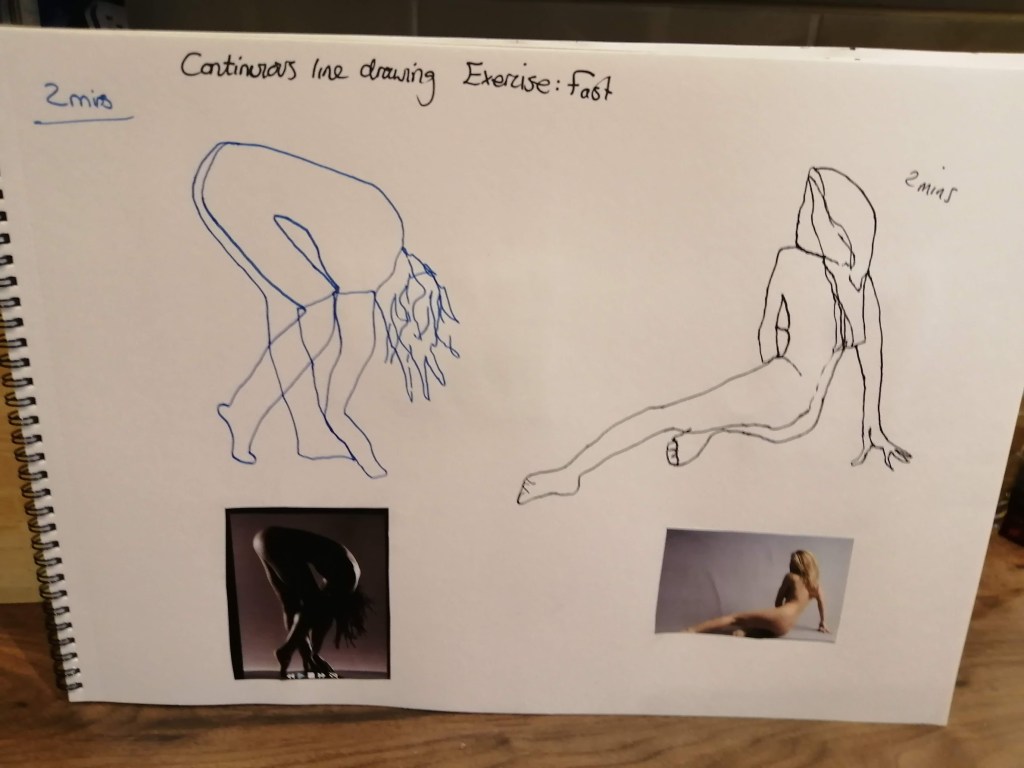
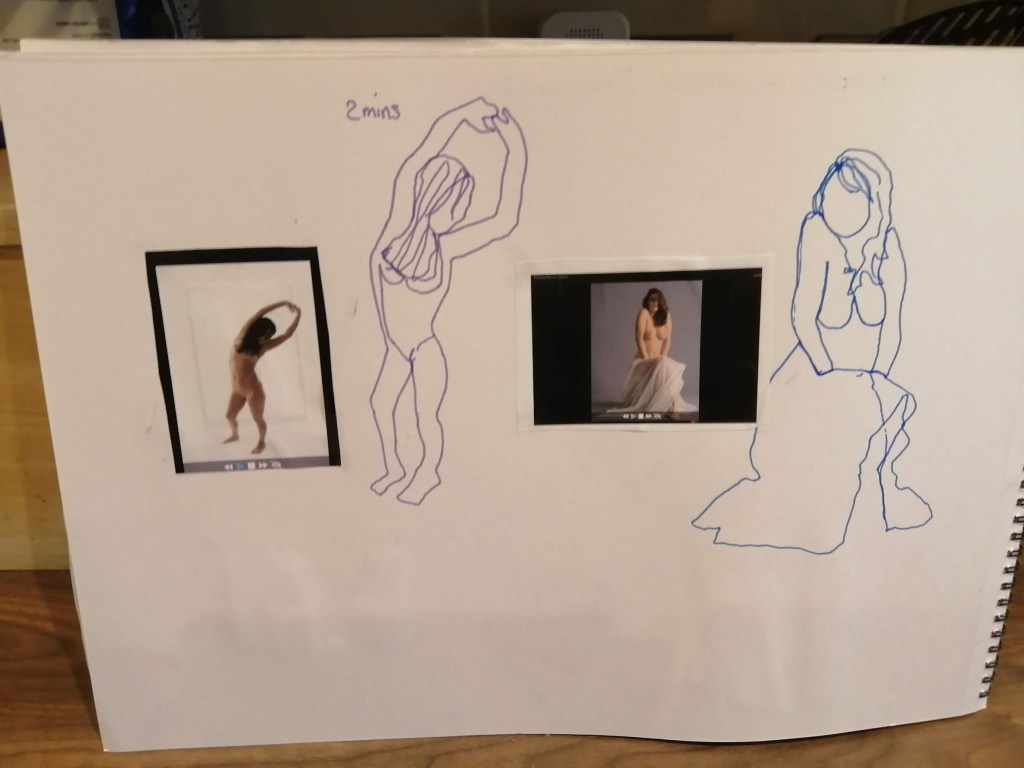
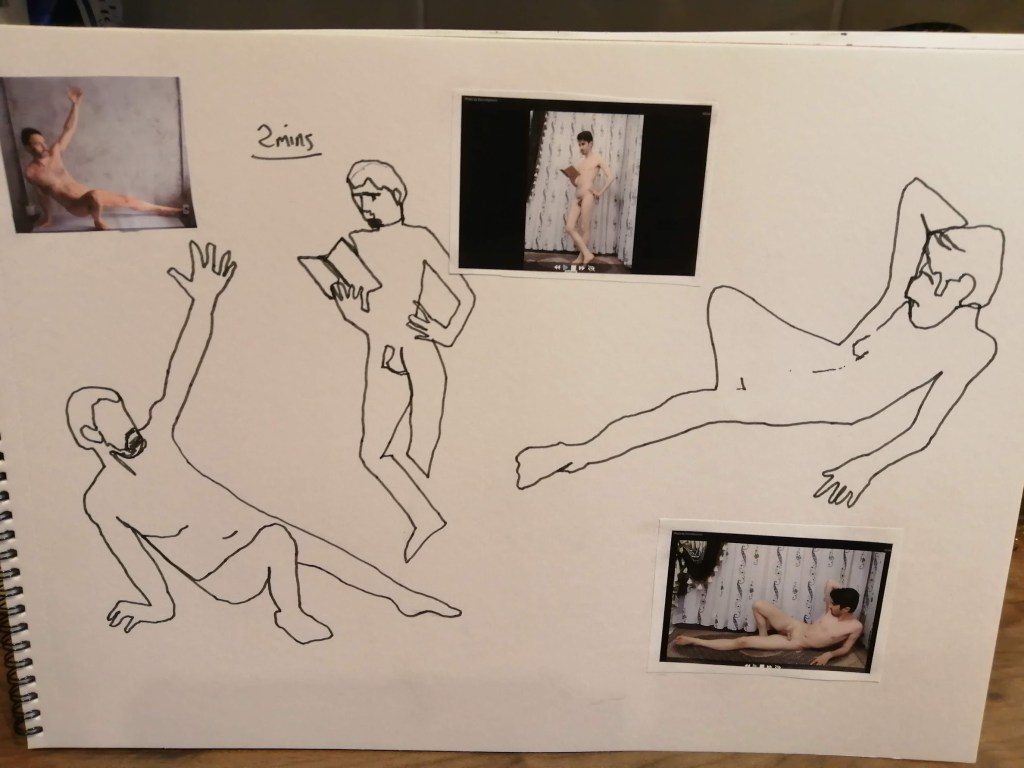
For this exercise I have to create a short comic strip based on the themes of slowness and pace.

Key words from the brief:

Option 3: A Comic Book

  • This option involves developing a simple narrative and then producing an illustrated storyboard in a comic book style
  • Have a look at a few comics or graphic novels and note down your thoughts on their respective styles in your log
  • Emulate one of the artists you have looked at in the production of your work, or you can work in your own style.
  • The theme of the exercise is based on slowness and pace
  • Keep it simple so that you can concentrate on making the panels of your storyboard interesting
  • Three page narrative, with either 6 or 9 panels per page.

Research

Before starting any sketchbook work I decided to do some research into comic books and comic book artists. Firstly, I looked at a comic called ‘Watchmen’ written by Alan Moore and illustrated by Dave Gibbons.

The Watchmen was originally a series of twelve comics that was published in 1986 – 1987, by DC Comics. Eventually it was complied together to make a graphic novel called’Watchmen’. Below is a lecture I watched from ArtsOne in which the teacher talks about the book. It was interesting to get a better understanding of the decisions that were made from an artistic point of view and getting a better understanding of the narrative of the comic.

Alan Moore  & Dave Gibbons – Watchmen

To get a closer look at the comics content and the illustrations, I looked at pages from Watchmen using Pinterest.

Key points noted from the lecture and my own interpretation of the artist.

  • Nine panel grid used throughout the book
  • Careful consideration of the composition of each panel
  • Capturing motion through the use correct use of composition and panel layout.
  • Realistic illustrations with a focus on facial expressions and body language.
  • Altering perspectives.
  • Overlapping pannels
  • Contrast of colours and emphasis on shadows and highlights.
  • Careful consideration of character design.
  • Detailed illustrations of architecture.
  • Muted colour palette enhances mood and atmosphere.

After I researched the illustrator Dave Gibbons and watched an interesting interview with him explaining his methods of working. I found it invaluable to see how he draws using Clip Studio Paint, I thought perhaps I could apply some of his methods to my own illustration work when I learn how to use Procreate, or perhaps Adobe Illustrator/ Photoshop.

Three points he recommended.

  • Be really good at your job
  • Be reliable
  • Be a nice guy.

Richard McGuire’s – Here

Next, I then looked into Richard McGuire’s graphic novel. It’s called “Here.” I found McGuire’s website online, and when I clicked on the link with the book information, I was astounded by the images and narrative displayed. It is one of the most imaginative books I have ever seen. Each page is organised in the same location, which is in the corner of a living room. The narrative effortlessly spans through many historical moments by jumping back and forth in time. The pages from the website excited me so much I had to buy the book.

Below are images from the book ‘Here’ that I downloaded to my iPad kindle app.

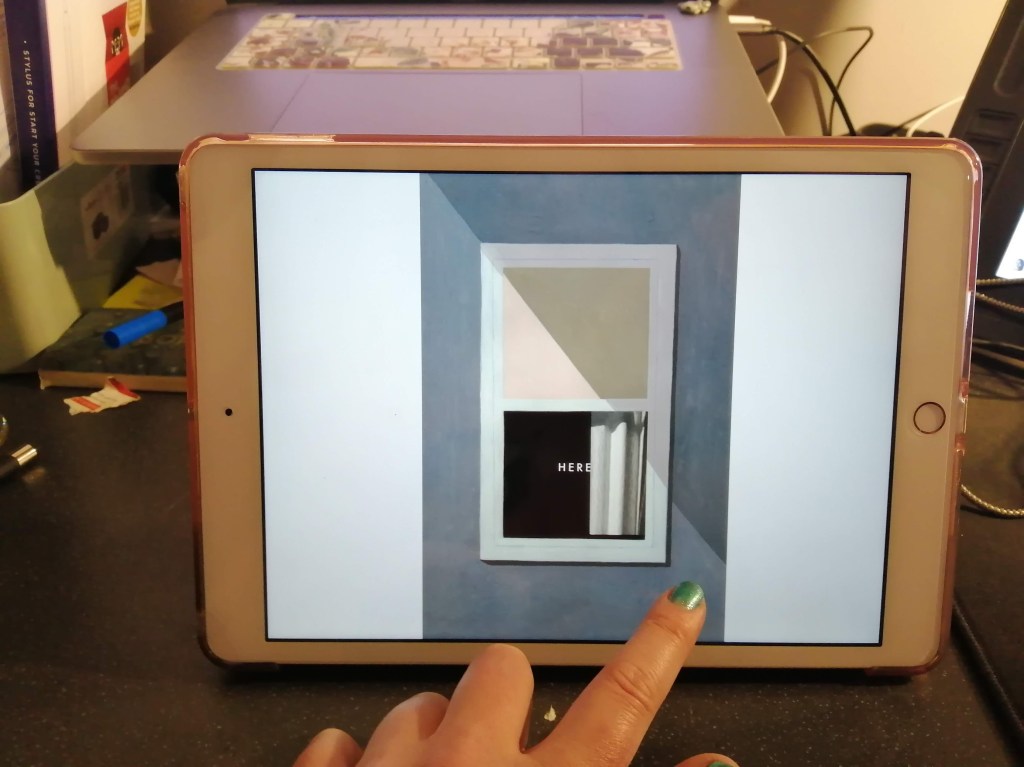
Upon completing the graphic novel, I became aware of how captivating and visually striking “Here” was—a study of space, time, and human behaviour as viewed through the lens of a single room. It is a fantastic source of inspiration for my illustration work and leads me to consider my relationship with my own home and the hidden secrets it may hold.

Notes that make the comic successful which I could apply to my own comic.

  • Single location
  • Minimalistic artwork to allow readers to understand the complex narrative
  • Line drawings
  • Limited colour pallette
  • Reoccuring graphics
  • Interconnecting panels, capturing the passage of time
  • Emotional connection (joy, sorrow, love)

Chris Ware’s – ‘Jimmy Corrigan: The Smartest Kid on Earth’.

Finally, I researched Chris Ware’s – ‘Jimmy Corrigan: The Smartest Kid on Earth’ by watching a couple of video reviews about the book and other research material.

Originally the story was a series of comic strips published in a weekly newspaper in Chicago, before being published as a standalone book in the year 2000. The narrative is based on a mid thirty’s man who is sad and lonely and constantly having to deal with his over bearing mother. Everything in his life is a little dull until one day he receives a letter from his estranged father asking to meet him. Jimmy then undertakes this trip and eventually meets his father. However, there is also a parallel story about his Grandfather who has a similar upbringing to Jimmy that is set in 1893.

Notes that make the comic successful which I could apply to my own comic.

  • Emotional connection
  • Relatable relationships
  • Passage of time
  • Grid based layout
  • Muted colour palette
  • Precise line work
  • Small lettering
  • Arrows to guide panels layout
  • Repetitive illustrations
  • Illustrates life

To get a better understanding of comics I read the book Studying Comics and Graphic Novels by Karin Kukkonen. The book goes into depths about how comics are laid out and how the viewer interprets the visual information in front of them.

Below are some notes I have made from the book to consider when creating my own comic.

  • Sometimes hand written text.
  • Emphasis on facial expressions.
  • Different postures of characters.
  • Size of lettering indicates if someone is shouting or talking quietly.
  • Character design Symbolism and metaphor.
  • Different perspectives in panels.
  • Gaze of the character can inform direction of page and importance.
  • Gestalt Theory- Similarity, Continuation, Closure, Proximity, Figure/ground, Symmetry and order.

Recently, I have purchased an iPad, having never owned one I am currently getting used to how to operate it. The main reason I purchased it was to learn how to use Procreate. Therefore I feel this exercise is a good opportunity to do so.

Idea generation

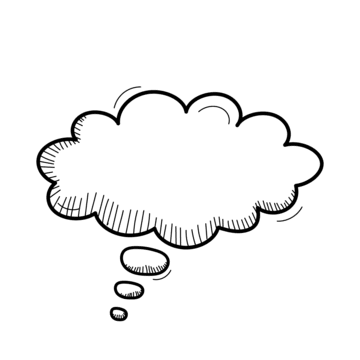
 Considering the word “slow,” I began creating a spider diagram.

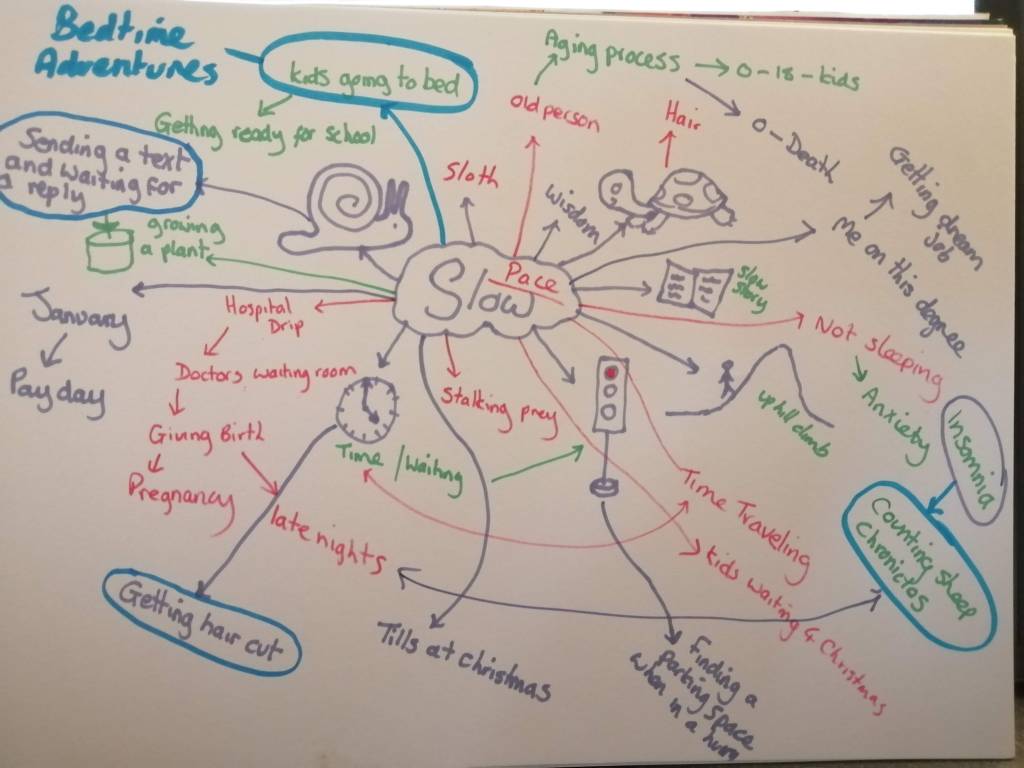
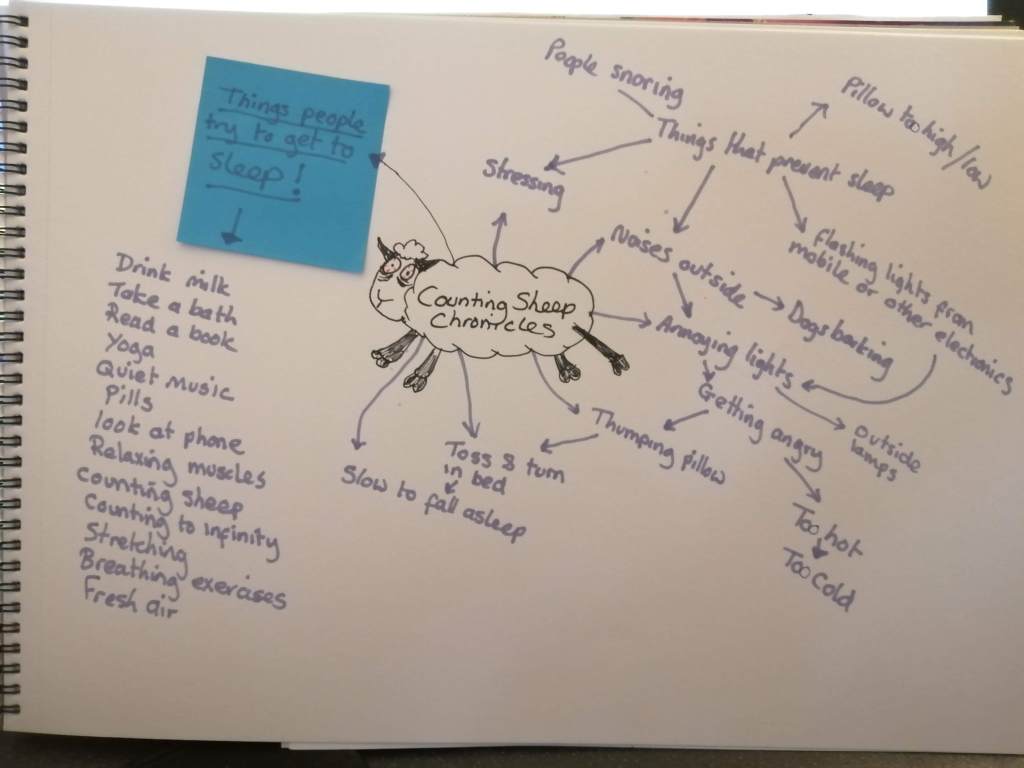
The sentences circled in the mind map are ideas that I thought had the most promise for a short comic. After thinking carefully I decided to look more closely at the word insomnia. To this I created another mind map.

Idea development

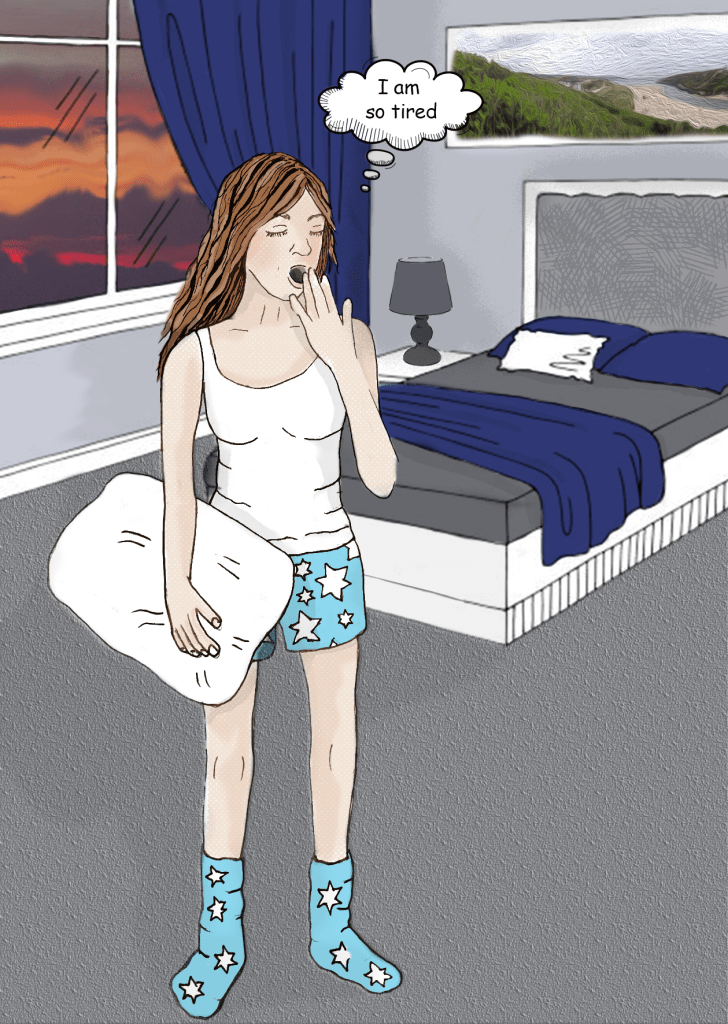
I began sketching out thumbnail ideas using the thoughts from the mind map above. I felt the idea, which centres on a tired mother and wife trying to go to sleep but is having trouble falling asleep, was suitable for the term “slow.”

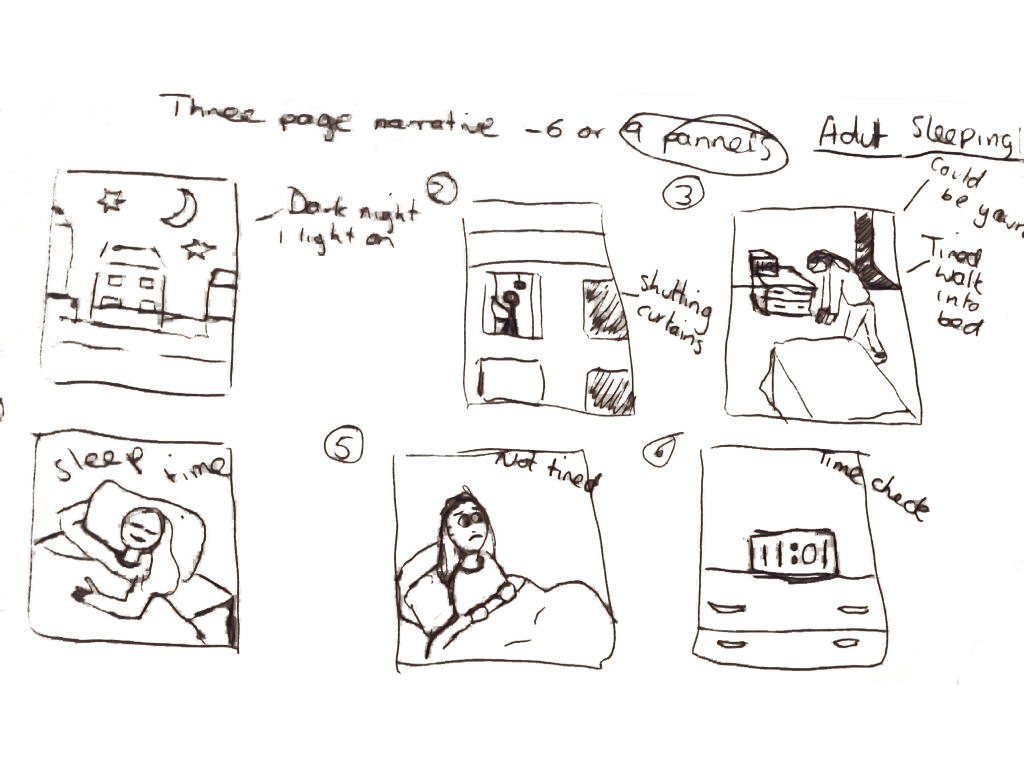
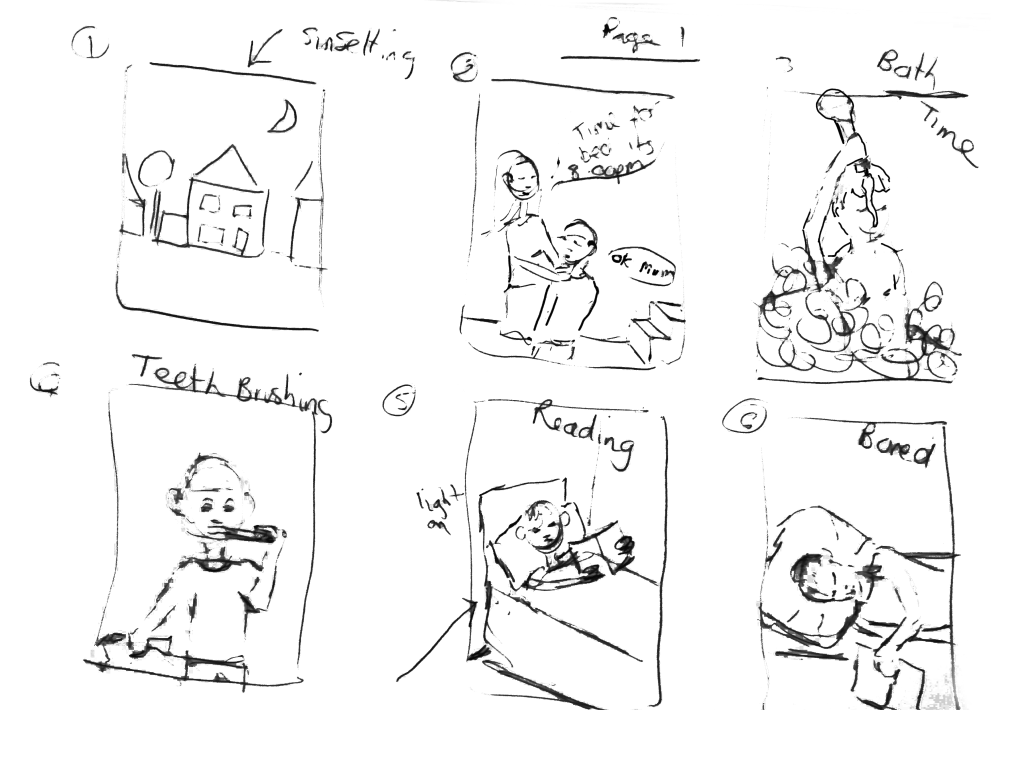
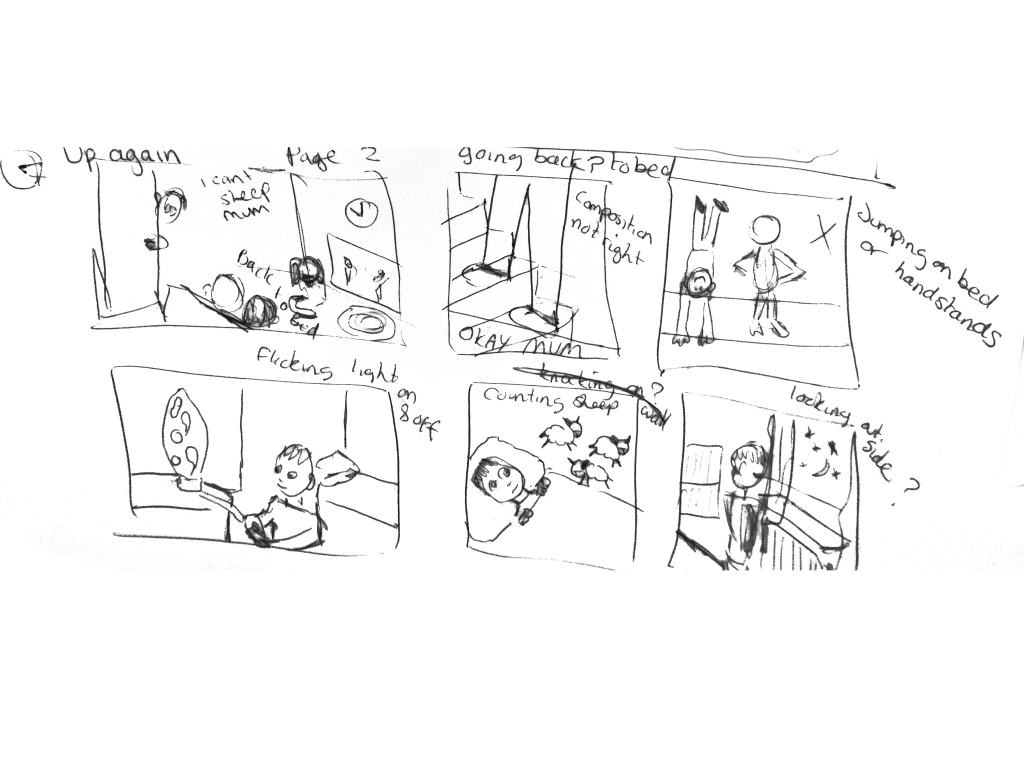
After sketching these ideas I also had a slightly different idea about a young boy who wouldn’t go to sleep. Again, I produced some thumbnail sketches for this concept too.

Comparing the two concepts I decided to go with the first idea about the tired mother/wife.

Next, I began sketching out some more detailed drawings for each panel before creating detailed visuals.

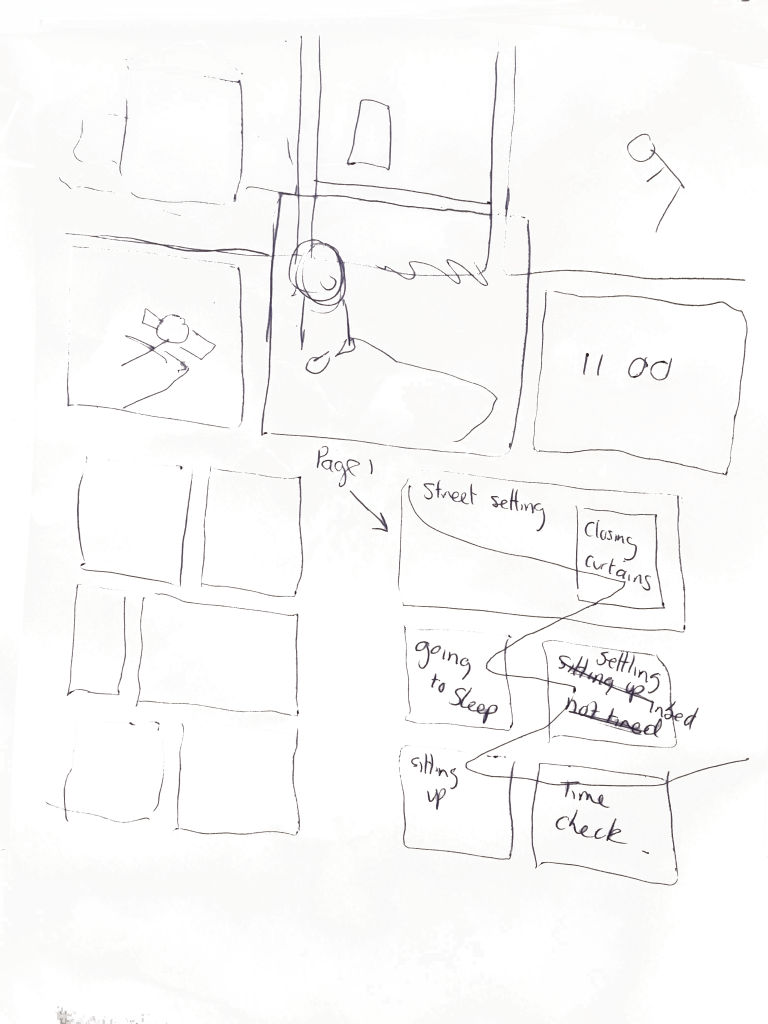
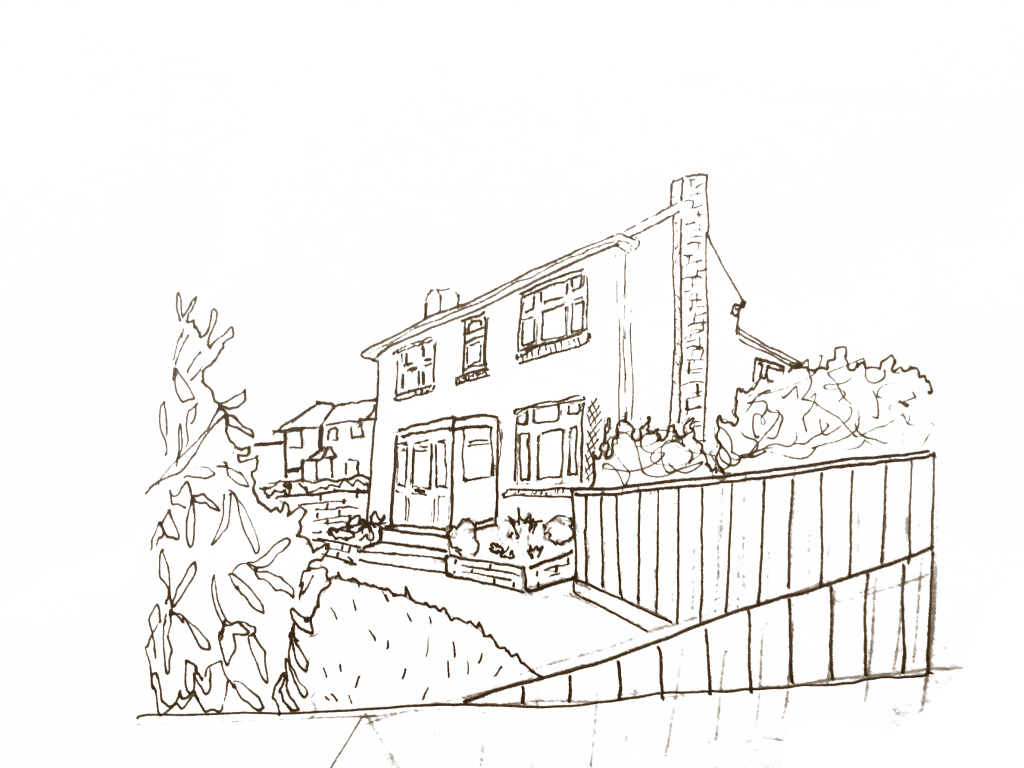
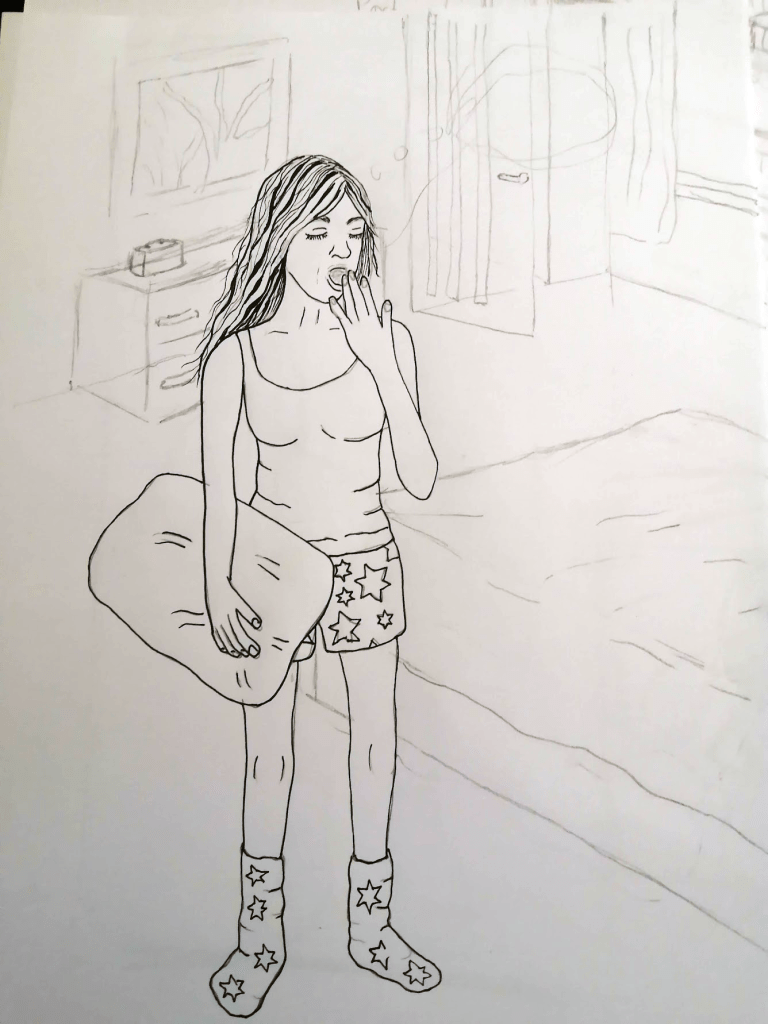
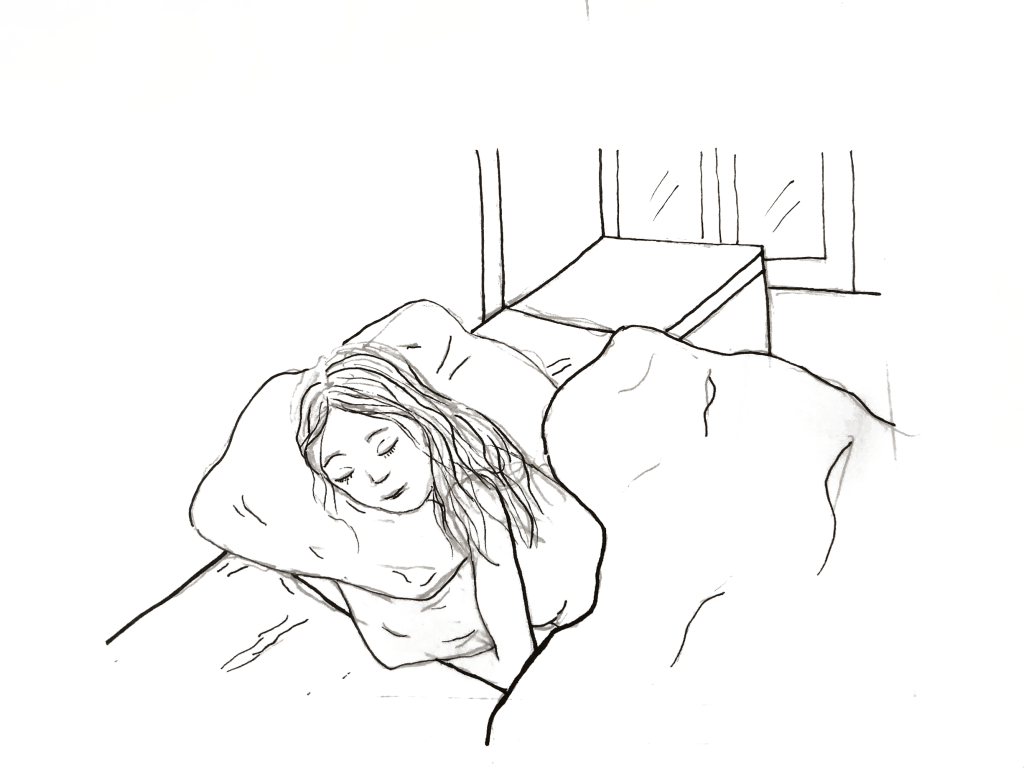
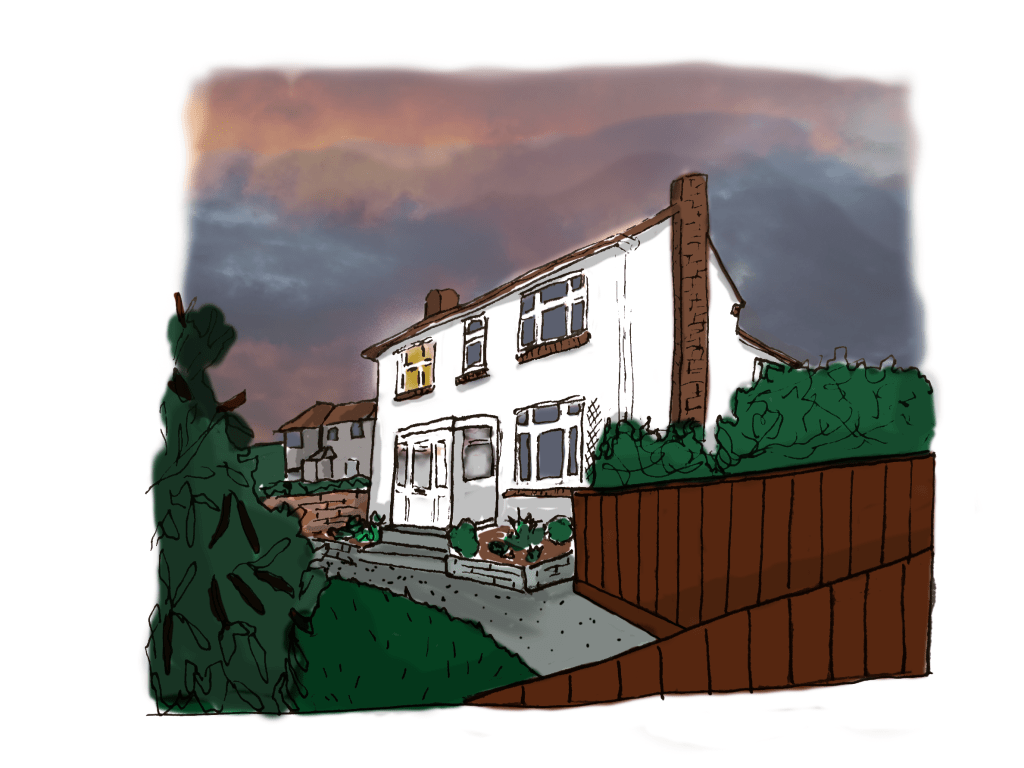
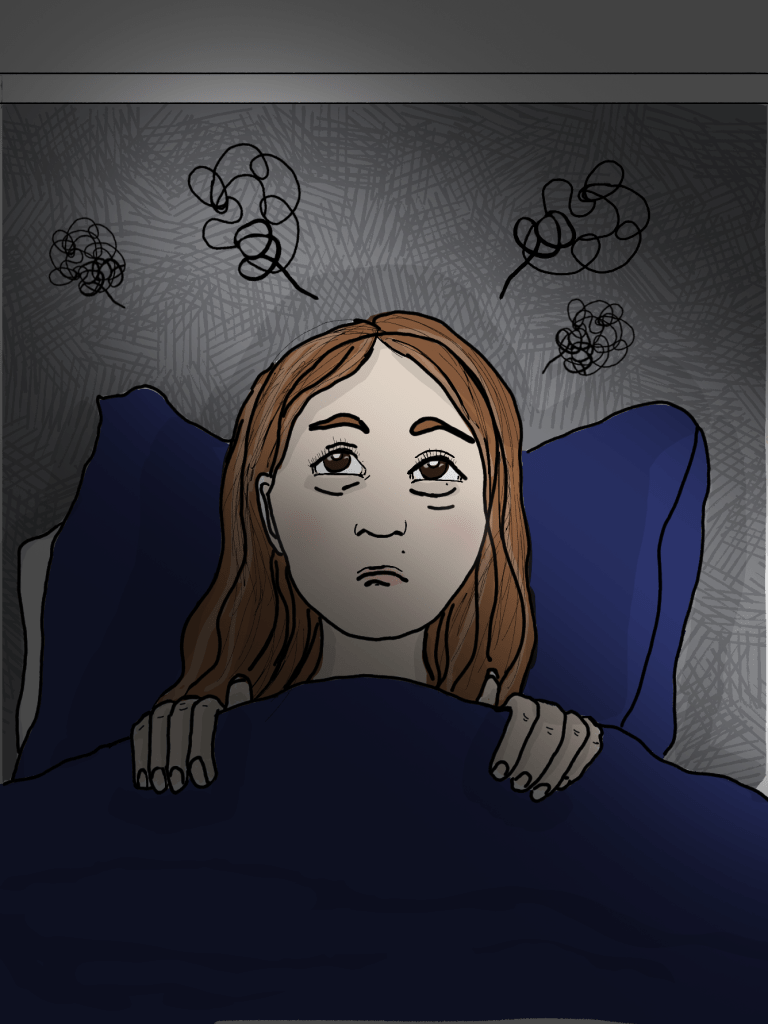
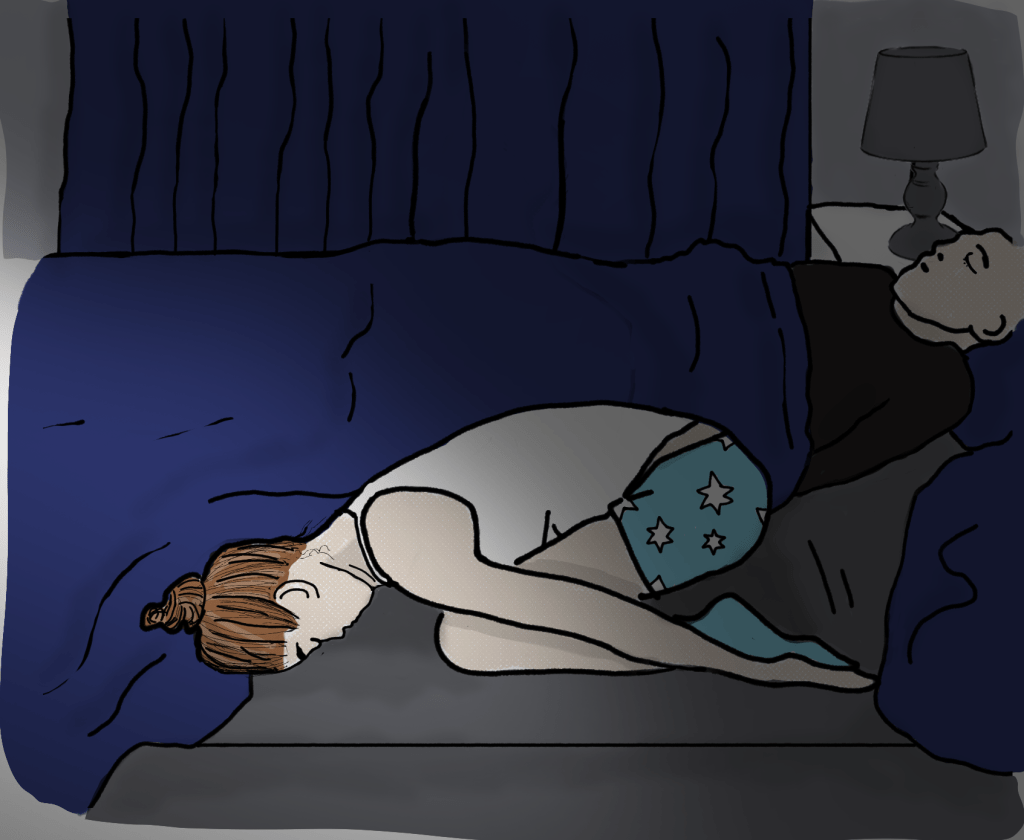
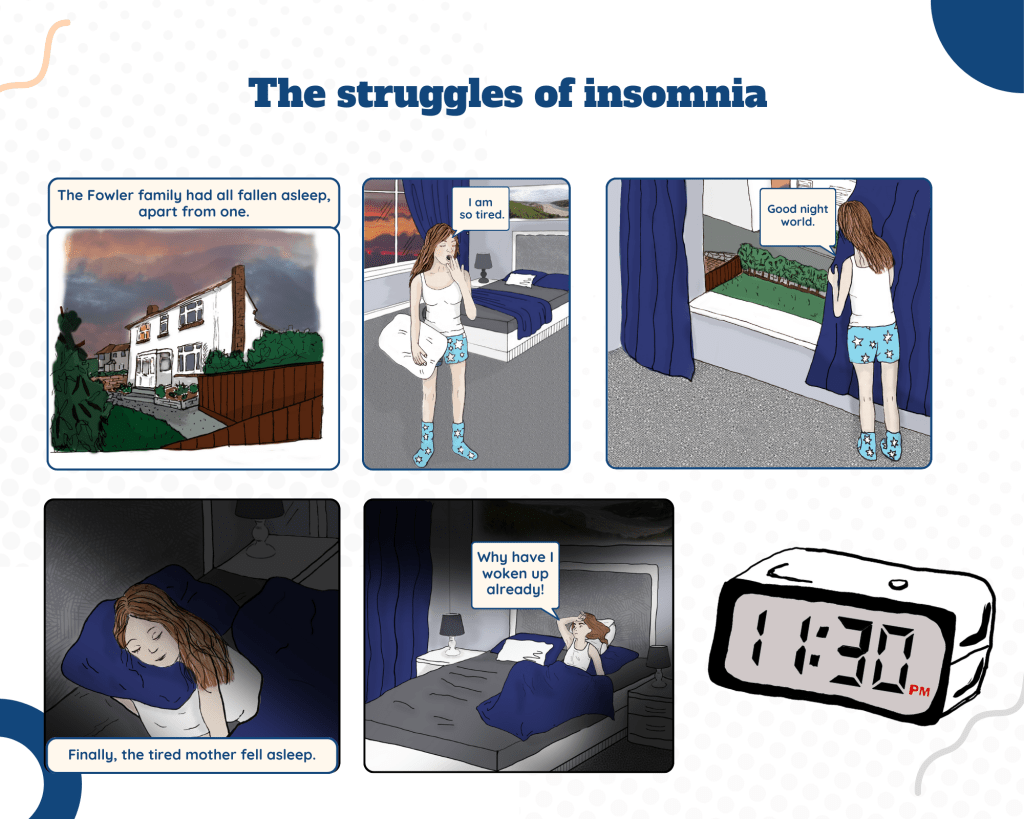
Visuals for page one

Using my sketches I then enhanced them using Adobe Photoshop by adding colour, highlights and shadows. After getting used to using Photoshop I managed to do some further drawing using the brush tool with a Manga Crisp brush to do the other drawings.

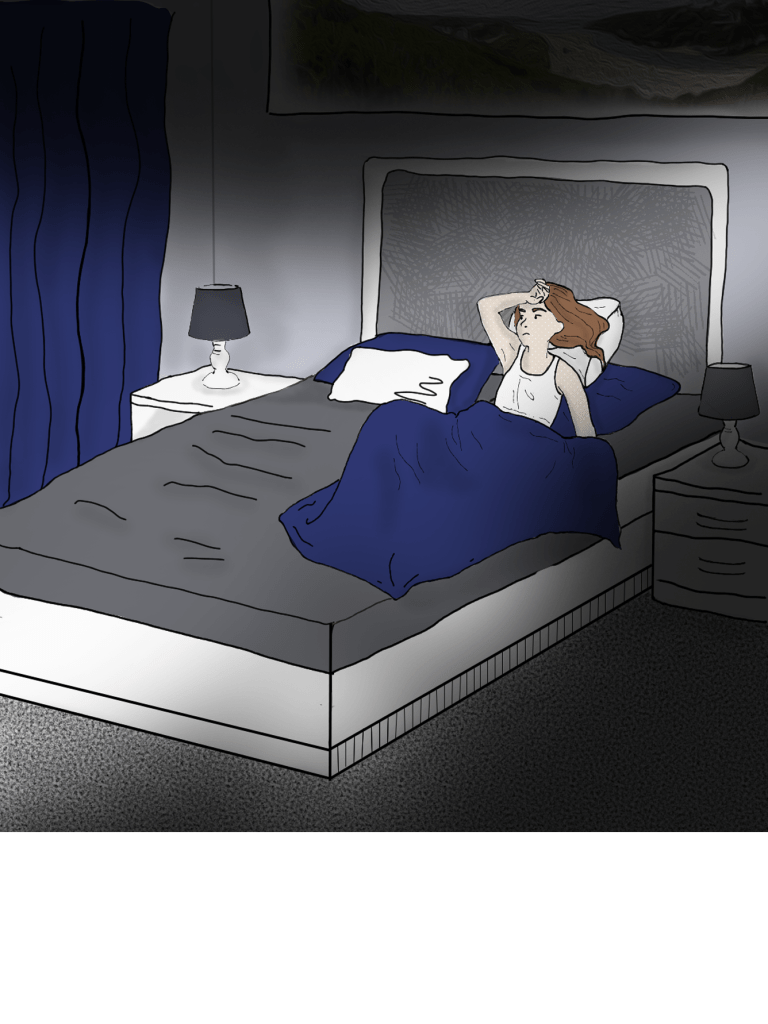
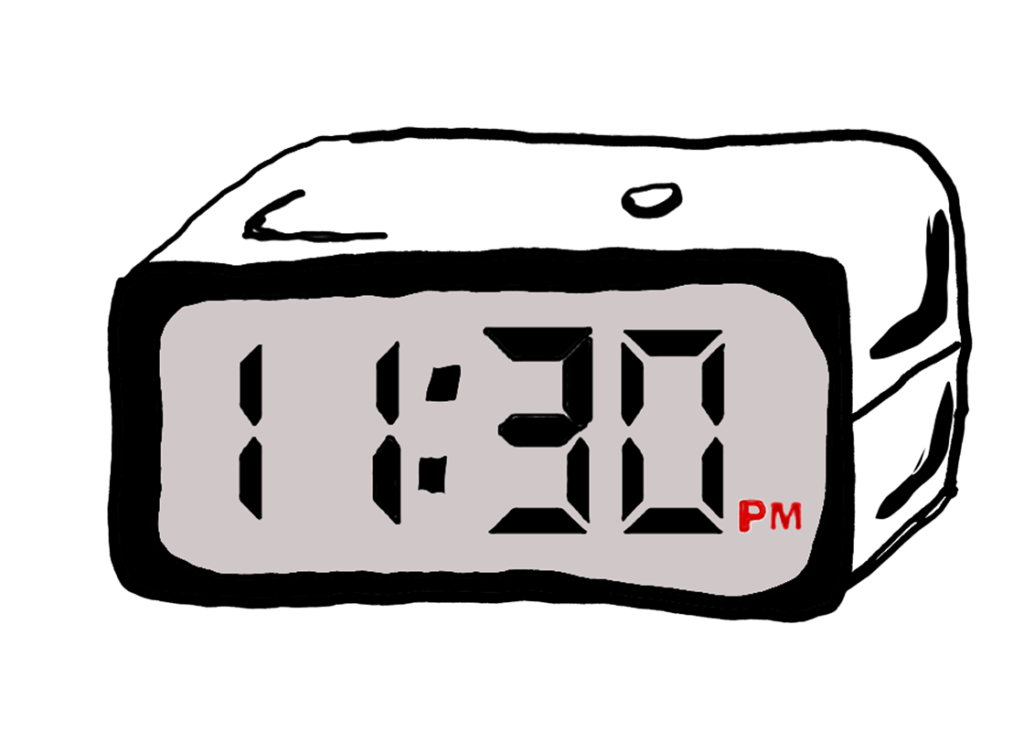
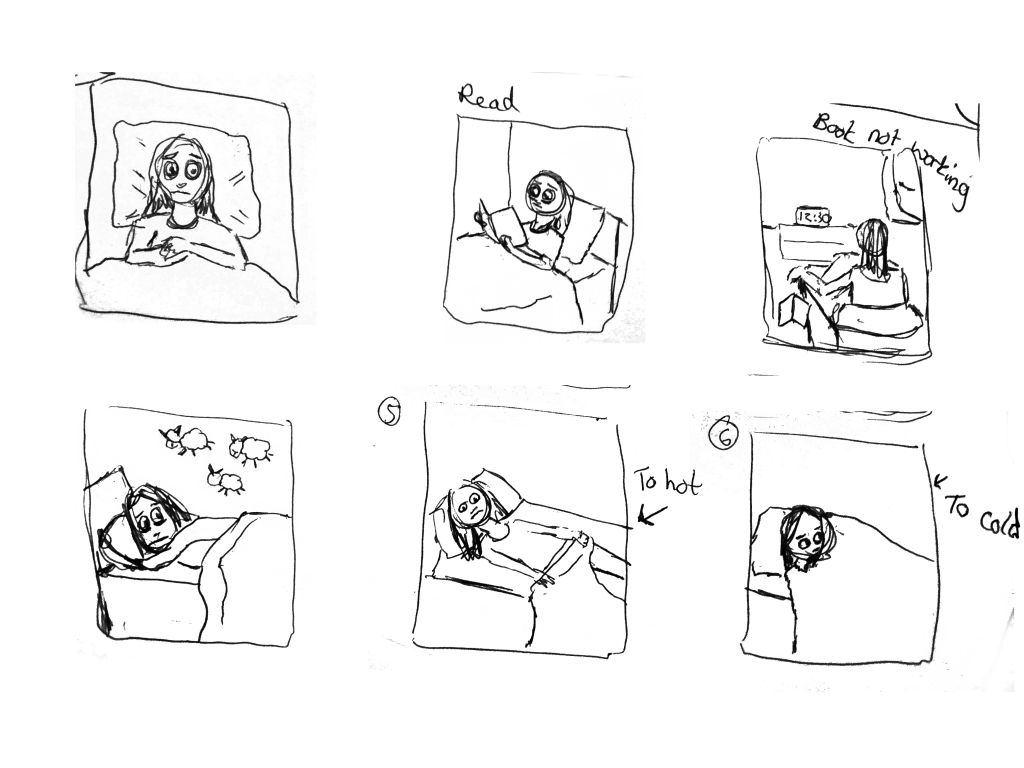
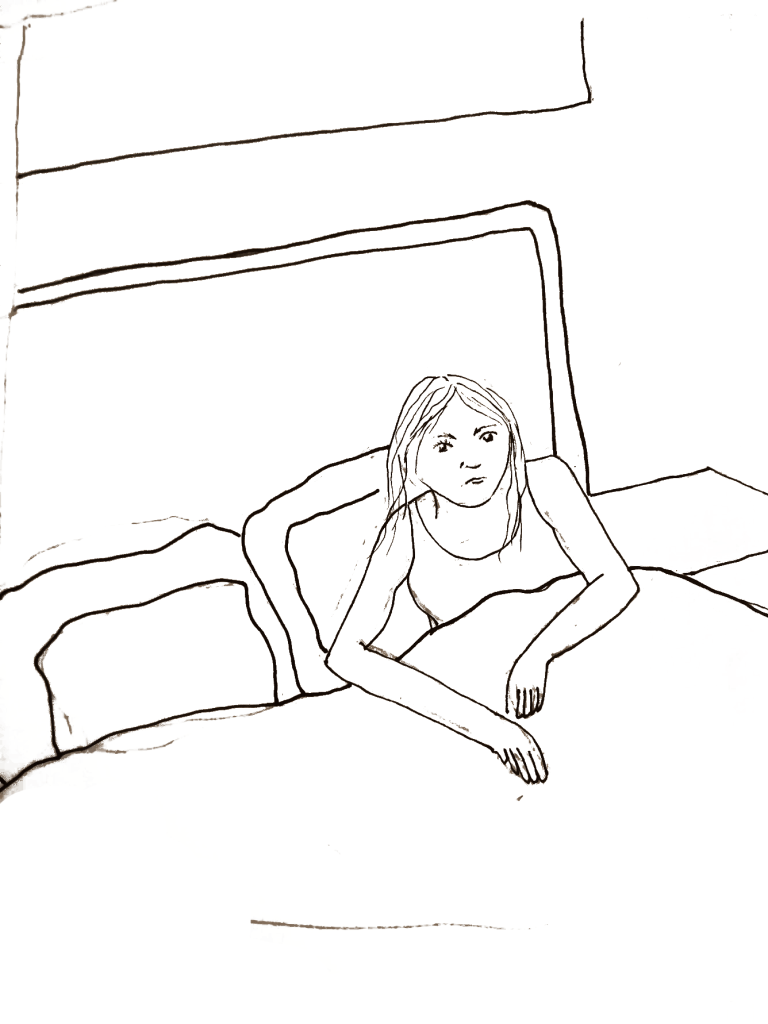
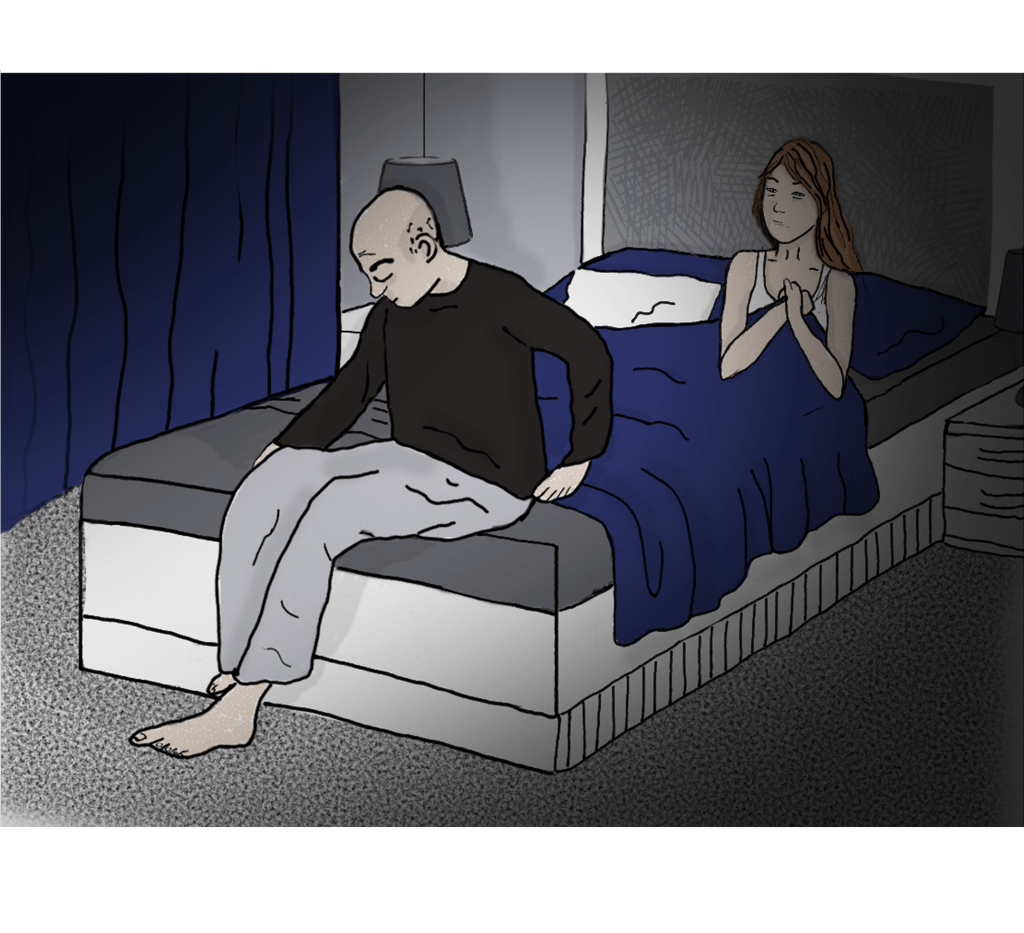
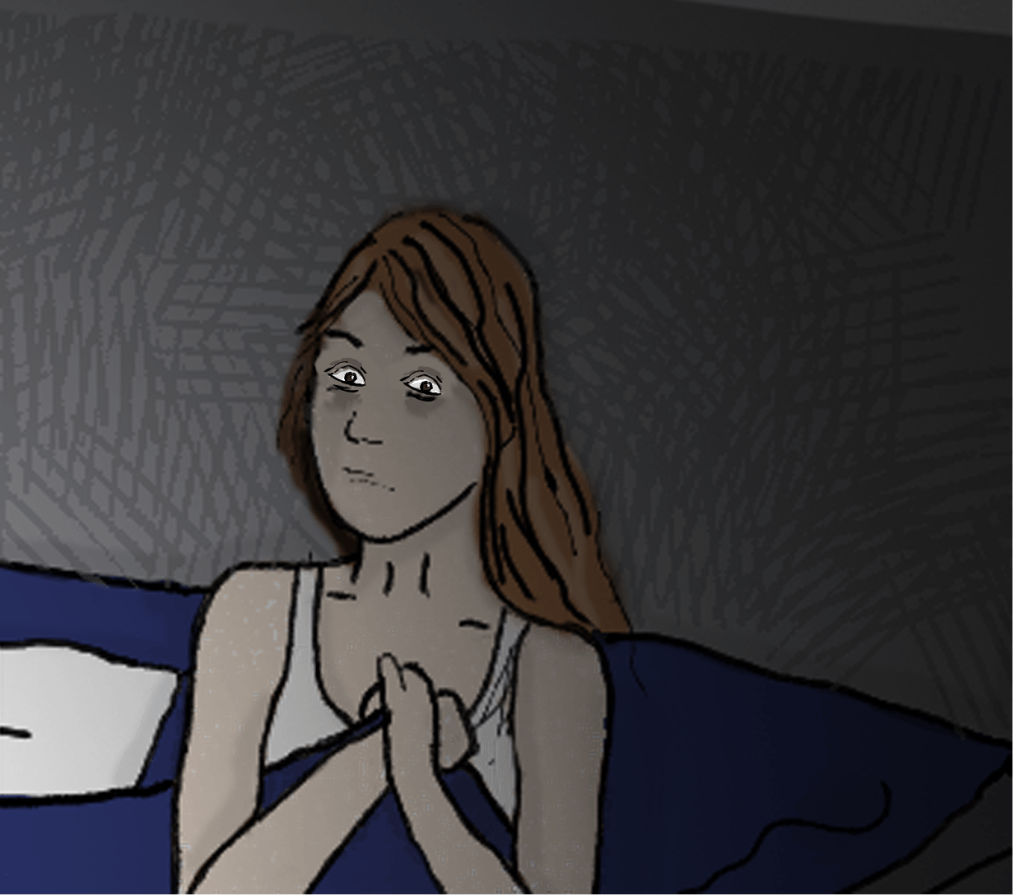
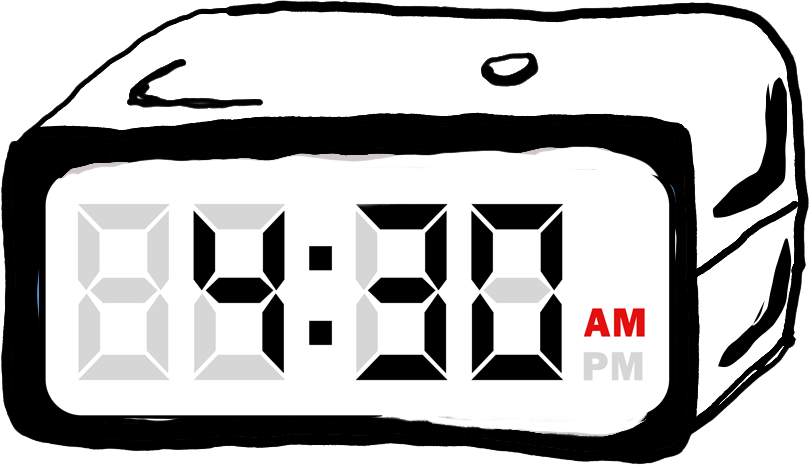
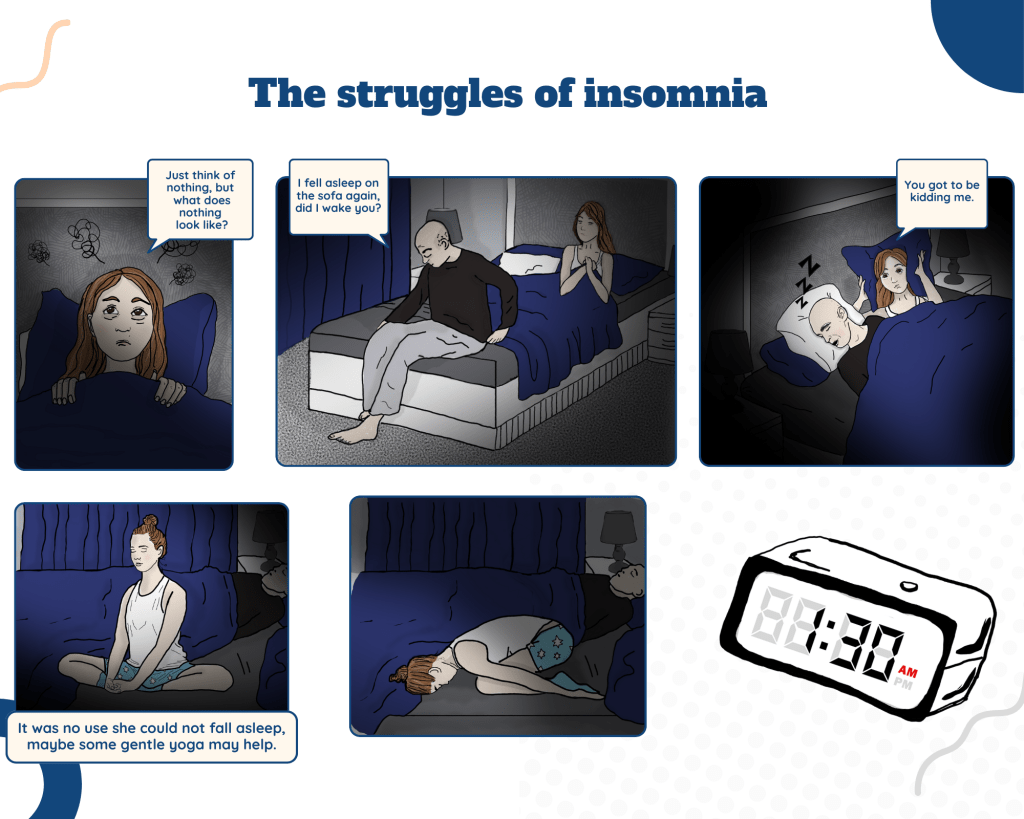
Visuals for page two

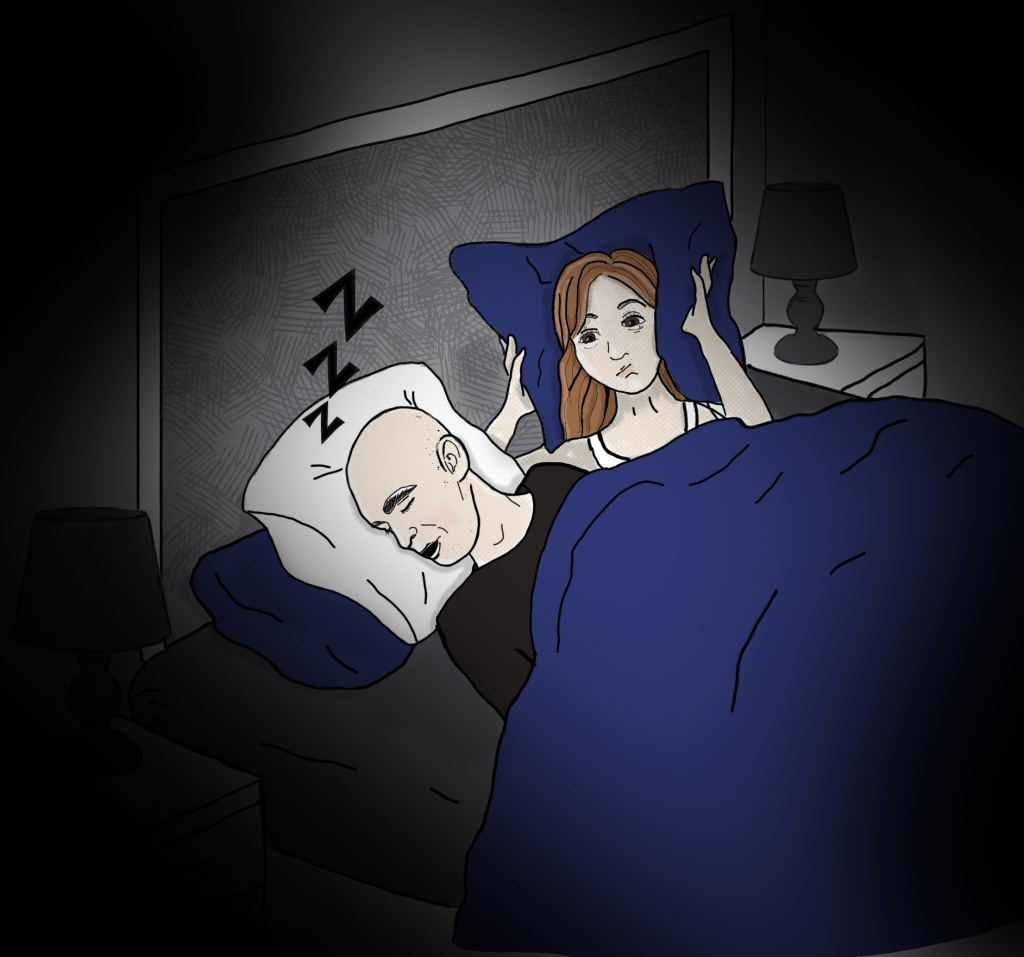
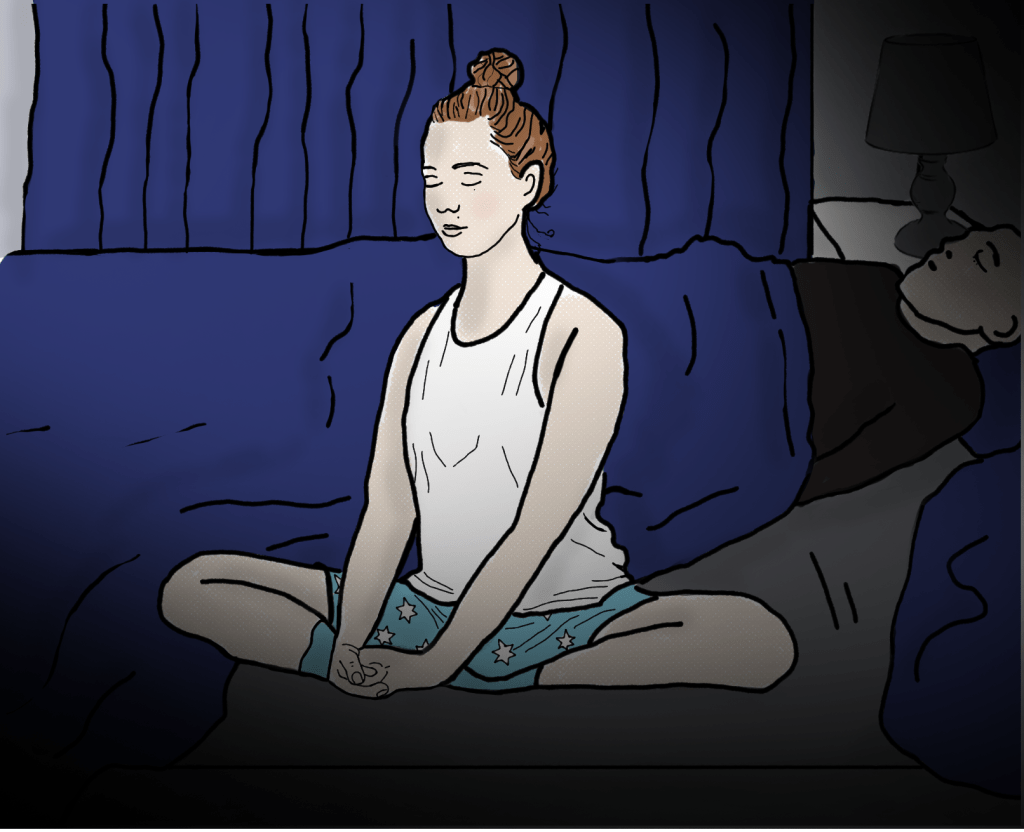
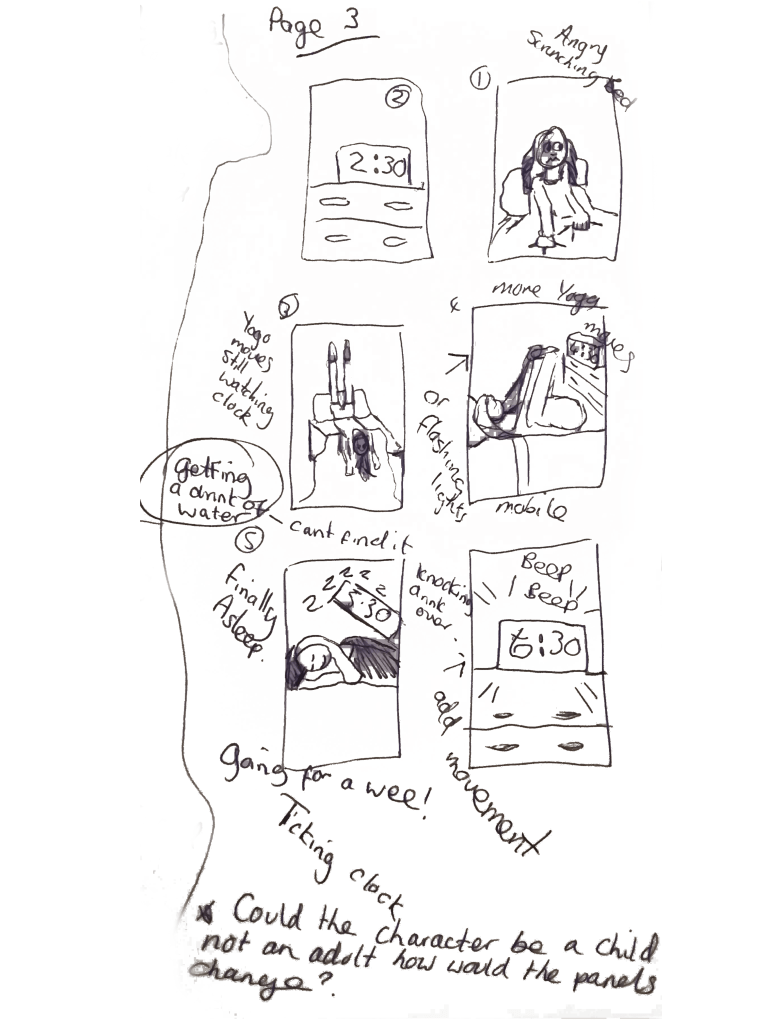
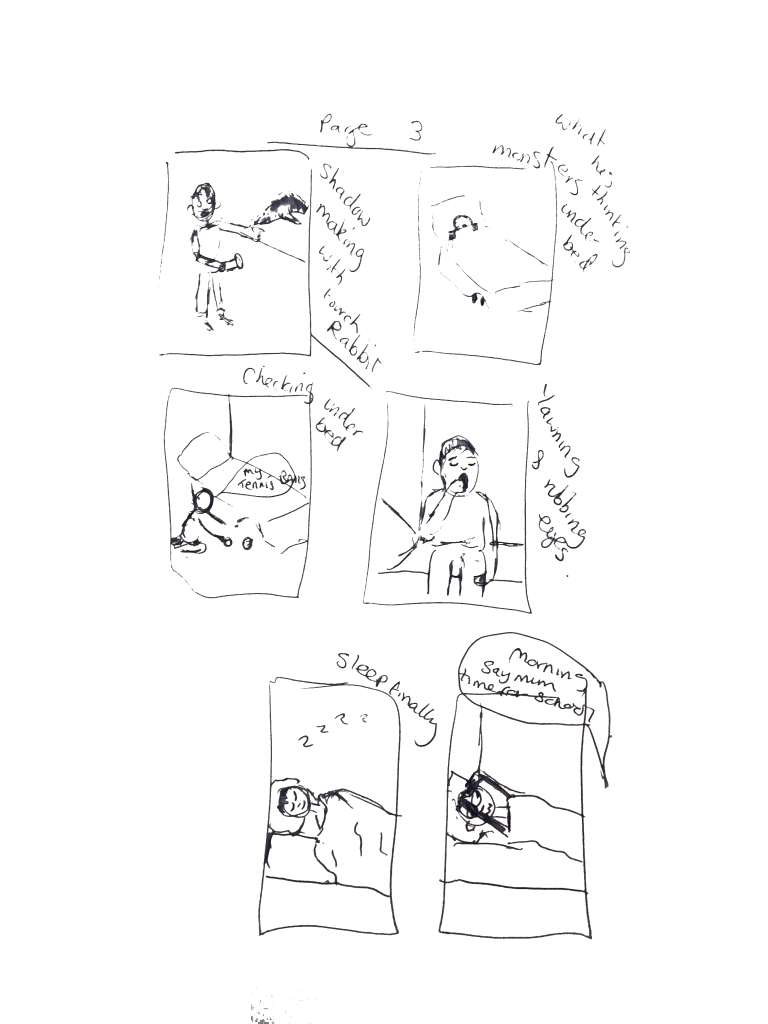
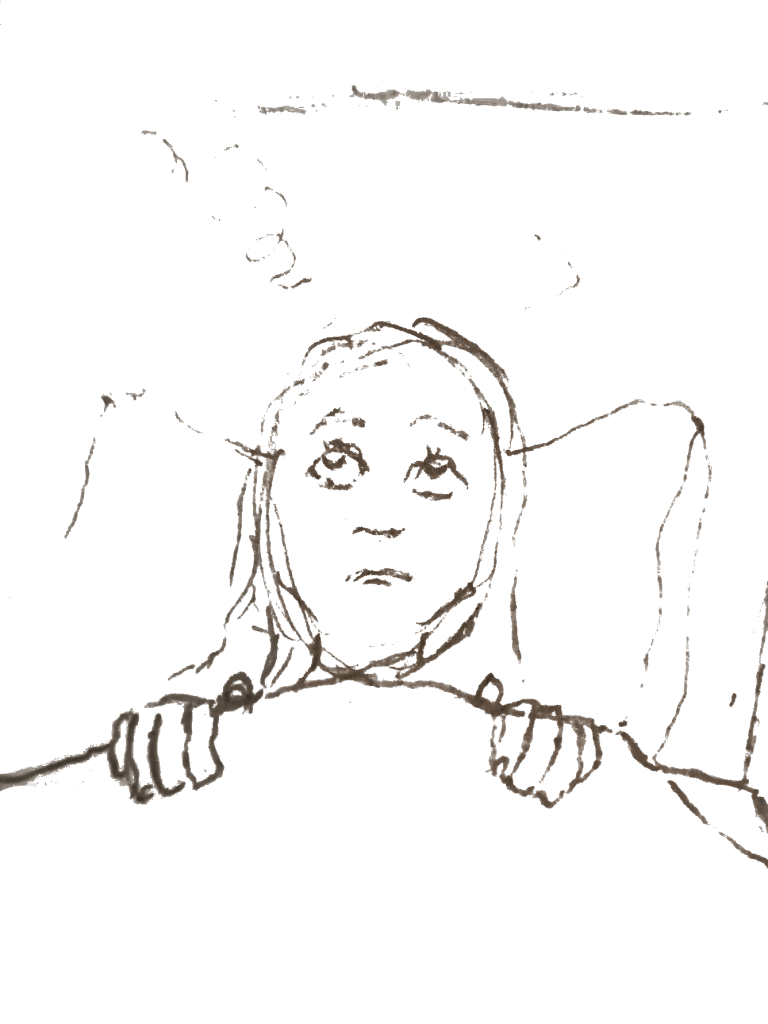
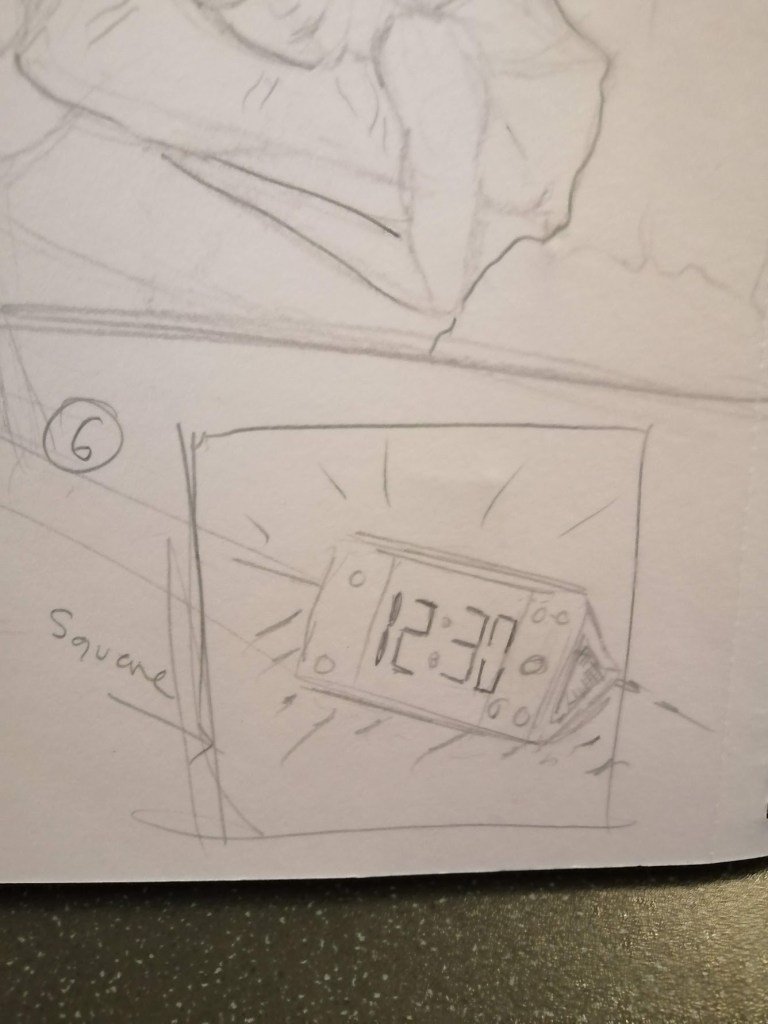
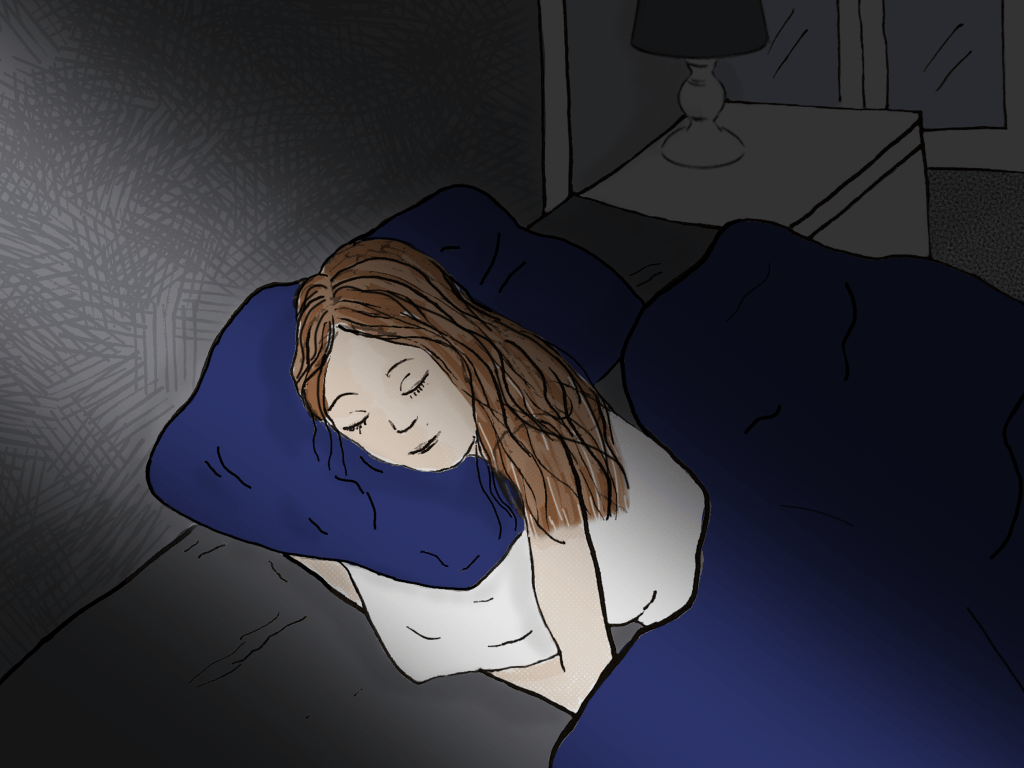
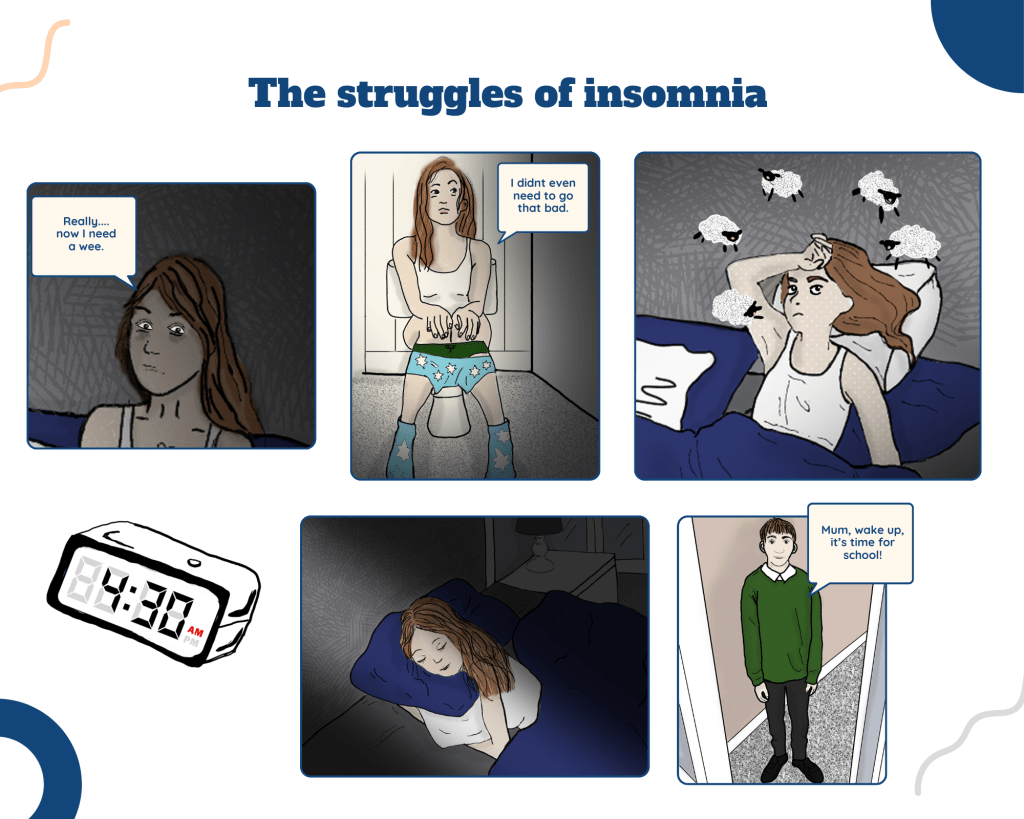
Visuals for page three
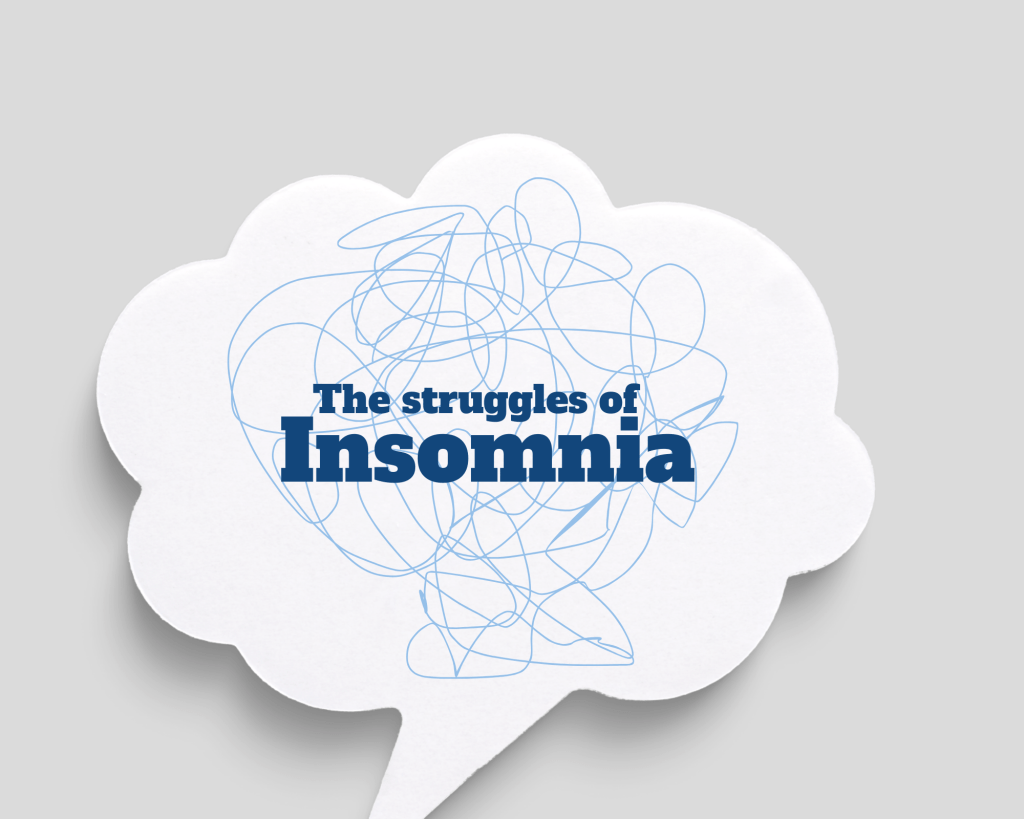
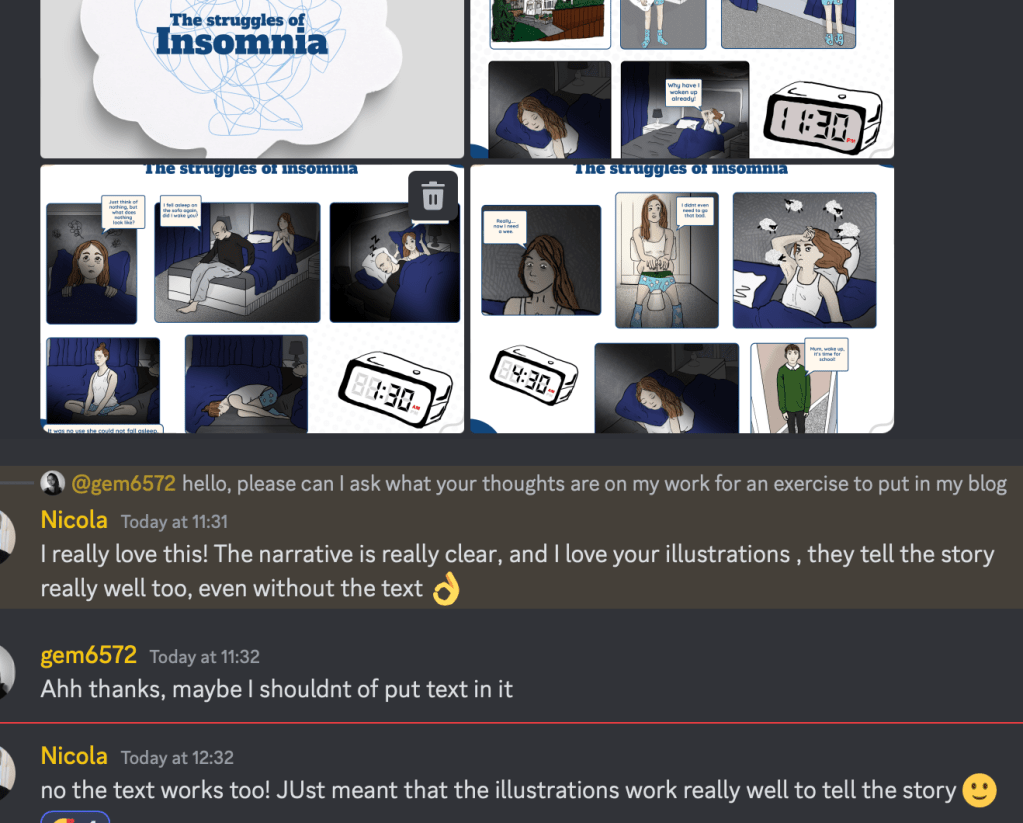
Final design

Please press the arrows on the slideshow to see the final design.

Reflection

What did you find most challenging?

This exercise was rather challenging because aside from my earliest memories of reading comics like Dandy, Beano, and Garfield, I had yet to find adult comics very appealing. Subsequently, I’m not used to seeing comic book formats and have had trouble with similar exercises in the past.  
Yet, as I began comic book research, I recognised I ought to be more open-minded of the various inspirations available to me. For example,  I liked reading Richard McGuire’s graphic novel Here,  and I’m sure there are many other comics and graphic novels I’d like to read.

Creating comic book-style artwork posed another significant challenge for me. I delved into various digital drawing software options, such as Procreate, Adobe Illustrator, and Clip Studio Paint, under the assumption that digital tools were the optimal choice for this style of work. However, my lack of experience with these programs led to unsuccessful attempts at drawing. Consequently, the majority of my illustrations were created by hand and subsequently enhanced using Photoshop. Despite this setback, I gradually gained confidence as I refined my drawing skills and identified a suitable digital brush for sketching. Towards the end of the comic, I successfully produced several drawings entirely through digital means. This experience has boosted my confidence to explore other software programs and embark on tutorials, particularly focusing on improving my skills in Procreate.

Is establishing a particular pace something that you have experimented with before?

Yes, I have experimented establishing a particular pace before in the past. This was achieved in the unit, Key Steps in Illustration where I illustrated making a cup of tea over a small time frame. This work can be seen by clicking the following link. https://kolb2016.wordpress.com/2016/10/14/giving-instructions/ . Also for the same unit in Assignment five I had to produce a series of illustrations for a poster entitled “How to train your dog in seven days” again this can be seen by clicking the following link. https://kolb2016.wordpress.com/2018/03/24/assignment-5/ In both of these previous exercises I remember struggling with creating successful layouts but reflecting on my previous work I am happy that my technical skills and illustrations have since improved.

Would you attempt this again and if so how would you change your approach?

Absolutely, I would try this again. I really loved making the final comic strip, and the people I showed it to—friends, family, and fellow students enjoyed reading it.

Before embarking on a similar project however, I would like to read more graphic novels, and attend more tutorials on comics. As this can only improve upon the outcome and teach me more about comic styles.

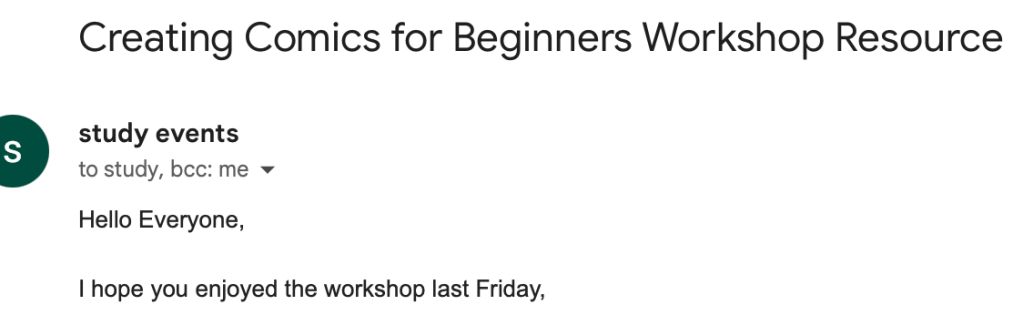
During this exercise, I did take part in a study event with the university called Creating Comics for Beginners Workshop.

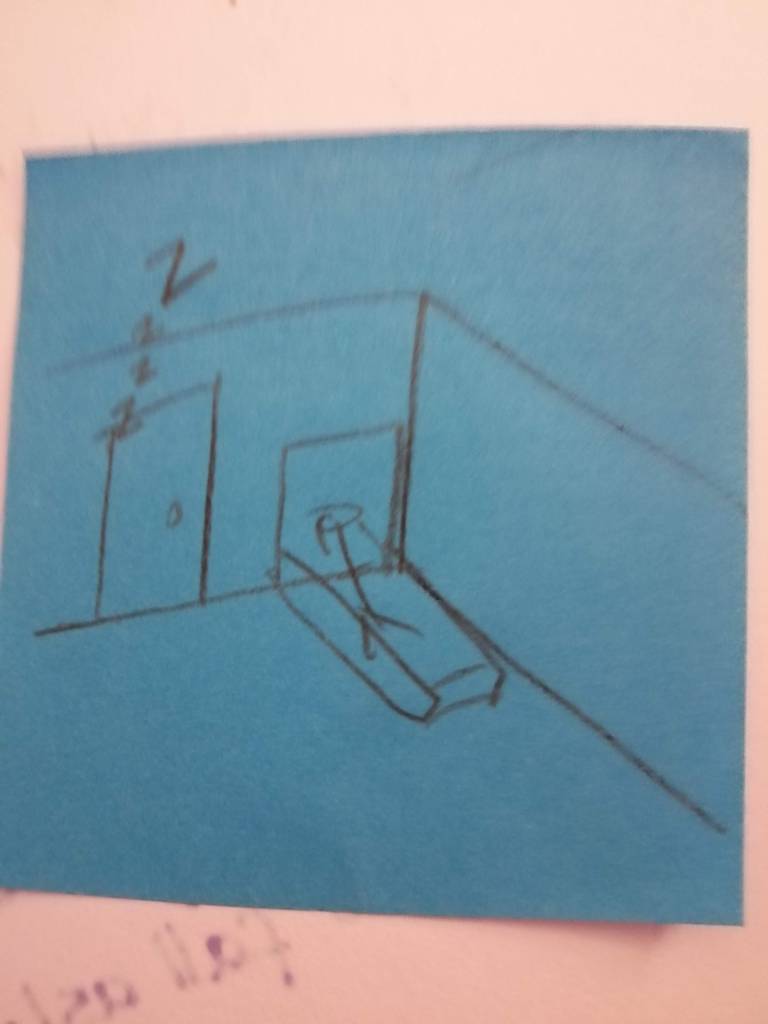
It was helpful to hear other peoples questions and ask a professional in the industry questions. I showed Julian Gray who is a comic artist one of my illustrations and he said he really liked it and would be interested to see the final outcome. He also said not to include speech bubbles like the one shown below because he said they are dated and to stick to a six panel layout if I am new to designing a comic.

I received several helpful resources from the session, which I will review later and utilise some of the advice for my future work.

References

https://www.facebook.com/CreativeBloQ (2018). The designer’s guide to Gestalt Theory. [online] Creative Bloq. Available at: https://www.creativebloq.com/graphic-design/gestalt-theory-10134960.

Kukkonen, K. (2013). Studying Comics and Graphic Novels. Chichester: Wiley Blackwell.

McGuire, R. (n.d.). Here. [online] Richard McGuire. Available at: https://www.richard-mcguire.com/new-page-4.

McGuire, R. (2020). Here. Pantheon.

Wikipedia. (2022). Jimmy Corrigan, the Smartest Kid on Earth. [online] Available at: https://en.wikipedia.org/wiki/Jimmy_Corrigan.

Categories
Coursework Part Three: Making

Exercise 1: Fast 

WARNING!

CONTENT CONTAINS SOME EXPLICIT IMAGES DUE TO LIFE DRAWINGS OF NAKED MODELS.

Option one: Rapid Portraits

Brief:

For this exercise, I had to use a modelling material to produce a range of rapid portraits. With a maximin time of three minutes for each model.

To begin the exercise, I printed off a selection of portrait expressions from the internet that I wanted to try and capture. From this reference photo, I picked ten to try and model with my selected material.

Fig. 1 Facial Expressions reference project (2012)

Next, I gathered some of my son’s plasticine modelling clay that he uses for animation purposes, some modelling tools and put a three-minute timer on my laptop.

Fig. 2 Materials (2024)

Below are ten facial expressions I tried to capture with my portrait models.

Shocked

Fig.3 Shocked (2024)

Tired

Fig.4 Tired (2024)

Holding breath

Fig. 5 Holding Breath (2024)

Angry

Fig. 6 Angry (2024)

Resting face

Fig. 7 Resting face (2024)

Scared

Fig.8 Scared (2024)

Laughing

Fig.9 Laughing (2024)

Embarrassed

Fig. 10 Embarrassed (2024)

Looking up

Fig. 11 Looking up (2024)

Looking down

Fig. 12 Looking down (2024)

For an extra challenge, I tried to capture a confused facial expression with a one-minute time limit.

Fig.13 Confused (2024)

Reflection

I really enjoyed this exercise. I often find I don’t leave enough time to play in my work and this was just that playing. As an older child, my favourite hobby was sculpture and making pots on my refurbished potter’s wheel. So, to be able to sit and sculpt portrait models was not only fun but I was able to reminice.

Working with the clay rapidly was made challenging by the three-minute timer.  I haven’t used plasticine since I was maybe seven years old, and I forgot that it’s fairly hard and requires hand warming before handling. Therefore this was an extra challenge.

Seeing how much expression I could achieve in the allotted time was interesting but I was happy with how much information I could portray with each sculpture. The ones that I struggled with the most were the ones that were smiling and looking down. It’s interesting to see that I also have difficulty when I try and draw these angles. So maybe to get better at them, I need to study them more in my sketchbook.

If I was to try this again it would be interesting to see how the sculptures would look using a single-colour clay. Would I still capture all of the expressions?

Another option

Option two’s brief appealed to me too and I believed it would enhance my illustration capabilities, even though I could have completed Option One alone for this task. It meant I would have the opportunity to do some more exploring.

Option 2:​ Continuous Line Drawing

Brief

For this exercise, I had to create various continuous line drawings. (This means making drawings without taking my drawing tool off the paper until it is complete. ) With an added challenge of a maximum time limit of three minutes for each.

Research

Before starting to draw, I researched some examples of artists who use this technique in their practice.

Pablo Picasso 

One of the masters of art during the 20th century was Picasso. During this time he drew many pictures using continuous lines. It is quite amazing to see the amount of detail and complexity he can convey, in what appears at first to be a simple drawing. When looking at the drawing of the horse below I enjoy how he has captured the sense of movement with his fluid use of line.

Next, I watched the short film below which is about an exhibition of Picasso’s line work dating from his first to last drawings (1901-1969). There are 100 sketches in total some never seen by the public before. What I like about his line work is how expressive and creative he is. In the video, you can see how he challenges himself to look at things in new ways and experiments with lines.

Other well-known artists who use lines are Egon Schiele, Sherrie Levine, Andy Warhol, and Henri Matisse.

Henri Matisse

Matisse produced artwork during the same time as Picasso and there are some similarities in their artwork such as how they used line. Yet, there are some differences I think Picasso’s work was a little more complex especially when he started experimenting with cubism where his lines become much more angular and intricate. Where as Matise’s work was much more decorative and simplistic.

Al Hirschfeld

Al Hirschfeld was a 20th century illustrator best known for his black and white line drawings of caricatures. He had an impressive nine decades of illustrative work, including working for the New York Times. On the website https://www.alhirschfeldfoundation.org I found many examples of his work to study. I really enjoyed researching his work they are full of movement, humour, expression and cheekiness.

DFT

Next, I wanted to see what illustrators today may be using the continuous line technique in their practice and came across a French duo of artists called DFT (differantly). It excited me to see that their work has attracted interest from world famous brands such as Apple, Hermès, Nike and Adidas.

Below is a video of one of the artist showing how they create their work. I found it incredible how quickly the illustrations were drawn but amazingly there is still such large amounts of detail.

After, researching past and present-day artists that have used this method I have to say I am a little apprehensive at what I will be able to achieve especially with a maximum time-limit of three minutes but looking forward to experimenting.

Continuous line sketches

To begin the continuous line sketches I began with a sheet from my sketchbook and used one of my clay models as a still life to draw from. This was a warm up sheet before starting properly as it has been some time since I have sketched anything.

Fig. 14 Warm up sketches (2024)

I was surprised at how difficult it was to record information quickly without lifting my pen off the paper and found that I seemed to be only able to record half the face unless I went back over some of the lines I had previously drawn.

Now that my hand and eye coordination had warmed up, I set my timer for one minute and began sketching the same clay model.

Fig. 15 Shocked line drawing (2024)

Interestingly, with more practicie the lines to each of the drawings are now much more fluid and I am able to record more information.

Fig. 16 Tired line drawing (2024)

Again, setting my timer I practiced more continuous line drawings. Once more, I used one of my sculptures to practise this. The hand added an additional element to the face’s shape, making it more difficult to capture, but overall, I believe the sketches capture the essence of the sculpture.

Following my attempts at drawing expressions in lines, I wondered what it would be like to sketch an actual person. Researching online  I came to a website that assists artists by providing images of models in different poses. The webpage also allows you to set a timer, so I used the two-minute setting for each of the upcoming line drawings. Here are some of my sketches.

Fig. 18 Life drawing pose 1 (2024)

Fig. 19 Life drawing pose 2 (2024)

The sketches are not exactly true to scale or have captured every detail but I am pleased I have managed to capture the women’s poses.

After, I thought would I be able to do the same for a male model? Searching on the website I found three photos of male models to use for reference.

Fig.20 Life drawing pose 3 (2024)

The first sketch I did was the middle one, the second was the one to the right and finally the one to the left was the last sketch I drew. It was interesting to see the line become more fluid the more I practiced and that the last drawing has recorded more information and done so more accurately.

Reflection

This continious line drawing exercise has been an enjoyable one. Having a short time limit has made me not worry about making mistakes but think quickly about what is the best way to convey what is in front of me.

It has been beneficial for strengthening my hand and eye coordination and has made me make deliberate choices in the placement of each mark. This exercise will undoubtedly help improve my drawings if I practice this exercise often.

References

About – DFT – minimalist line art (no date) DFT. Available at: https://www.dft.art/about (Accessed: 01 February 2024). 

Al Hirschfeld (no date) Bio. Available at: https://www.alhirschfeldfoundation.org/bio (Accessed: 01 February 2024). 

Brilliant single line drawings by differantly (aka DFT) (2018) YouTube. Available at: https://youtu.be/xaiUyI9OB5w (Accessed: 01 February 2024). 

Figure study tool (no date) Line of Action. Available at: https://line-of-action.com/practice-tools/figure-drawing (Accessed: 01 February 2024). 

Gallery, G. (2018) Who’s next? – DFTart-director-portfol. Available at: https://www.geneycleegallery.com/post/who-s-next-dft (Accessed: 01 February 2024). 

Picasso the line (2016a) YouTube. Available at: https://youtu.be/OrPwBPwqI3Y (Accessed: 01 February 2024). 

Picasso the line (2016b) YouTube. Available at: https://youtu.be/OrPwBPwqI3Y (Accessed: 01 February 2024). 

R, T. (2012) Facial Expressions Reference ProjectDeviant Art. Available at: https://www.deviantart.com/tamarar/art/Tammy-s-facial-expressions-313627461 (Accessed: 01 February 2024). 

List of illustrations

Fig. 1 Tamara, R. (2012) Facial Expressions reference project. [Photograph, Portrait] At: https://www.deviantart.com/tamarar/art/Tammy-s-facial-expressions-313627461 (Accessed 01/01/2024). 

Fig. 2 Fowler, G (2024) Materials. [Photograph, landscape] In possession of: the author: Forest of Dean. 

Fig. 3 Fowler, G (2024) Shocked. [Photograph, portrait] In possession of: the author: Forest of Dean. 

Fig. 4 Fowler, G (2024) Tired. [Photograph, portrait] In possession of: the author: Forest of Dean.  

Fig. 5 Fowler, G (2024) Holding breath. [Photograph, portrait] In possession of: the author: Forest of Dean. 

Fig. 6 Fowler, G (2024) Angry. [Photograph, portrait] In possession of: the author: Forest of Dean. 

Fig. 7 Fowler, G (2024) Resting face. [Photograph, portrait] In possession of: the author: Forest of Dean. 

Fig. 8 Fowler, G (2024) Scared. [Photograph, portrait] In possession of: the author: Forest of Dean. 

Fig. 9 Fowler, G (2024) Laughing. [Photograph, portrait] In possession of: the author: Forest of Dean. 

Fig. 10 Fowler, G (2024) Embarrassed. [Photograph, portrait] In possession of: the author: Forest of Dean. 

Fig. 11 Fowler, G (2024) Looking up. [Photograph, portrait] In possession of: the author: Forest of Dean. 

Fig. 12 Fowler, G (2024) Looking down. [Photograph, portrait] In possession of: the author: Forest of Dean. 

Fig. 13 Fowler, G (2024) Confused. [Photograph, portrait] In possession of: the author: Forest of Dean. 

Fig. 14 Fowler, G (2024) Warm up sketches. [Drawing] In possession of: the author: Forest of Dean. 

Fig. 16 Fowler, G (2024) Tired line drawing [Drawing] In possession of: the author: Forest of Dean. 

Fig. 17 Fowler, G (2024) Warm up sketches. [Drawing] In possession of: the author: Forest of Dean. 

Fig. 18 Fowler, G (2024) Life drawing pose 1. [Drawing] In possession of: the author: Forest of Dean. 

Fig. 19 Fowler, G (2024) Life drawing pose 2. [Drawing] In possession of: the author: Forest of Dean. 

Fig. 20 Fowler, G (2024) Life drawing pose 3. [Drawing] In possession of: the author: Forest of Dean. 

Categories
Assignment 2 Assignments

Assignment 2: Presenting Your Work

Brief

For this assignment I had to prepare a presentation of my work that I believe is engaging and varied in addition to reviewing the work completed during part 2 of Visual Exploration and thinking critically about how I work.

Key words from the brief:

  • Look back through all of the work you have produced in this part of the course, especially the final outcomes of each of the seven exercises.
  • Make a Powerpoint, Keynote or other slideshow presentation that selects and presents what you think is an interesting and varied collection of work.
  • The slideshow could be seen as a selective sketchbook or portfolio that underpins some of the thought processes and decisions you have made throughout this part of the course.
  • You could add notes from your learning log or a voiceover to explain or discuss your thinking in more detail.
  • illustrate your commentary by showing examples of your work and also how you work
  • These should draw on your visual responses to the exercises so far, but can also make reference to your previous work. 
  • Use the slideshow to visually present your creative making process, which may include showing your working space
  • Five to seven minutes long

For the presentation I looked at various ways I could present such as filming myself, creating a PowerPoint presentation and using other presentation software. Finally, I settled on using Adobe Express as I felt this gave me a way to present my work clearly and be able to talk about my work using a voice over. Below is my presentation.

Presentation

Reflection on the assignment

What have you learnt about your practice by reflecting on creative processes?

Upon completion of the work I have created in part two, I have come to the realisation that I am motivated by illustrations that trigger feelings or somehow communicate a message.

However, I’ve also recognised that I found some of the work difficult, like beginning the collage project. As said in the presentation I have not enjoyed collage in the past however, after I gave it some context, I started to like it.

What I enjoyed about this part of the course is it has made me experiment with new ways of working and each one has helped me to generate new and exciting ideas.

How did the experience of making a video go for you – did it communicate you and your practice successfully?

Creating a presentation using Adobe Express was a technical challenge for me as I have never used the program before. It was difficult to know how long to talk about each slide without talking too much. To overcome this I typed out what I wanted to say for each piece of work and made sure each slide didn’t go over thirty seconds. Once I got to grips with it I found it enjoyable and exciting to see a show about my work come together.

Animating some of the work and text made the slideshow more interesting visually and I hope it captures the viewers attention. Being able to add my voice to the presentation allowed me to express myself and explain my working process. Hopefully this helped me to connect with my audience at a deeper level.

As all the work had been completed when creating the presentation, I decided not to do a live video as I didn’t think it was necessary. However, in the future I would like to create a similar video but add in a couple of short clips of me drawing or painting. I think this would add an interactive element to my presentation allowing viewers to witness my creative process in action.

Reflect on your outcomes but more so on your creative process – what worked for you, and how might you adapt these approaches for future projects?

Exercise 3 was enjoyable it is something I have not done before and got me really thinking about what I could draw whilst having a constraint. Only having the word ‘making’ to use as inspiration was quite challenging, yet I was pleasantly surprised at the final outcome.

Exercise 4 was a fun activity where I had to generate a series of mind-maps to generate associations based on a single concept. It was surprising how many ideas I was able to come up with and proved to be a useful tool for the future, for example when having a mental block. 

It was enjoyable to experiment with digital painting and to gain new skills, but I am disappointed that I still have a lot to learn in this area. Due to my lack of technical understanding in this field, it will take some time for me to make a digital drawing that I am proud of. However, I will continue to practise this whenever possible. 

In the last month I have recently purchased an ipad and bought the drawing program Procreate which I am excited to learn to use as I think it will be beneficial for my illustration practice. 

Exercise 5

For this exercise I had to play the word association game using Word on the computer. I have never done this before and it was quite interesting to see what list of words I came up with. I also enjoyed making some of the illustrations such as the sea scene. 

Exercise 7 is a debatable one for me. On one hand I have never liked doing collage work or looking at other artist collage work. Yet, by doing this exercise it has pushed me outside of my comfort zone and I have been able to express different thoughts and messages in my artwork. I was able to do this by carefully thinking about the composition of mixing textures, colours, and illustrations. It allowed me to open up to new ways of thinking and spark creative connections.


Which pieces of work do you feel have been most successful and why?

Exercise 4

Exercise 4 led to a successful outcome with the creation of a fantasy illustration of a wizard. It has shown me how effective mind-mapping can be in sparking creativity and generating ideas. Being able to overcome mental blocks when they arrive and finally being able to turn it into a positive and imaginative result I think is a success. 

Overall all these exercises have pushed my creative boundaries and I can see they are valuable for my personal and artistic growth. 

Have the exercises helped you to think about things in new ways or try out new ways of working? What have they been and how has your viewpoint changed?

Yes these exercises have helped me think about new ways of working and have created successful outcomes by doing them. For example, the mind mapping exercise, the word association game exercise, the cutting up exercise and the collage exercise have all been able to enhance my creative problem-solving skills, overcome mental blocks, and discover new approaches to my work that I can take forward in my practice.

What area(s) would you like to develop further?

The reason I am on this degree is not only my love of illustration but that my aim is to illustrate children’s books and book covers in the future. With this in mind there have been a couple of fantasy illustrations that I have drawn in the unit and I realised I became totally absorbed when drawing them. I would quite like to have another go at this perhaps for a fairy tale children’s book and spend time experimenting with ideas and creating an array of character designs. 

As said above in exercise five, I was able to express myself, be imaginative and create art that had meaning. This is something I would like to do more of but perhaps not in the form of collage.